Configure Application Metadata Exporter Application
In GigaVUE-FM, perform the following to configure the Application Metadata Exporter application in the Monitoring Session.
|
S.No |
Steps |
Refer to |
|
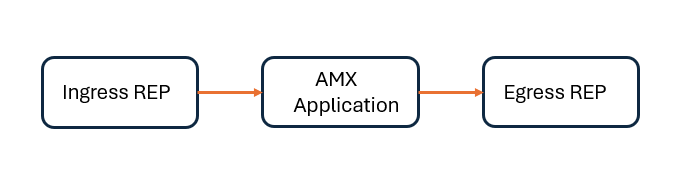
1 |
Create an ingress REP |
Create Raw Endpoint (VMware vCenter) |
|
2 |
Create a link between the ingress REP and Application Metadata Exporter application |
N/A |
|
3 |
Create an egress REP |
Create Raw Endpoint (VMware vCenter) |
|
4 |
Create a link between the Application Metadata Exporter application and egress REP |
N/A |
To add AMX application:
- Go to Traffic > Virtual > Orchestrated Flows and select your cloud platform. The Monitoring Session page appears.Notes:
Ensure to create separate Monitoring Domains and Monitoring Sessions for Application Metadata Exporter (AMX) and Application Metadata Intelligence (AMI). Even when AMI is deployed virtually, it operates independently and requires its own Monitoring Session.
You can use the Third-Party Orchestration method when deploying fabric components, such as the AMX V Series Node, on your own.
- When deploying AMX using the Third-Party Orchestration method, configure Monitoring Session in the same work flow. To deploy through Third Party Orchestration, go to Traffic > Virtual > Orchestrated Flows > Third Party Orchestration.
Before deploying AMX, ensure to change the Traffic Acquisition Method to Customer Orchestrated Source in the Monitoring Domain. For details, refer to Create Monitoring Domain.
- Perform one of the following to navigate to the TRAFFIC PROCESSING tab:
- Create a Monitoring Session.
- Navigate from an existing Monitoring Session.
The GigaVUE‑FM The Monitoring Session canvas page appears.
- On the left pane of the canvas, click the
 icon to view the traffic processing elements.
 - Drag and drop AMX from APPLICATIONS to the graphical workspace. The application quick view appears.
- Enter the Alias for the application.
- In the Ingestor section, enter or select the following details. Click
 to add another ingestor to add multiple inputs to the AMX application and click
  to remove an existing ingestor.
Fields
Description
Name
Enter name for the Ingestor.
Port
Enter the port number to which the Application Metadata or the NetFlow/IPFIX or the Control Plane metadata must be ingested.
Type
Select any one of the following:
AMI - Select this option if the input is AMI.
Mobility Control Plane - Select this option if the input is Control Plane Metadata.
NetFlow/IPFIX - Select this option if the input type is NetFlow/IPFIX.
Note: If your selected ingestor type is NetFlow/IPFIX, Metadata Enrichment will be disabled by default. NetFlow/IPFIX input type is not supported for Metadata Enrichment.
- Enter or select the following details in the Metadata Enrichment section:
You can use the Actions button to add multiple Metadata Enrichment. Keep in mind the following when configuring multiple Metadata Enrichment:
- You can only configure either Mobility or Workload enrichment
- You can only configure one Metadata enrichment with either Mobility or Workload as the Type
- You can only configure a maximum of 5 Metadata enrichment with Others as the Type.
Fields
Description
Enrichment Name
Enter a unique name for each enrichment.
Enable
Use this option to enable the enrichment.
Type Select the type from the drop-down menu.
o Mobility o Workload o Others Mobility
Attribute Fields
Select the attributes from the list. You can use the Select All option to select all the available attributes. For details, refer to Attributes for GigaVUE Enriched Metadata for Mobile Networks.
Workload
Platforms
Select the platform in which your Workload Virtual Machines are present.
VMware vCenter AWS Azure Attribute Fields
Select the attributes from the list. You can use the Select All option to select all the available attributes. For details, refer to Attributes for GigaVUE Enriched Metadata for Cloud Workloads.
Advanced Options
The advanced options allow you to configure additional details like interval and delay.
Click Add. Enter the following details:
o Enter the Key. o Enter the Value. Source Information
Enter the details of the source.
Name: Enter a unique name for each Source Information.
Key: The default keys for each platform are listed as follows. Click + to add more keys.
AWS: Refer to Manage access keys for IAM users section in AWS documentation for more detailed information on how to create an access key ID and a secret access key.
■ aws_access_key_id ■ aws_secret_access_key ■ aws_region Azure: For details, refer to Register a Microsoft Entra app and create a service principal section in Azure documentation.
■ azure_client_id ■ azure_client_secret ■ azure_tenant_id ■ azure_subscription_id VMware:
■ url - The URL of VMware vCenter. ■ username - Username of the VMware vCenter ■ password - vCenter password used to connect to the vCenter ■ self_signed_certificate Value: Enter the value for the keys. This field is editable after saving the changes.
Secure Keys: Use this option to mask the value. After saving the changes, Secure Keys and Key fields are disabled and the value is masked.
Click
to add another Source Information and click to remove a Source Information. You can add multiple Source Information if your workloads are across different vCenters, AWS Accounts, or Azure Subscriptions. You can create an individual Source Information for each of the vCenters, AWS Accounts, or Azure Subscriptions.Others: Use this setting to perform custom mapping for advanced use cases. For details contact Gigamon Support.
Attribute Fields
Click Add and enter the attribute.
Settings
Click Add and enter the details.
- Enter or select the following details in Cloud Tools Export section:
Fields
Description
Alias
Enter the alias name for the cloud tool export.
Cloud Tool
Select the Cloud tool from the drop-down menu.
Type Select any one of the following: AMI - Select this option to export AMI.
Mobility Control- Select this option to export control plane metadata.
AMI Enriched - Select this option to export enriched metadata for cloud workloads.
NetFlow/IPFIX - Select this option to export NetFlow/IPFIX packets to tools such as HTTPS or Kafka.
Account ID
Enter the account ID number of the selected Cloud Tool.
API Key
Enter the API key of the Cloud Tool.
Source IP Address Source IP Address is needed when the egress interface is configured with multiple IP addresses. Configure the source IP address which is connected to the Cloud Tool. Both IPv4 and IPv6 are supported. This field is optional. Enable Export
Enable the box to export the Application Metadata Intelligence output in JSON format.
Format
The default output format is JSON.
Zip
Enable the box to compress the output file.
Note: Enable this field when using New Relic as the cloud tool.
Interval
The time interval (in seconds) in which the data should be uploaded periodically.
Recommendation
Minimum: 10 seconds
Maximum: 90 seconds.
Parallel Writer
Specifies the number of simultaneous JSON exports done.
Export Retries
The number of times the application tries to export the entries to Cloud Tool.
Recommendation
Minimum value: 4
Maximum: 10.
Maximum Entries
The number of JSON entries in a file.
Maximum: 20000
Minimum is 10
Default: 1000
Backoff Reset Window
With a non-zero value, the exporter keeps trying to reach the tool as many times as the retry. The default setting is 0, and the Backoff Reset Window is disabled at this value.
Request Timeout
This is the time exporter waits for a response back from the tool. The default value is 10 seconds.
Labels
Click Add. Enter the following details:
o Enter the Key. o Enter the Value. Note: Refer to the deployment guides of the respective cloud tools for configuring the Key and Value.
- Enter or select the following details in the Kafka Exports section:
Fields
Description
Alias
Enter the alias name for the Kafka Export.
Topic
The topic name to push JSON streams to, which is generally given to users part of the Kafka administration. Type Select any one of the following: AMI - Select this option to export AMI.
Mobility Control - Select this option to export control plane metadata.
AMI Enriched - Select this option to export enriched metadata.
NetFlow/IPFIX - Select this option to export NetFlow/IPFIX ingestor types.
Brokers
The URL that contains the Kafka cluster endpoints. Click  to add another broker and click
  to remove an existing broker.
Source IP Address Source IP Address is needed when the egress interface is configured with multiple IP addresses. Configure the source IP address which is connected to the Kafka Broker. Both IPv4 and IPv6 are supported. This field is optional. Enable Export
Enable the box to export the Application Metadata Intelligence output in JSON format.
Format
The default output format is JSON.
Zip
Enable the box to compress the output file.
Interval
The time interval (in seconds) in which the data should be uploaded periodically. The recommended minimum time interval is 10 seconds and the maximum time interval is 90 seconds. The default time interval is 30 seconds.
Parallel Writer
Specifies the number of simultaneous JSON exports done.
Export Retries
The number of times the application tries to export the entries to Kafka. The recommended minimum value is 4 and the maximum is 10.
Maximum Entries
The number of JSON entries in a file.
Maximum: 20000
Minimum: 10
Default: 1000
Backoff Reset Window
With a non-zero value, the exporter keeps trying to reach the tool as many times as the retry. The default setting is 0, and the Backoff Reset Window is disabled at this value.
Labels
Click Add. Perform the following:
o Enter the Key. o Enter the Value. Producer Configurations Click Add to enter the authentication details if a Kafka broker needs authentication.
For Example:
- security.protocol=SASL_SSL
- sasl.mechanisms=PLAIN
- sasl.username=username
- sasl.password=password
- Click Save to deploy the Monitoring Session. The Select nodes to deploy the Monitoring Session dialog box appears. Select the GigaVUE V Series Node for which you wish to deploy the Monitoring Session.
- Click Deploy from the Actions menu to deploy the Monitoring Session.
The status is displayed as Success in the Monitoring Sessions page. The session is successfully deployed on all the V Series Nodes.
Switching to outer_ip for Mobility Enrichment
In 5G Control Plane (CP) records, only the lower 64 bits of the inner IP address are captured. To overcome this limitation, you can switch to outer_ip. Follow the steps below based on your configuration.
If AMX is already configured and the Monitoring Session is deployed:
- Undeploy the Monitoring Session in GigaVUE-FM.
- Create a new .yaml file in the GigaVUE V Series Node: vi /etc/amx_settings.yaml
- Modify the enrichment mode:
# Default mobility enrichment mode: inner_ip (default) or outer_ip
mobility_outer_ip_version: <Enter version as v6 or v4>
mobility_enrichment_mode: outer_ip
- Deploy the Monitoring Session.
During Initial AMX Configuration:
- Create a new .yaml file in the GigaVUE V Series Node: vi /etc/amx_settings.yaml
- Modify the enrichment mode:
# Default mobility enrichment mode: inner_ip (default) or outer_ip
mobility_outer_ip_version: <Enter version as v6 or v4>
mobility_enrichment_mode: outer_ip
-
Save the file and proceed with the deployment.
Application Monitoring Options
You can configure the traffic health monitoring for this application in the THRESHOLDS tab. You can select an existing template from the Threshold Templates drop-down menu or provide the threshold values. For more details on Traffic health monitoring and how to create threshold template, refer to
You can view the configuration health status and the traffic health status of the application in the HEALTH STATUS tab. For more details on configuration health and traffic health, refer to
You can view the statistics of the application in the STATISTICS tab. For details, refer to View Application Statistics for Application Metadata Exporter.


