Create a Monitoring Domain
GigaVUE-FM connects to the AWS Platform through the public API endpoint and uses HTTPS, the default protocol to communicate with API. For more information about the endpoint and the protocol used, refer to AWS service endpoints.
GigaVUE-FM provides you the flexibility to monitor multiple VPCs. You can choose the VPC ID and launch the GigaVUE fabric components in the desired VPCs.
Note: To configure the Monitoring Domain and launch the fabric components in AWS, you must have the fm_super_admin role or the write access to the Infrastructure Management category. For details, refer to Role Based Access Control.
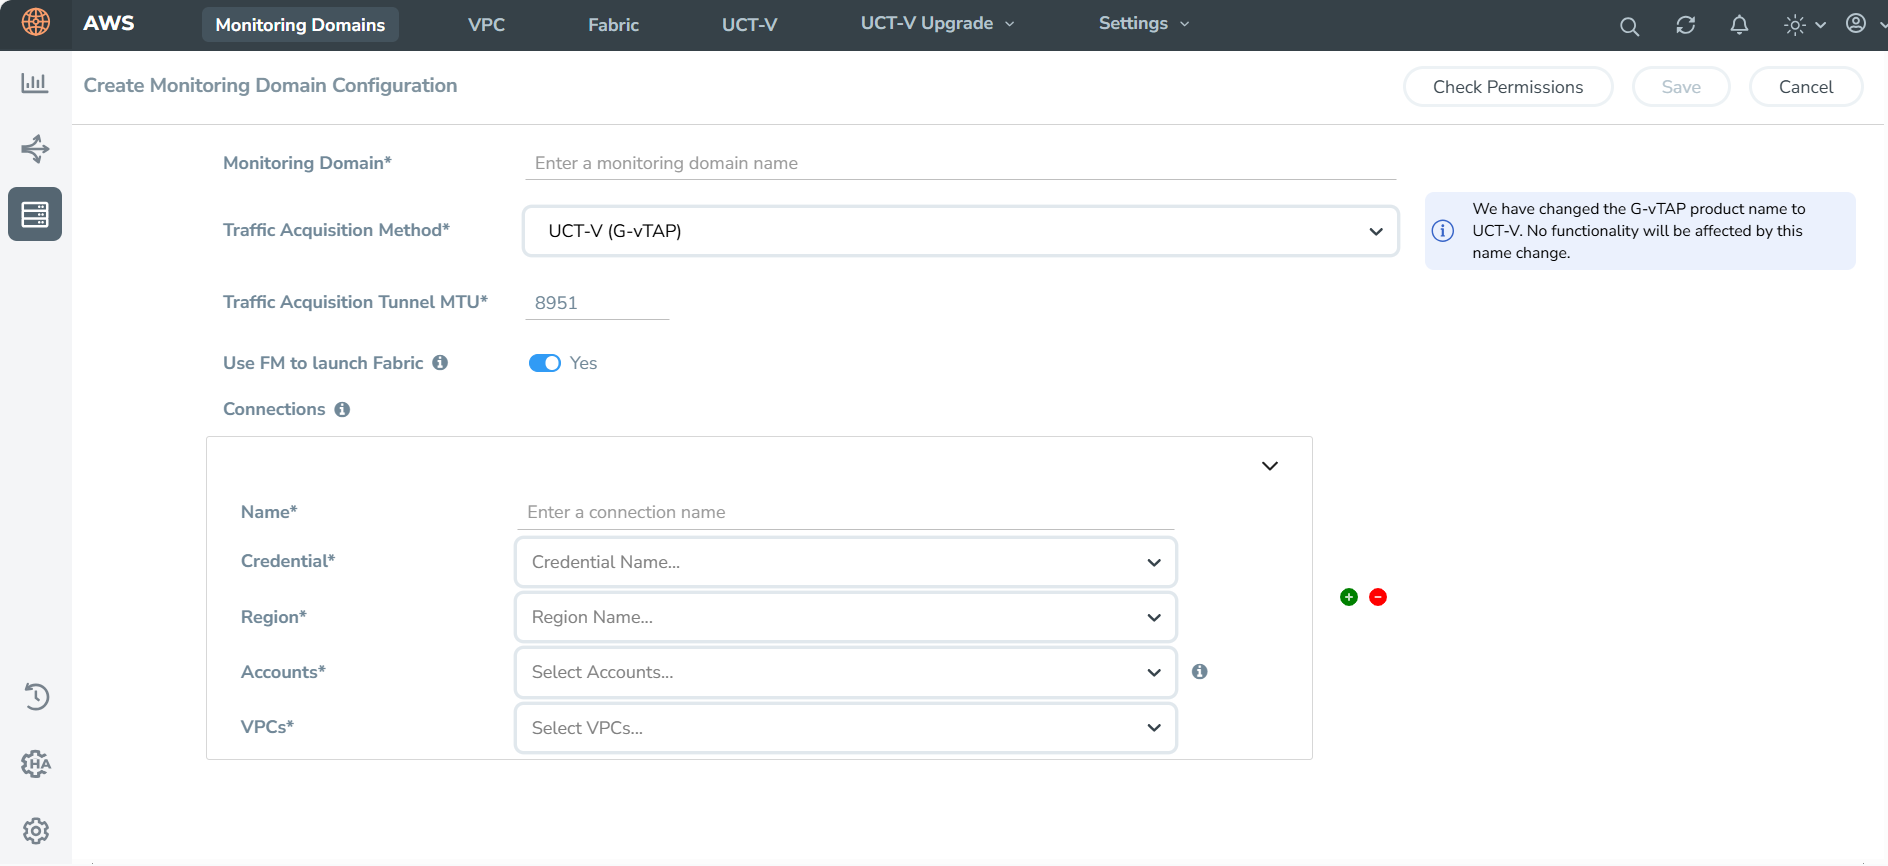
To create a Monitoring Domain:
- Go to Inventory > VIRTUAL > AWS , and select Monitoring Domain.
- On the Monitoring Domain page, select New. The Monitoring Domain Configuration page appears.
- Select Check Permissions and validate whether you have the required permissions.
- In the Monitoring Domain field, enter an alias used to identify the Monitoring Domain.
- From the Traffic Acquisition Method drop-down list, select one of the following tapping methods:
- Inline: If you select this option, you can directly capture the inline traffic from the instances.
- In the Traffic Acquisition Tunnel MTU, enter the MTU value. The Maximum Transmission Unit (MTU) is the maximum size of each packet that the tunnel endpoint can carry from the UCT-V to the GigaVUE V Series Node. The default value is 8951.
When using IPv4 tunnels, the maximum MTU value is 8951.
When using IPv6 tunnels, the maximum MTU value is 8931.
- Turn on the Use FM to Launch Fabric toggle, to deploy GigaVUE Fabric Components using GigaVUE‑FM.
- Select Yes: Configure GigaVUE Fabric Components in GigaVUE-FM
- Select No: Configure GigaVUE Fabric Components in AWS using Third Party Orchestration - Integrated Mode.
- Under Connections, in the Name field, enter an alias used to identify the connection.
- From the Credential drop-down list, select an AWS credential. For details, refer to Create AWS Credentials.
- From the Region drop-down list, select US ISOB East (Ohio) for the Monitoring Domain.
- From the Accounts drop-down list, select the AWS accounts.
- From the VPCs drop-down list, select the VPCs to monitor.
- Click Save.
| Ensure that all V Series Nodes within a single Monitoring Domain are running the same version. Mixing different versions in the same Monitoring Domain may lead to inconsistencies when configuring Monitoring Session traffic elements. |
| Similarly, when upgrading a V Series Node, ensure that the GigaVUE‑FM version is the same or higher than the V Series Node version. |
You can view the new Monitoring Domain in the Monitoring Domain page list view.
To edit a Monitoring Domain, select the deployed Monitoring Domain and select Actions. From the drop-down list, select Edit and the Monitoring Domain Configuration page appears.
Check Permissions while Creating a Monitoring Domain
To check the permissions while creating a Monitoring domain, follow these steps:
- Go to Inventory > VIRTUAL > AWS, and then click Monitoring Domain. The Monitoring Domain page appears.
- Select New. The Monitoring Domain Configuration page appears.
- Enter the details as mentioned in the Create a Monitoring Domain section.
- Select the Check Permission button. The Check Permissions widget opens.
- Select the connection for which you wish to check the required permissions and then select Next.
- Select the Permission Status to view the missing permissions. The ACCOUNTS tab lists the accounts and the permissions status.
- Review the accounts that has an error in the permission status. The PERMISSIONS tab lists the permissions required to run GigaVUE Cloud Suite for AWS.
- Make sure to include all the permissions with Access Status as Denied in the IAM policy.
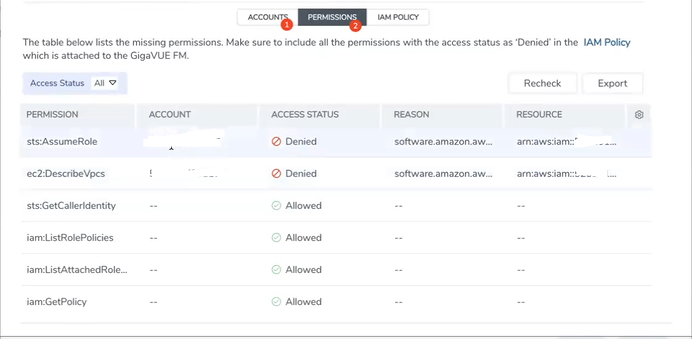
The IAM POLICY tab lists the sample policy containing the required permissions for deploying the GigaVUE Cloud Suite for AWS. You must update the AWS IAM policy with the missing permissions that are highlighted in the JSON.
- Go to the PERMISSIONS tab and select Recheck to recheck the IAM policy.
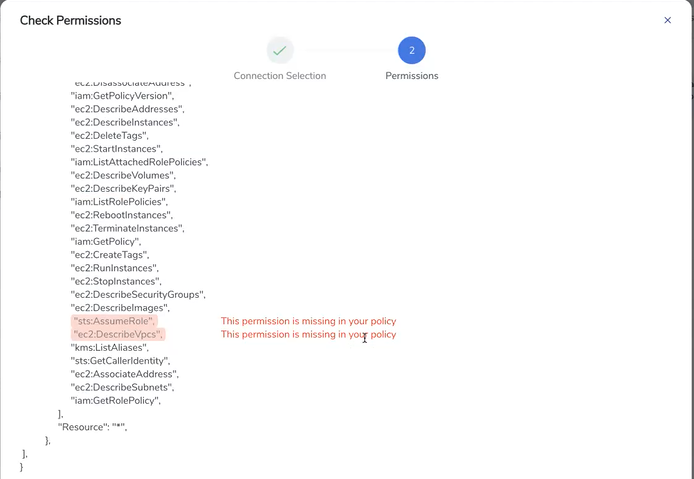
When you click Copy or Download, the entire JSON will be copied or downloaded.
Note: After updating the IAM Policy, it takes around 5 minutes for the changes to reflect on the Check Permissions screen.
You can view the permission status reports in the Monitoring Domain page. Permission status reports consist of previously run Check permissions reports. They are auto purged once every 30 days. You can change the purge interval from the Advanced Settings page. Refer to Configure AWS Settings for more detailed information.
To view permission status report, in the Monitoring Domain page, click Actions > View Permission Status Report. To view or delete individual reports, select the report and click Actions button.
What to do Next:
Based on your chosen deployment option, perform any of the following actions:
- Use FM to Launch Fabric is enabled: You reach the AWS Fabric Launch Configuration page. For details on how to deploy GigaVUE Fabric Components using GigaVUE‑FM, refer to Configure GigaVUE Fabric Components in GigaVUE-FM.
- Use FM to Launch Fabric is disabled: You must deploy GigaVUE Fabric Components using AWS. For details on how to deploy GigaVUE Fabric Components using AWS, refer to Configure GigaVUE Fabric Components in AWS using Third Party Orchestration - Integrated Mode.


