Create Application Filtering Intelligence by Selecting Applications from Dashboard
GigaVUE‑FM allows you to create Application Filtering Intelligence by selecting the applications available from the Total Applications displayed on the Application Intelligence dashboard. To create Application Filtering Intelligence, follow these steps:
- On the left navigation pane, click on
 .
.
-
Select Solutions > Application Intelligence.
Note: If you are creating Application Filtering Intelligence immediately after creating Application Monitoring, then you can proceed from Step 3.
-
Select the required application from the Total Applications in the right pane of the Application Intelligence dashboard. You can also select multiple applications for creating the Application Filtering Intelligence.
-
Click Operations, and select App Filtering from the drop-down list.
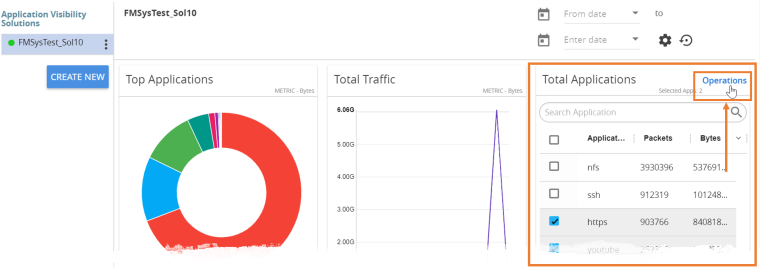
You can view the list of applications selected in the Selected Applications section.
-
Select either the Pass or Drop check box for an application to allow it to either pass through or get dropped off in the tool port present in the DestinationTrafficPriority. You can also perform a search operation to filter the required application from the list of applications.
-
Use the Destination Traffic Priority section:
For Physical: Either choose the available tool port or add a new port for creating a traffic priority. In the Select ports... field, select the tool ports for sending the filtered applications traffic to the external tool. If you are unable to view the required port in the Port field, perform these steps:
-
Click Port Editor. Select the Type as Tool from the drop-down list for the required Port Id. Select OK.
-
The selected Port appears in the list.
-
Click Save.
Note: You can select the Null Port option, when you need to collect only the application metadata without sending the filtered traffic to any physical port.
For Virtual: Select the required destination tunnel. To configure the destination tunnel refer to Create Tunnel Specifications section for details.
-
In the Priority section, you can perform the following actions:
-
Enable the Pass All check box to pass all the applications when there are no matching rules.
-
Click Advanced Rules > Add a rule to add new rules to perform advanced filtering on the application.
For more details on adding a rule Adding Rules, refer to section.
-
In the Destination Traffic Priority section, click +Add New to create additional Destination Traffic Priority (second level maps). In Application Filtering Intelligence, you can create a maximum of five Destination Traffic Priorities.
Note:
You can click and drag the icon  to reorder the map priority when there are multiple priorities.
Click Filter to buttonfor the corresponding Priority in a Destination Traffic Priority sectionfor passing and dropping the applications to the required tool ports.
In the Application Filtering Intelligence Settings, you can edit the following options while creating the application filtering intelligence:
| o | Bidirectional (Default option). |
| o | Buffer/Buffer count - The option is enabled default. |
| o | Protocol- The default value is TCP-UDP. |
| o | Timeout in seconds - The default value is 15 seconds. |
- Click Save.
You can view the Application Filtering Intelligence Statistics from the Application Intelligence Dashboard page.
Adding Rules
You can use Advanced Rules option to add more rules in Application Filtering. To add rules, do the following:
1. Click Priority > Advanced Rules> Add a Rule.
2. Click the field Select Options in Rule 1 and select any of the following options:
|
■
|
Pattern Match — You can select the pattern type as either as follows and provide the respective values. |
|
o
|
Regex —If you want to filter HTTP sessions that include JSON and API traffic. |
|
■
|
VN-Tag Destination VIF ID |
3. Click Pass or Drop check box to allow it to either pass through or get dropped off in the tool port present in the Destination Traffic Priority.
4. Click Save.


