Configure ICAP Client
Before You Begin:
| Configure the required inline networks. Refer to Configure Inline Network Ports and an Inline Network. |
| Configure the required IP Interface. Refer to Configure IP Interface. |
Note: For ICAP, it is not necessary to add GS Groups when configuring IP interface. It will be added automatically when the port is added to ICAP Client.
To configure the ICAP Client:
| 1. |
Go to  > Physical > Orchestrated Flows > Inline Flows > Configuration Canvas to create a new Flexible Inline Canvas. > Physical > Orchestrated Flows > Inline Flows > Configuration Canvas to create a new Flexible Inline Canvas. |
| 2. | In the displayed Flexible Inline Canvas, select the device where you want to configure the ICAP Client. |
| 3. | Click the ‘+’ icon next to the ICAP Client to create a new entry. |
| 4. | Enter a name and description for the inline network in the Alias and Description fields. |
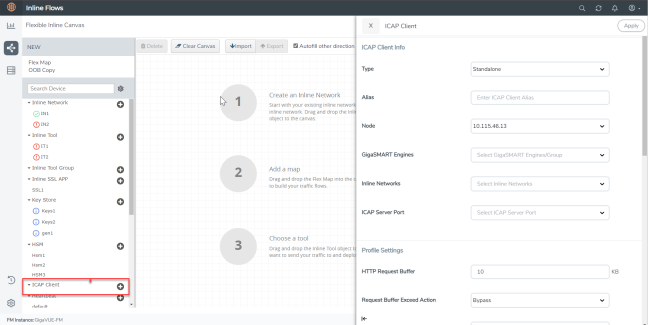
| 5. | In the ICAP Client properties pane that appears on the right, complete the required fields in the ICAP Client Info, Profile Settings, and the Server sections. Refer to ICAP Client—Field References for more details. |
| 6. | Click Apply to save the configurations. |
ICAP Client—Field References
The following table lists and describes the attributes that define the ICAP Client.
|
Field |
Description |
|
ICAP Client Info |
|
|
Type |
Select the required type from the following:
|
|
Alias |
Enter a unique name for the ICAP Client. |
|
Node |
Select the required node for which you want to configure the ICAP Client. |
|
GigaSMART engines |
Select the required GigaSMART engine. |
|
Inline Networks |
Select the required inline networks, which are the source for the ICAP app. |
|
Source Ports |
Select the required tool port of iSSL, which is connected to the inline network of ICAP. (This option will not appear if you select standalone as type.) |
|
ICAP Server Port |
Select the required IP interface physical port. |
|
Profile Settings |
|
|
HTTP Request Buffer |
Enter the HTTP request buffer size. |
|
Request Buffer Exceed Action |
Select the buffer action on exceeding the size:
|
|
Preview Size |
Enter the required preview size. |
|
REQMOD |
Enable or disable the Request Modification Mode. |
|
RESPMOD |
Enable or disable the Response Modification Mode. |
|
Response Timeout |
Enter the response timeout in seconds. |
|
Response Timeout Action |
Select the response timeout action on exceeding the timeout:
|
|
Inactivity Timeout |
Enter the session inactivity timeout value in seconds. |
|
Port Range |
Enter the ICAP client source port range for connecting to ICAP server. |
|
Server |
|
|
Server Alias |
Enter a unique name for the ICAP Server. |
|
Description |
Enter a description for the ICAP Server. |
|
Port |
Enter the L4 port number on which the ICAP server is listed. |
|
Address |
Enter the L3 IPV4/IPV6 address of the ICAP server. |
|
Request Modification URL |
Enter the Request Modification service URL. |
|
Response Modification URL |
Enter the Response Modification service URL. |
|
Options URL |
Enter the ICAP options URL (if necessary). |


