Configure Entrust nShield HSM for TLS/SSL Decryption
This section describes the configuration and use of Entrust nShield HSM for TLS/SSL decryption.
Prerequisites
■
From the HSM administrator:
o
For Entrust nShield, provide the HSM group key handler files: the Security World file named “world” and the per‑HSM module file(s). Install one “world” per HSM group and one module file for each HSM in that group; these can be fetched from the Entrust nShield RFS or uploaded locally (UI expects the filename “world”).
o
The HSM IP address and port (Entrust nShield default is 9004).
o
The HSM’s unique identifiers: ESN (Electronic Serial Number) and KNETI (a key hash exposed by each Entrust nShieldHSM), used to uniquely identify and validate the target HSM during configuration and health checks.
■
The key token(s) for the private keys (for example, primary and secondary signing), and each token’s corresponding server certificate.
■
The CA certificate(s) that signed the above server certificate(s) for trust store import.
■
A static IP address to assign to the GigaSMART engine that is pre‑registered/allowed on the HSM; static IP is recommended to avoid re-registration if DHCP changes addresses.
■
A Keychain password on the device; it must be configured before installing any certificates and keys in the keystore.
Access Flexible Inline Canvas
1.
Go to > Physical > Orchestrated Flows > Inline Flows > Configuration Canvas to create a new Flexible Inline Canvas.
2.
In the displayed Flexible Inline Canvas, select the device where you want to configure the TLS/SSL decryption.
Configure Inline Network
1.
On the left pane, click the ‘+’ icon next to Inline Network option to create a new entry.
2.
Enter a name and description for the inline network in the Alias and Description fields. Then, click Port Editor.
3.
In the Alias and Description fields, enter a name and description for the inline network.
4.
Click Port Editor. In the Quick Port Editor, scroll down to the inline network ports that you want to configure. Select Enable to administratively enable inline network ports, and click OK to apply the changes.
5.
From the Port A and Port B drop-down lists, select the ports that you want to configure as the inline network pair.
6.
From the Traffic Path drop-down list, select To Inline Tool.
o
To Inline Tool—All traffic originating from the inline network is directed to the sequence of inline tools and inline tool groups and is guided through the inline tools and inline tool groups according to the current inline tool and inline tool group status.
7.
Click OK. You have successfully created an Inline Network.
On the left pane, click the ‘+’ icon next to the Inline Tool option to create a new inline tool.
2.
In the Properties pane, in the Alias and Description fields, enter a name and description for the inline tool.
3.
From the Type drop-down list, select one of the following options:
o
External- To configure a third-party tool.
o
GigaVUE Node- To configure a GigaVUE node as a tool.
4.
Click Port Editor. In the Quick Port Editor, scroll down to the inline tool ports that you want to configure. Select Enable to administratively enable the inline tool ports, and then click OK to apply the changes.
5.
From the Port A and Port B drop-down lists, select the inline tool ports according to the direction the inline tool expects traffic from the network.
6.
Verify that the Enabled check box is selected.
7.
Click OK. You have successfully created an Inline Network.
Go to > Physical > Orchestrated Flows > Inline Flows > Configuration Canvas to create a new Flexible Inline Canvas.
2.
In the displayed Flexible Inline Canvas, select the device where you want to configure the HSM Group.
3.
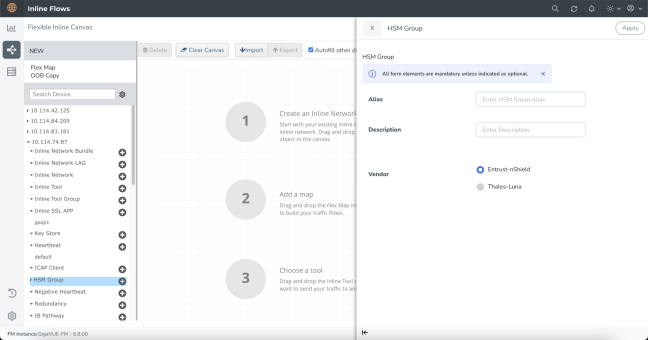
Click the ‘+’ icon next to the HSM Group to create a new entry.
4.
Enter a name and description for the HSM Group in the Alias and Description fields.
5.
Select the required vendor type from the available options —Entrust-nShield or Thales-Luna—to create the corresponding HSM Group.
Note: For Thales-Luna Network HSM, you can create a maximum of 16 HSM units per device.
6.
Click Apply to save the configurations. All individual HSM units you create will be listed under the configured HSM Group.
Add Entrust nShield HSM Appliance to the HSM Group
To add your vendor type as Entrust nShield to your configured HSM Group follow the below steps:
1.
In the Flexible Inline Canvas, select the device for which the HSM Group is configured.
2.
Click the expand menu on the configured HSM Group.
3.
Click the ‘+’ icon next to the configured Entrust nShield HSM to proceed.
4.
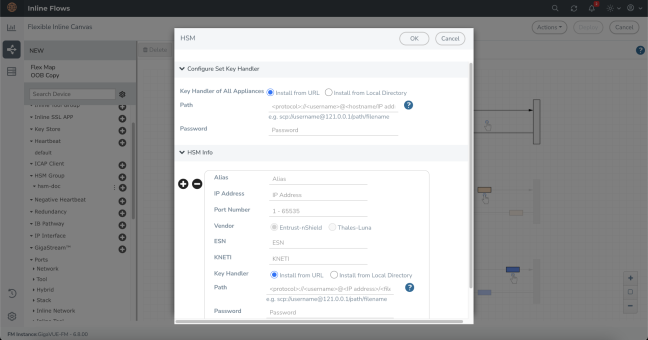
On the HSM pop-up pane, choose one of the following methods to install the key handler file:
o
Install from URL—Enter a valid directory path including the file name and enter the password to access the server.
Note: SCP, SFTP, HTTP, and FTP are the supported protocols from where you can select the key handler file.
o
Install from Local Directory—Browse and select the key handler file from your local directory.
Note: Ensure that the file name is "world".
5.
In the Alias field, enter a name for the HSM appliance.
6.
Enter the IP address of the HSM server and Port Number.
Notes:
The default port number for Entrust nShield HSM is 9004.
It is preferable to use a static IP address to prevent the Entrust nShield registration from expiring.
7.
By default, Entrust nShield is selected and Thales-Luna is disabled in the Vendor type when configuring Entrust nShield.
8.
Enter the ESN and KNETI that you obtained from the HSM administrator.
9.
Choose one of the following methods to select the required key handler file:
o
Install from URL—Enter a valid directory path including the file name and enter the password to access the server.
o
Install from Local Directory—Browse and select the key handler file from your local directory.
10.
Click OK to save the configuration.
Create an Inline SSL APP and Attach the HSM Group
1.
On the left pane, click the ‘+’ icon next to the Inline SSL APP option.
2.
Enter a name for the Inline SSL APP and select the required GigaSMART engines.
3.
From the HSM Group drop-down list, select the configured Entrust nShield HSM Group alias.
4.
Under Deployment Type, set up Key chain Password:
a.
Click Keychain Password, and then choose either Add or Reset.
b.
If you choose to reset the Keychain Password, enter a password that is 8 to 30 characters long and contains at least one numerical character, one uppercase character, one lowercase character, and one special character.
c.
Select the Auto Login check box to enable GigaVUE-FM to unlock the keystore when the device reboots.
d.
Click OK to save the Key chain Password.
5.
Configure Keys and Certificates. A key in an inbound deployment can be selected only for decryption or for re-signing and re-encryption in an outbound deployment.
a.
Click Add Keys to open the Key page.
b.
In the Key Alias and Description fields, enter a name and description for the SSL key.
c.
For Key Type, select either RSA or ECDSA.
d.
From the File Type drop-down list, select nShield-HSM.
e.
Choose one of the following methods to import the required key token:
o
Install from URL—Enter a valid directory path including the file name and enter the password to access the server.
o
Install from Local Directory—Browse and select the key handler file from your local directory.
f.
Choose one of the following methods to import the corresponding certificate:
o
Install from URL—Enter a valid directory path including the file name and enter the password to access the server.
o
Install from Local Directory—Browse and select the certificate file from your local directory.
Note: You can obtain the key token and the corresponding certificate from your HSM administrator.
g.
Click OK. You have successfully created the Primary key.
h.
Repeat steps 1-6 to configure the secondary signing certificate and private key.
6.
Select the required deployment type. Entrust nShield HSM configuration is supported in Inbound, Outbound, and Hybrid deployment types.
o
Outbound - Add the configured primary and a secondary signing Certificate Authorities (CA).
o
Inbound - Add a new Server Key Mapping. Enter the domain name or IP address of the server, and then select the required Key Pair Alias.
o
Hybrid - Add a new Server Key Mapping, and a primary and a secondary signing CA.
7.
Under Configurations, for Default Action select one of the following options:
o
Decrypt—Decrypt all the traffic that is guided into the Inline SSL APP.
o
No Decrypt—Do not decrypt the traffic that is guided into the Inline SSL APP.
8.
For URL Cache Miss Action, select one of the following options:
o
Decrypt—Decrypt all the traffic that is guided into the Inline SSL APP.
o
No Decrypt—Do not decrypt the traffic that is guided into the Inline SSL APP.
o
Defer—Delay the decryption until the Defer Timeout seconds provided.
9.
Under Security Expectations, choose to either decrypt or drop the traffic for the following certificates:
o
Self-signed certificate
o
Unknown CA certificate
o
Invalid certificate
o
Expired certificate
10.
Under Network Access, select IP Address as the network access configuration mode. Enter the IP Address, Netmask, Gateway, DNS, MTU, and VLAN.
Notes:
DHCP mode is not supported when configuring Entrust nShield HSM, as IP changes can break connectivity if the new address isn’t registered with the HSM server
Ensure that IP address you are using is already registered in the HSM server.
11.
Under Trust Store, set up Set up the Signing Certificate Authority (CA).
o
Click Append and choose one of the following methods:
•
Copy and Paste—Directly paste the Trust Store Certificate.
•
Install from Local Directory—Browse and select the certificate file from your local directory.
o
Click Replace to update the existing certificate with a new one.
12.
Click OK to save the configuration.
Deploy Inline TLS/SSL Decryption Solution
1.
Drag and drop the required inline network or inline network bundle into the flexible inline canvas.
2.
Drag and drop the flexible inline map into the canvas.
3.
In the Properties pane, click Add a Rule, and add Bi-directional as the rule condition.
4.
In the rule description, add the protocol as TCP. Add the required rules for the inline map, and then click OK to save the configuration.
5.
Drag and drop the Inline SSL APP into the canvas.
6.
Drag and drop the required inline tools or inline tool group into the canvas.
7.
Click Deploy. You get two options to select your Traffic path during Deployment . It could be either Logical Bypass or Keep as is. Select an option based on your requirement and then click OK. Refer to View HSM Statistics to view the statistics details.
Verify the Solution
■
Confirm the solution is Deployed on the Flexible Inline Canvas (Physical > Orchestrated Flows > Inline Flows > Configuration Canvas) and the Inline SSL app is present in the canvas.
■
Validate HSM registration and trust:
o
In GigaVUE‑FM, verify the HSM Group exists and is associated to the target node(s).
o
Confirm the Entrust nShield HSM appliance is registered, reachable, and showing a healthy/connected state.
o
Ensure only one HSM vendor is used on a device (no mixing Entrust and Thales on the same node).
■
Confirm that the Inline SSL app is using Entrust nShield HSM-backed keys (not local files), the Keychain Password is unlocked, and the keys/certificates load without errors or HSM/keystore alerts so they are available for decryption
o
In the Inline SSL App, verify key/certificate entries indicate HSM-backed storage (Entrust nShield) and that the configured Keychain Password is unlocked.
o
Verify keys/certs load without errors and are available to the app (no HSM/keystore error events).
What to Do Next
After deployment, you can view the statistics details , refer to View HSM Statistics.
 > Physical > Orchestrated Flows > Inline Flows > Configuration Canvas to create a new Flexible Inline Canvas.