GigaVUE-TA25E HTL Chassis
The GigaVUE‑TA25E HTL chassis has forty-eight (48) 25Gb/10Gb/1Gb and eight (8) 100Gb/40Gb ports that are inactive by default.
Use the GVOS/upgrade license to activate/upgrade the ports provided in the table below.
| GVOS License | Upgrade Licenses |
|---|---|
| GVS-TAX20E-SW-TM : X1 - X48 + C1-C8 |
No upgrade license is required
|
| GVS-TAX20EA-SW-TM : X1 - X24 + C1-C4 |
UPG-TAX20E-SW-TM : X25 - X48 + C5-C8
|
| GVS-TAX20EB-SW-TM : X1 - X12 + C1-C2 | UPG-TAX20EB-SW-TM : X13 - X24 + C3 - C4 |
| UPG-TAX20E-SW-TM : X25 - X48 + C5 - C8 |
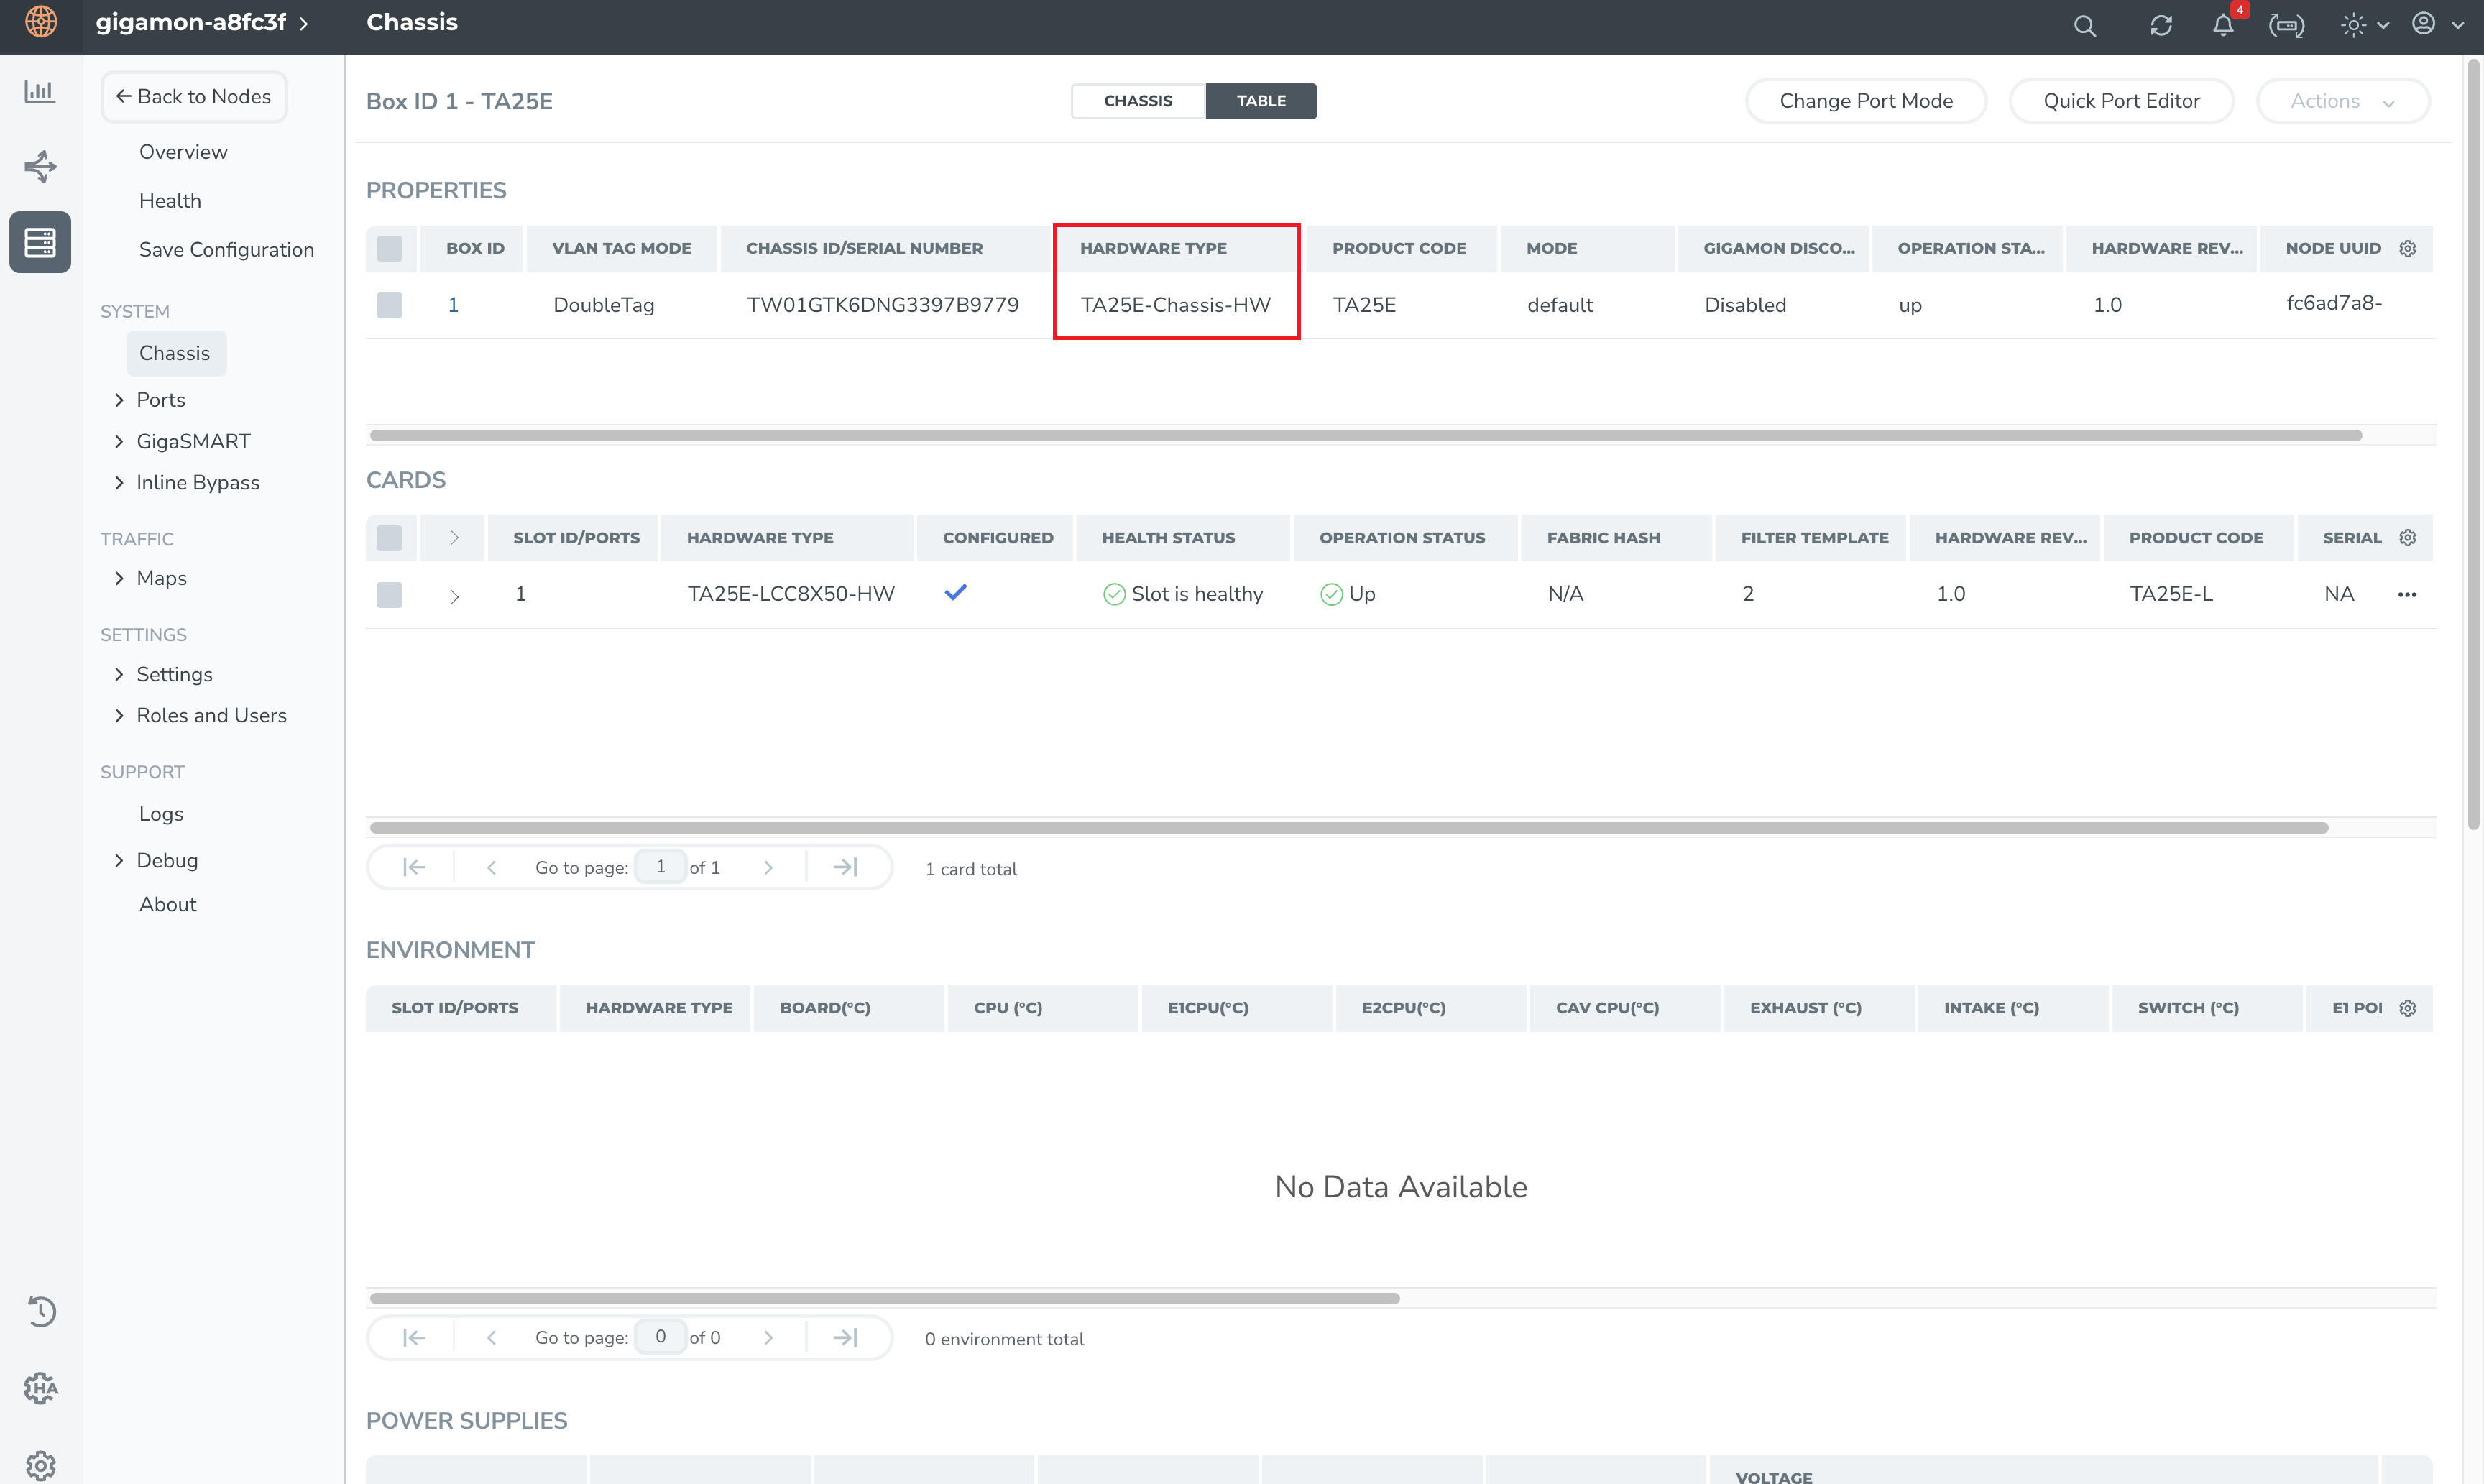
In a GigaVUE‑TA25E HTL Chassis, the hardware type is TA25E-Chassis-HW. Use the following CLI command to display the GigaVUE‑TA25E HTL chassis information:
(config) # show chassis

Chassis:
  Box ID            : 3*
  Hostname          : TA25E-AVMC-DND
  Config            : yes
  Mode              : default
  Oper Status       : up
  HW Type           : TA25E-Chassis-HW
  Vendor            : Gigamon
  Product Code      : TA25E
  Serial Num        : 732656X2240165
  HW Rev            : R01
  SW Rev            : 6.11.00
  GDP               : disable
  Tag Mode          : double
To view the same in GigaVUE-FM, on the left navigation pane, click  (Inventory). Select Physical > Nodes. Click Cluster ID. The GigaVUE-TA series overview page appears. Select System > Chassis. Click the TABLE tab. The properties and cards appear as shown below.
Enabling Additional Ports for GigaVUE‑TA25E HTL Chassis
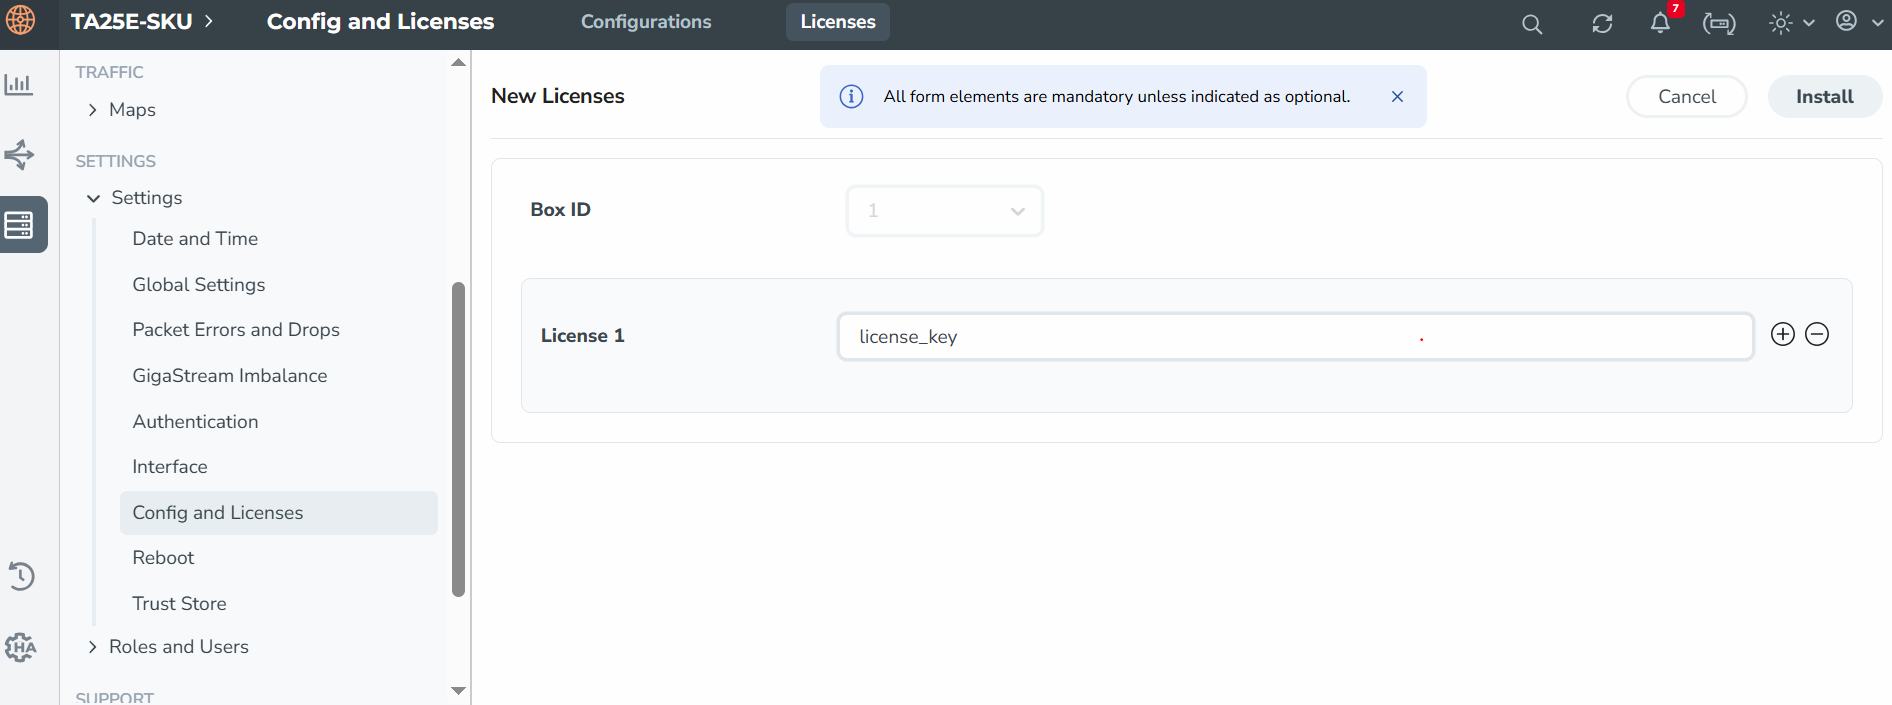
Contact your Sales Representative for information on obtaining a license key. Once you have obtained the license key for additional ports on
(config) # license install box-id <box ID> key <license key> To view the license in GigaVUE-FM, on the left navigation pane, click
(Inventory). Select Physical > Nodes. Click Cluster ID. The GigaVUE-TA series overview page appears. Select Settings > Config and Licenses. Click the Licenses tab. Click New to create a new license. The page appears as shown below.
where
| box ID is the box ID of the GigaVUE TA Series node. |
| license key is the license key obtained for the purposes of enabling additional ports. |
Use the following procedure to install the licenses in the devices:
- Switch to Configure mode.
The GigaVUE TA Series node provides three command entry modes, each with increasingly powerful rights – Standard, Enable, and Configure. The jump-start script is only available in Configure mode:
- Type en <Enter> to switch to Enable mode.
The system prompt changes from [hostname] > to [hostname] #.
- Type config t <Enter> to switch to Config mode.
The system prompt changes from [hostname] # to [hostname] (config) #.
- Type en <Enter> to switch to Enable mode.
- Reset the terminal settings to match the current window with the following command:
terminal resize
- Use the port command with the admin argument to enable ports. For example, the following two commands enable all available ports on a fully licensed GigaVUE‑TA25E HTL chassis:
(config) # port 1/1/c1..c8 params admin enable
(config) # port 1/1/x1..x48 params admin enable
Show port output without GVOS/upgrade license for GigaVUE‑TA25E HTL chassis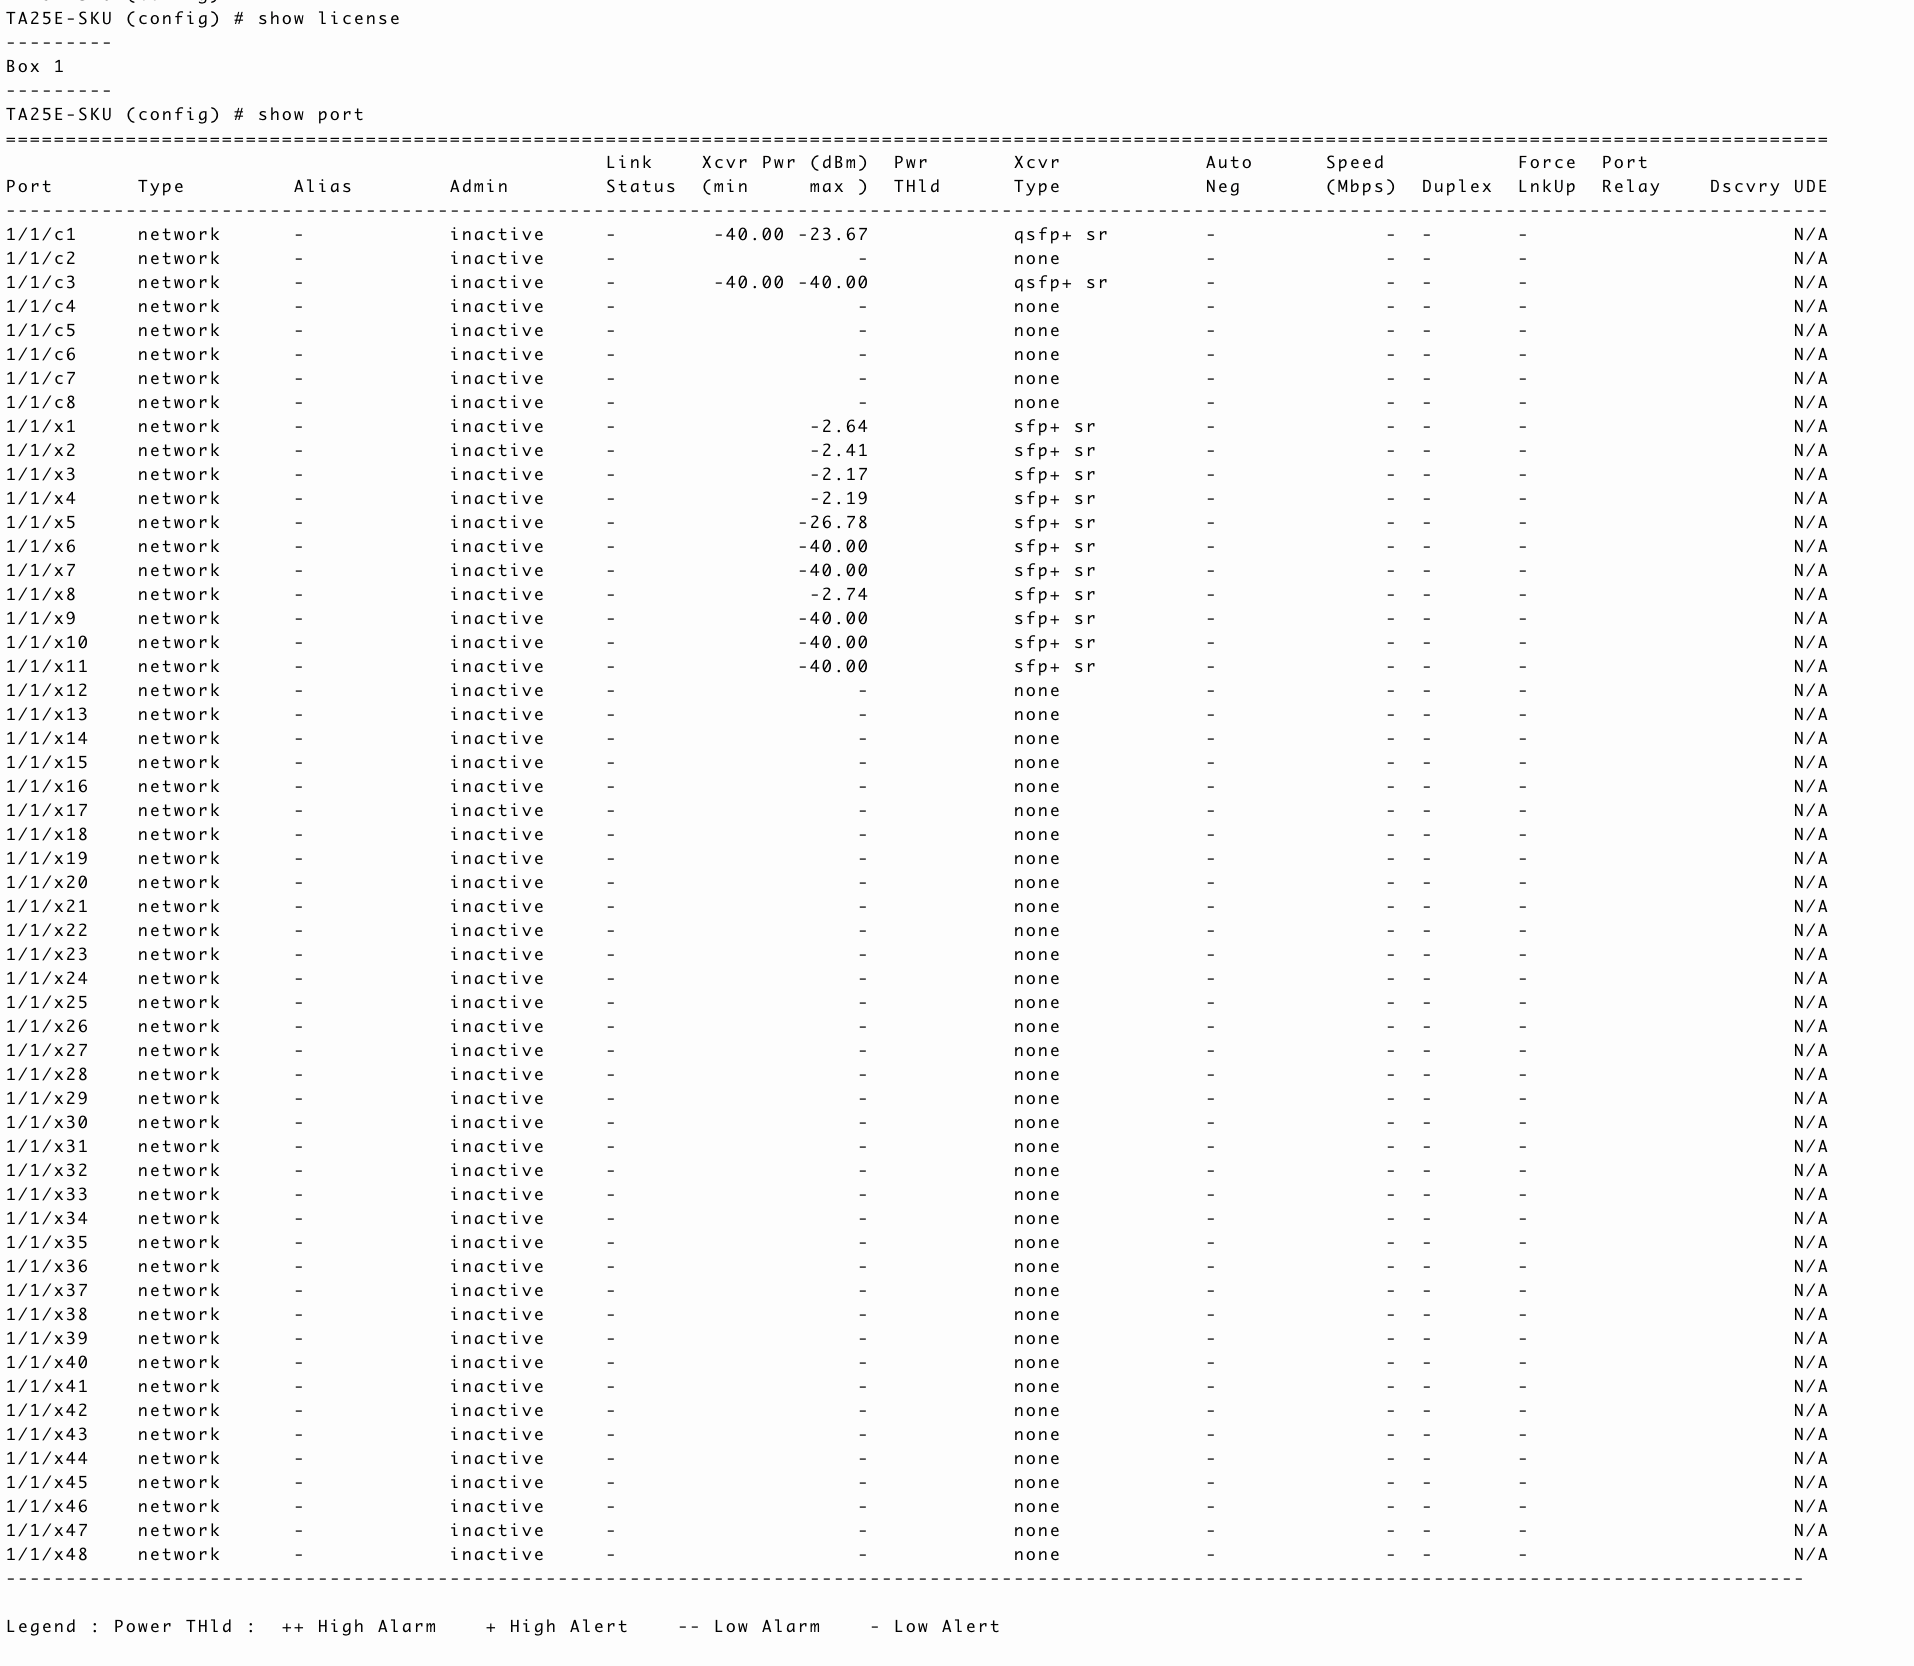
Refer to the above table to use the GigaVUE‑TA25E and GigaVUE‑TA25EA variants for the GVOS license.
GigaVUE‑TA25EB variant explains the GVOS/upgrade license.
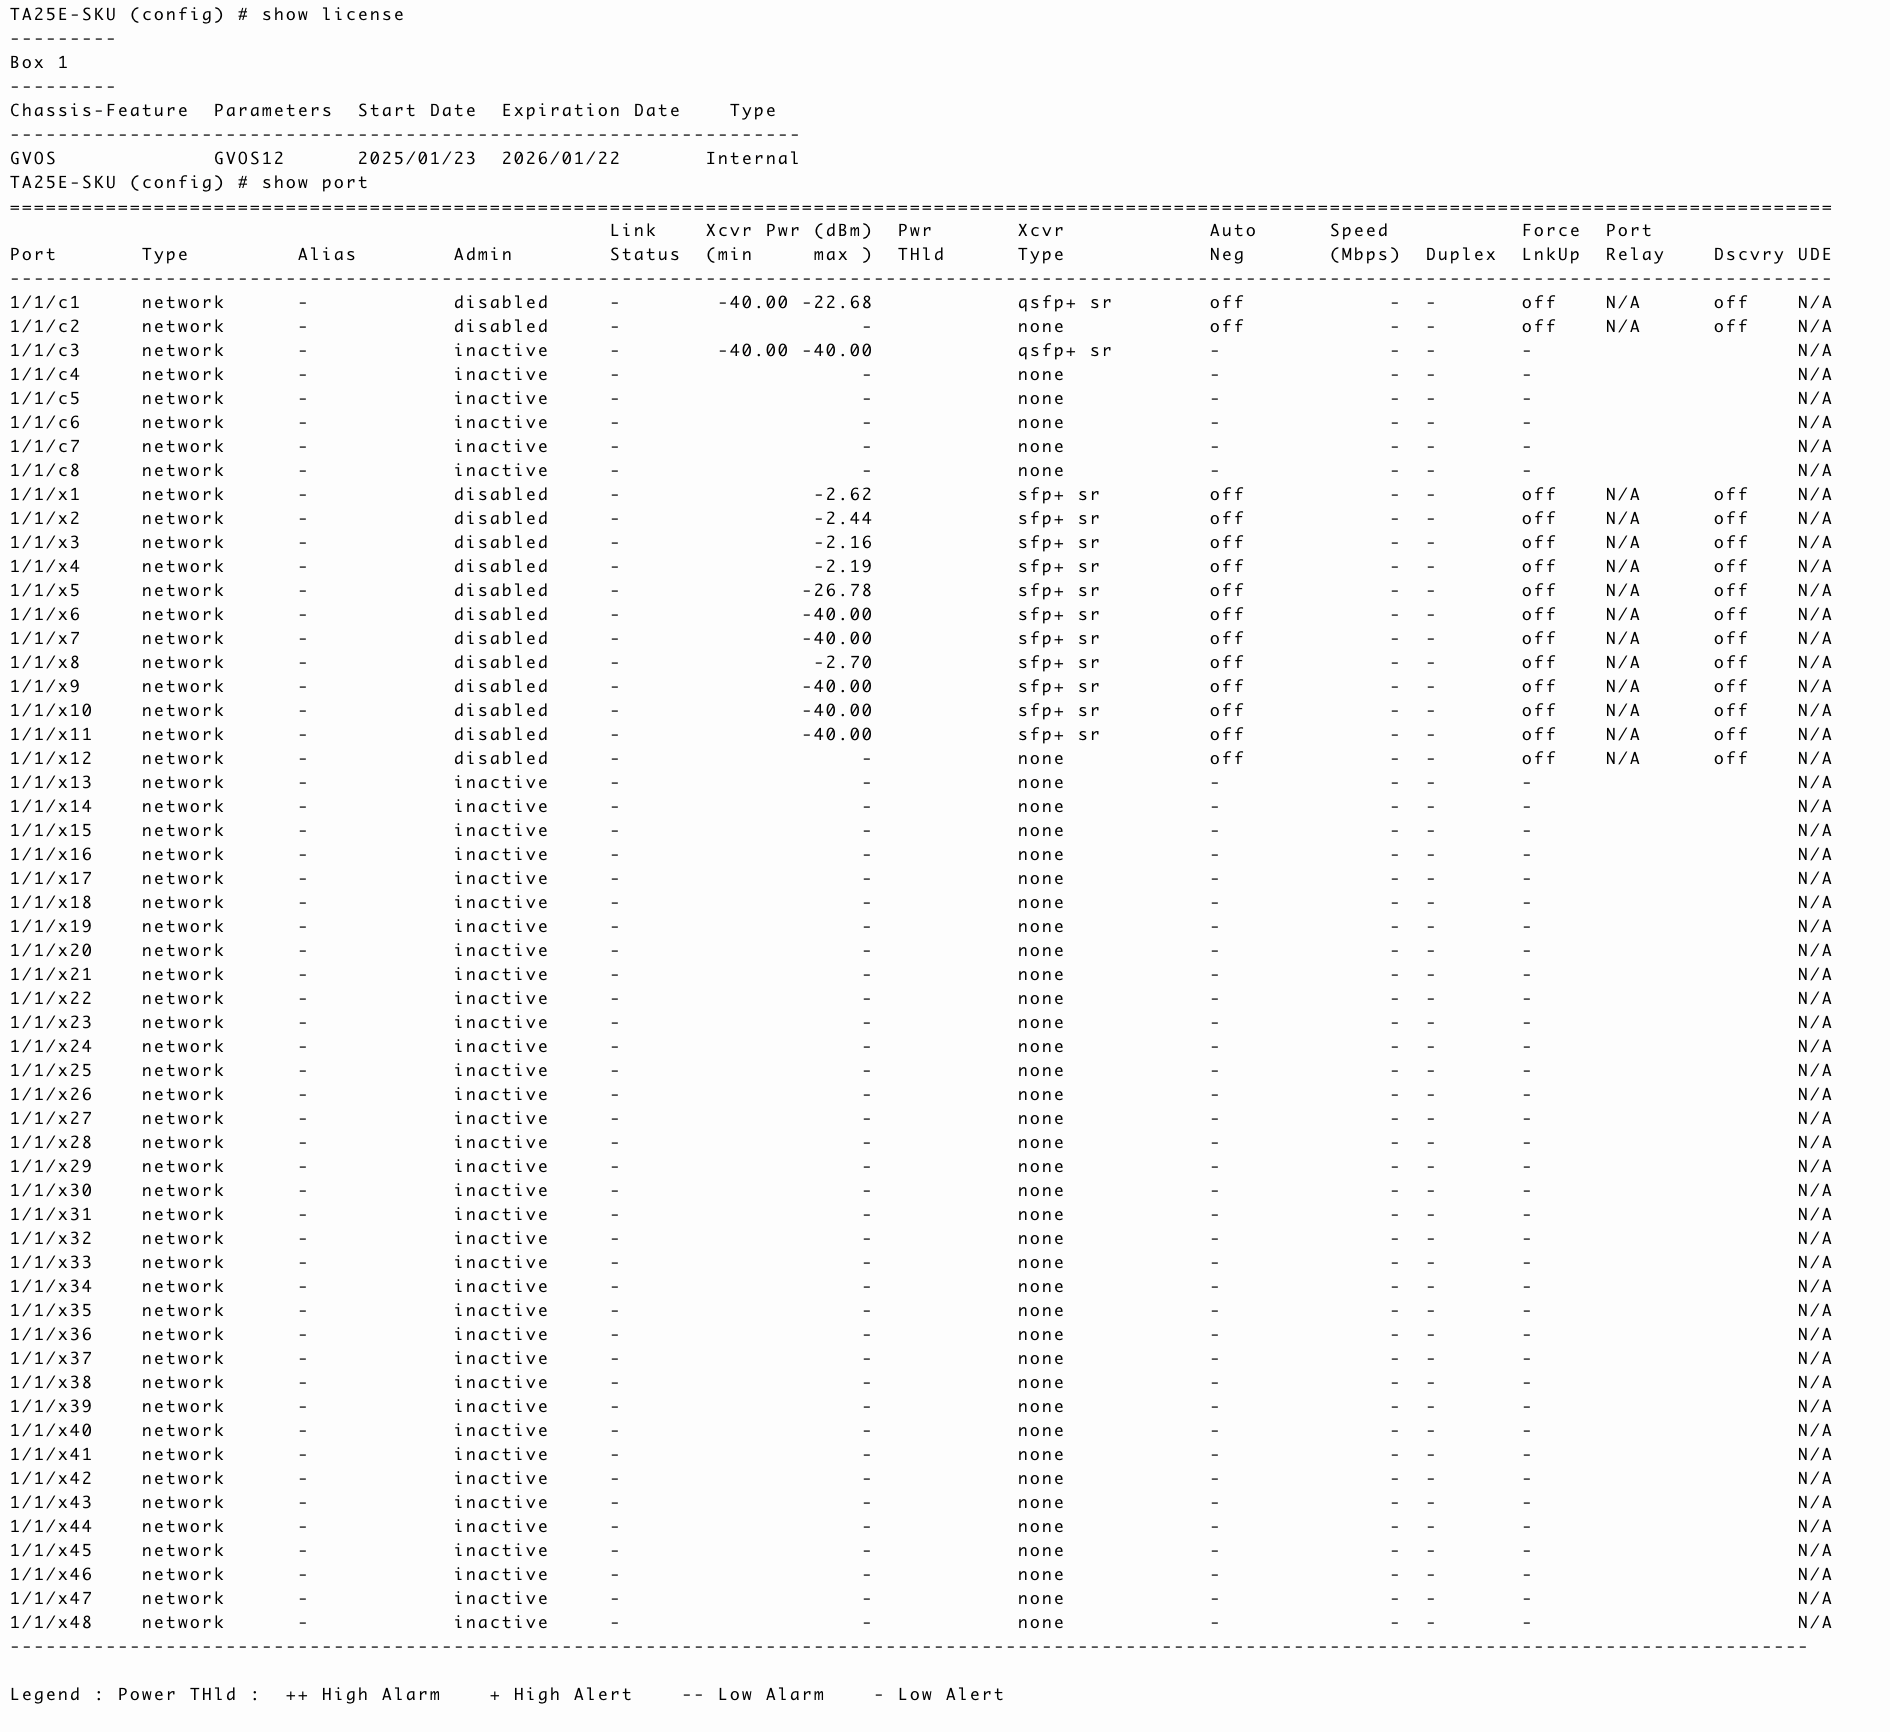
Show port output with GVOS license for GigaVUE‑TA25EHTLchassis to activate twenty four (24) 25Gb/10Gb/1Gb ports and four (4) 100Gb/40Gb ports
Show port output with GVOS license for GigaVUE‑TA25E HTL chassis to activate twelve (12) 25Gb/10Gb/1Gb ports and two (2) 100Gb/40Gb ports
Show port output with upgrade license for GigaVUE‑TA25E HTL chassis to activate additional twelve (12) 25Gb/10Gb/1Gb ports and two (2) 100Gb/40Gb ports (total 24 25Gb/10Gb/1Gb ports + 4 100Gb/40Gb ports)
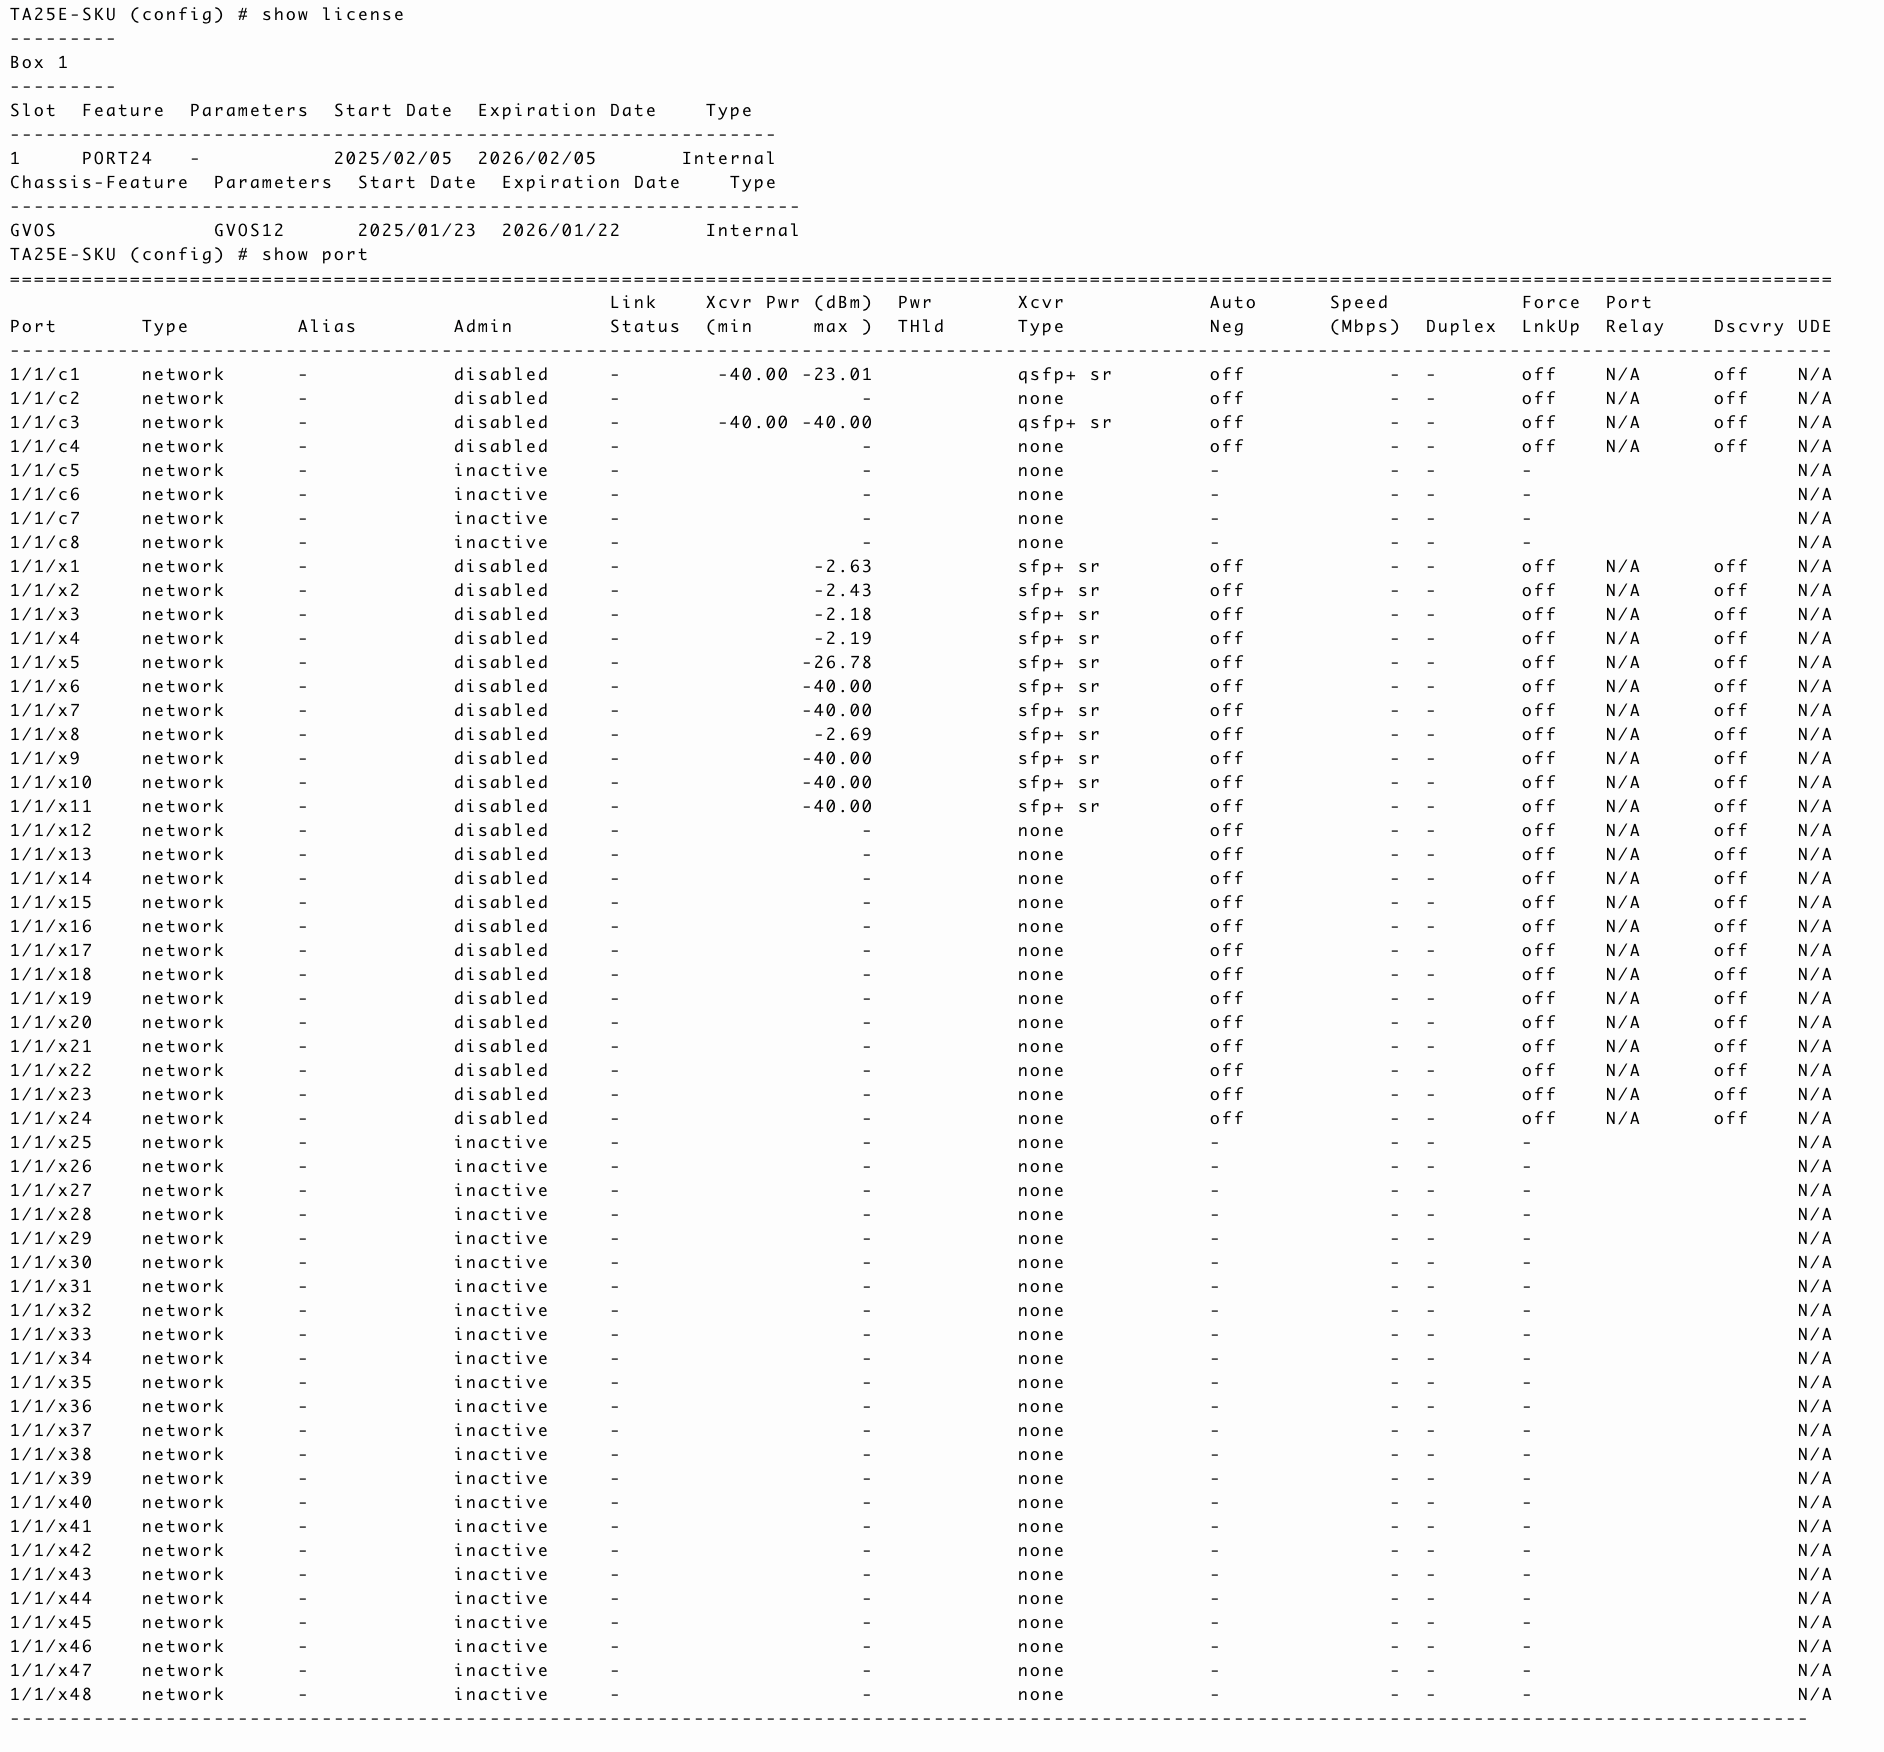
Show port output with upgrade license for GigaVUE‑TA25E HTL chassis to activate additional twenty four (24) 25Gb/10Gb/1Gb ports and four (4) 100Gb/40Gb ports (total 48 25Gb/10Gb/1Gb ports + 8 100Gb/40Gb ports)
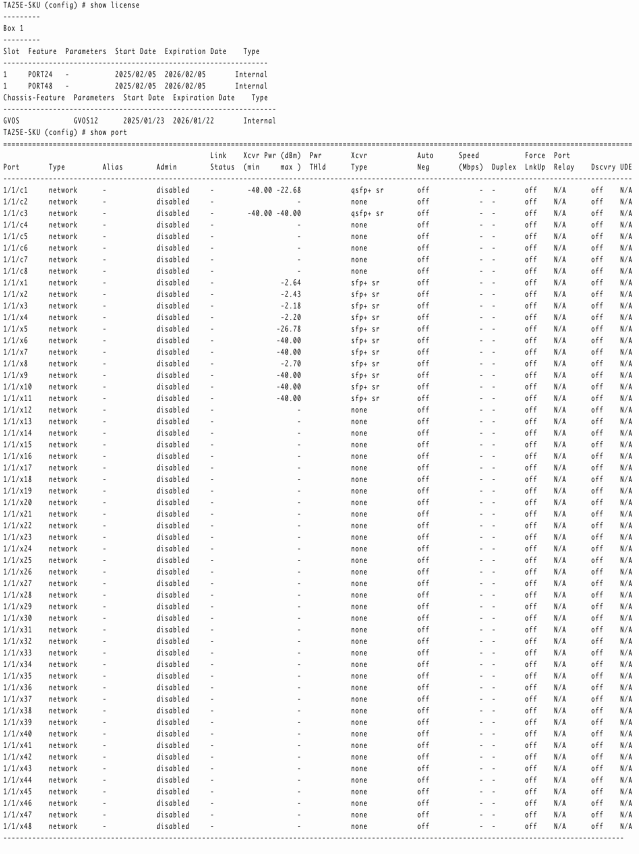
Note: Only Inactive ports are unlicensed ports.
- Enter the show license command after enabling an additional ports to check the applied port license.
- Save your changes so that ports come up automatically at the next reboot
write memory.


