Configure Proxy Server
GigaVUE‑FM cannot reach Azure API endpoints If the virtual network (VNet) hosting GigaVUE‑FM does not have internet access. To enable connectivity, you must configure a proxy server.
To create a proxy server,
-
Go to Inventory > VIRTUAL > Azure.
-
Select Settings > Proxy Server Configuration.
-
In the Proxy Server Configuration page, select Add.
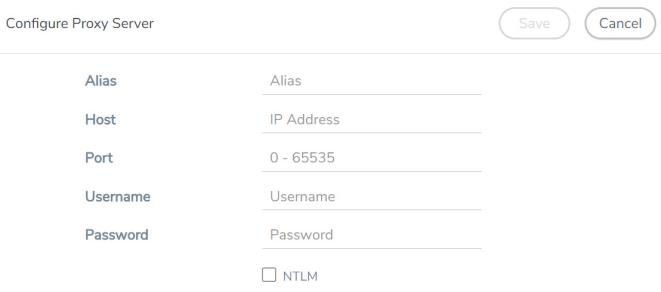
The Configure Proxy Server page appears.
-
Select or enter the appropriate information for the following fields.
-
Alias: The name of the proxy server.
-
Host: The host name or the IP address of the proxy server.
-
Port: The port number that the proxy server uses for Internet connection.
-
Username: (Optional) The username of the proxy server.
-
Password: The password of the proxy server.
-
NTLM: (Optional) The type of the proxy server used to connect to the VNet.
-
Domain: The domain name of the client accessing the proxy server.
-
Workstation: (Optional) The name of the workstation or the computer accessing the proxy server.
-
-
Select Save.
GigaVUE‑FM adds the new proxy server configuration to the Proxy Server Configuration page. The proxy server is also listed in the Azure Connection page.
Note: If you change any of the fields in the Proxy Server Configuration page after the initial connection is established between the GigaVUE‑FM and Azure, then you must also edit the connection and select the proxy server again and save (in the Azure Connection Page). Otherwise, GigaVUE‑FM does not use the new saved configuration that was saved, and may lose connectivity to the Azure platform.


