Create Monitoring Domain
You must establish a connection between GigaVUE‑FM and your Azure environment before you can perform the configuration steps. Creating a monitoring domain in GigaVUE-FM allows you to establish a connection between your Azure environment and GigaVUE-FM. After establishing a connection, you will be able to use GigaVUE‑FM to specify a launch configuration for the UCT-V Controllers, GigaVUE V Series Proxy, and GigaVUE V Series Nodes in the specified VNet and Resource Groups. GigaVUE‑FM connects to Azure using either an Application ID with the client secret or the MSI method of authentication. After the connection establishment, GigaVUE‑FM launches the UCT-V Controller, GigaVUE V Series Proxy, and GigaVUE V Series 2 Node.
To create an Azure monitoring domain in GigaVUE‑FM:
- Go to Inventory > VIRTUAL > Azure, and then click Monitoring Domain. The Monitoring Domain page appears.
- In the Monitoring Domain page, click New. The Azure Monitoring Domain Configuration wizard appears.
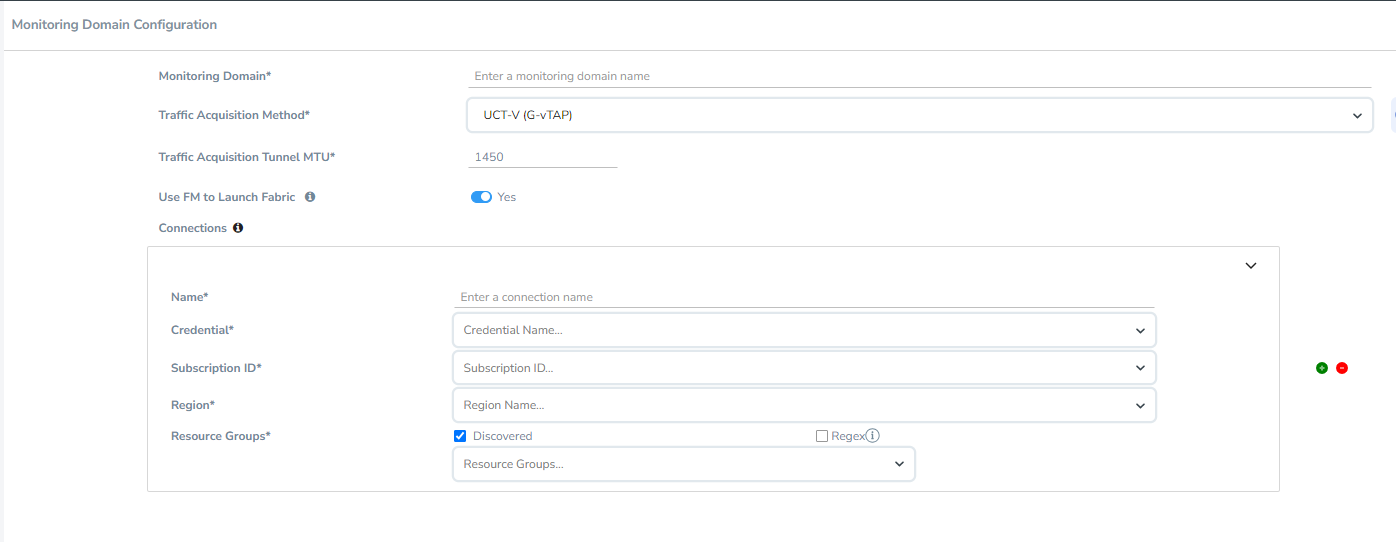
- Enter or select the appropriate information for the Monitoring Domain as described in the following table.
Field
Description Monitoring Domain
An alias used to identify the monitoring domain.
Traffic Acquisition Method
Select a Tapping method. The available options are:
UCT-V: If you select UCT-V as the tapping method, the traffic is acquired from the UCT-Vs installed on your standard VMs in the Resource Group or in the Scale Sets. Then the acquired traffic is forwarded to the GigaVUE V Series nodes. You must configure the UCT-V Controller to monitor the UCT-Vs. vTAP: If you select vTAP as the tapping method, traffic tapping is performed by the Azure platform and sent to the GigaVUE V Series Node. GigaVUE-FM creates the necessary configurations in Azure to enable this. Customer Orchestrated Source: If you select Customer Orchestrated Source as the tapping method, you can select the tunnel as a source where the traffic is directly tunneled to GigaVUE V Series nodes without deploying UCT-Vs or UCT-V Controllers. Note: Select the Traffic Acquisition Method as Customer Orchestrated Source if you wish to use Application Metadata Exporter (AMX) application.
Inline: If you select this option, you can directly capture the inline traffic from the instances. Traffic Acquisition Tunnel MTU
The Maximum Transmission Unit (MTU) is the maximum size of each packet that the tunnel endpoint can carry from the UCT-V to the GigaVUE V Series node.
The default value is 1450.
When using IPv4 tunnels, the maximum MTU value is 1450. The UCT-V tunnel MTU should be 50 bytes less than the UCT-V destination interface MTU size.
When using IPv6 tunnels, the maximum MTU value is 1430. The UCT-V tunnel MTU should be 70 bytes less than the UCT-V destination interface MTU size.
Use FM to Launch Fabric
Select Yes to Configure GigaVUE Fabric Components in GigaVUE-FM or select No to Configure GigaVUE Fabric Components in Azure.
Enable IPv6 Preference
Note: This option appears only when Use FM to Launch Fabric is disabled and Traffic Acquisition Method is UCT-V.
Enable this option to create IPv6 tunnels between UCT-V and the GigaVUE V Series Nodes.
Connections
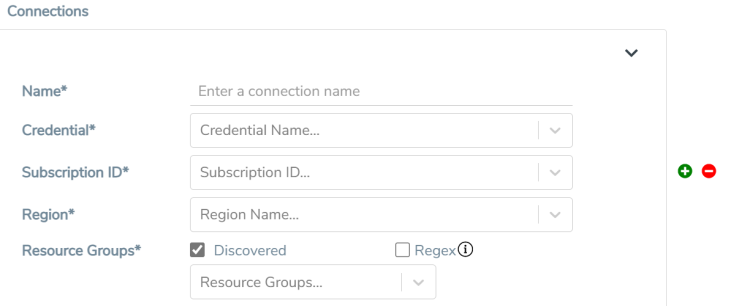
- A Monitoring Domain can have multiple connections, however only one connection can have Managed Service Identity as the Credential.
- The connections in a monitoring domain can be a combination of multiple Application ID with Client Secret (Service Principal) accounts, or one Managed Service Identity and multiple Application ID with Client Secret (Service Principal) accounts.
- Each connection can have only one Subscription ID.
Name
An alias used to identify the connection.
Credential
Select an Azure credential. For detailed information on how to create credentials, refer to Create Azure Credentials.
Subscription ID
A unique alphanumeric string that identifies your Azure subscription.
Region
Azure region for the monitoring domain. For example, West India.
Resource Groups
Select the Resource Groups of the corresponding VMs to monitor.
Note: This field is only available if you select UCT-V as the Traffic Acquisition Method.
- Click Save and the Azure Fabric Launch Configuration wizard appears.
| Ensure that all V Series Nodes within a single Monitoring Domain are running the same version. Mixing different versions in the same Monitoring Domain may lead to inconsistencies when configuring Monitoring Session traffic elements. |
| Similarly, when upgrading a V Series Node, ensure that the GigaVUE‑FM version is the same or higher than the V Series Node version. |
| You can only view and delete the existing configuration for GigaVUE V Series Node 1. You cannot perform any other actions on the existing configuration for GigaVUE V Series Node 1 as the features are deprecated from GigaVUE-FM. |
Check Permissions while Creating a Monitoring Domain
Note: The Check Permissions feature is not available when the Traffic Acquisition Method is vTAP.
To check the permissions while creating a monitoring domain, follow the steps given below:
- Go to Inventory > VIRTUAL > Azure, and then click Monitoring Domain. The Monitoring Domain page appears.
- Click New. The Monitoring Domain Configuration page appears.
- Enter the details as mentioned in the Create Monitoring Domain section.
- Click the Check Permission button. The Check Permissions widget opens.
- Select the connection for which you wish to check the required permissions and then click Next.
- Click the Permission Status tab to view the missing permissions.
- The PERMISSIONS tab lists the permissions required to run GigaVUE Cloud Suite for Azure. Make sure to include all the permissions with Access Status as 'Denied' in the IAM policy.
- The IAM POLICY tab lists the sample policy containing the required permissions for deploying the GigaVUE Cloud Suite for Azure. You must update the Azure IAM policy with the missing permissions that are highlighted in the JSON. To recheck the IAM policy, go to the PERMISSIONS tab and click the Recheck button.
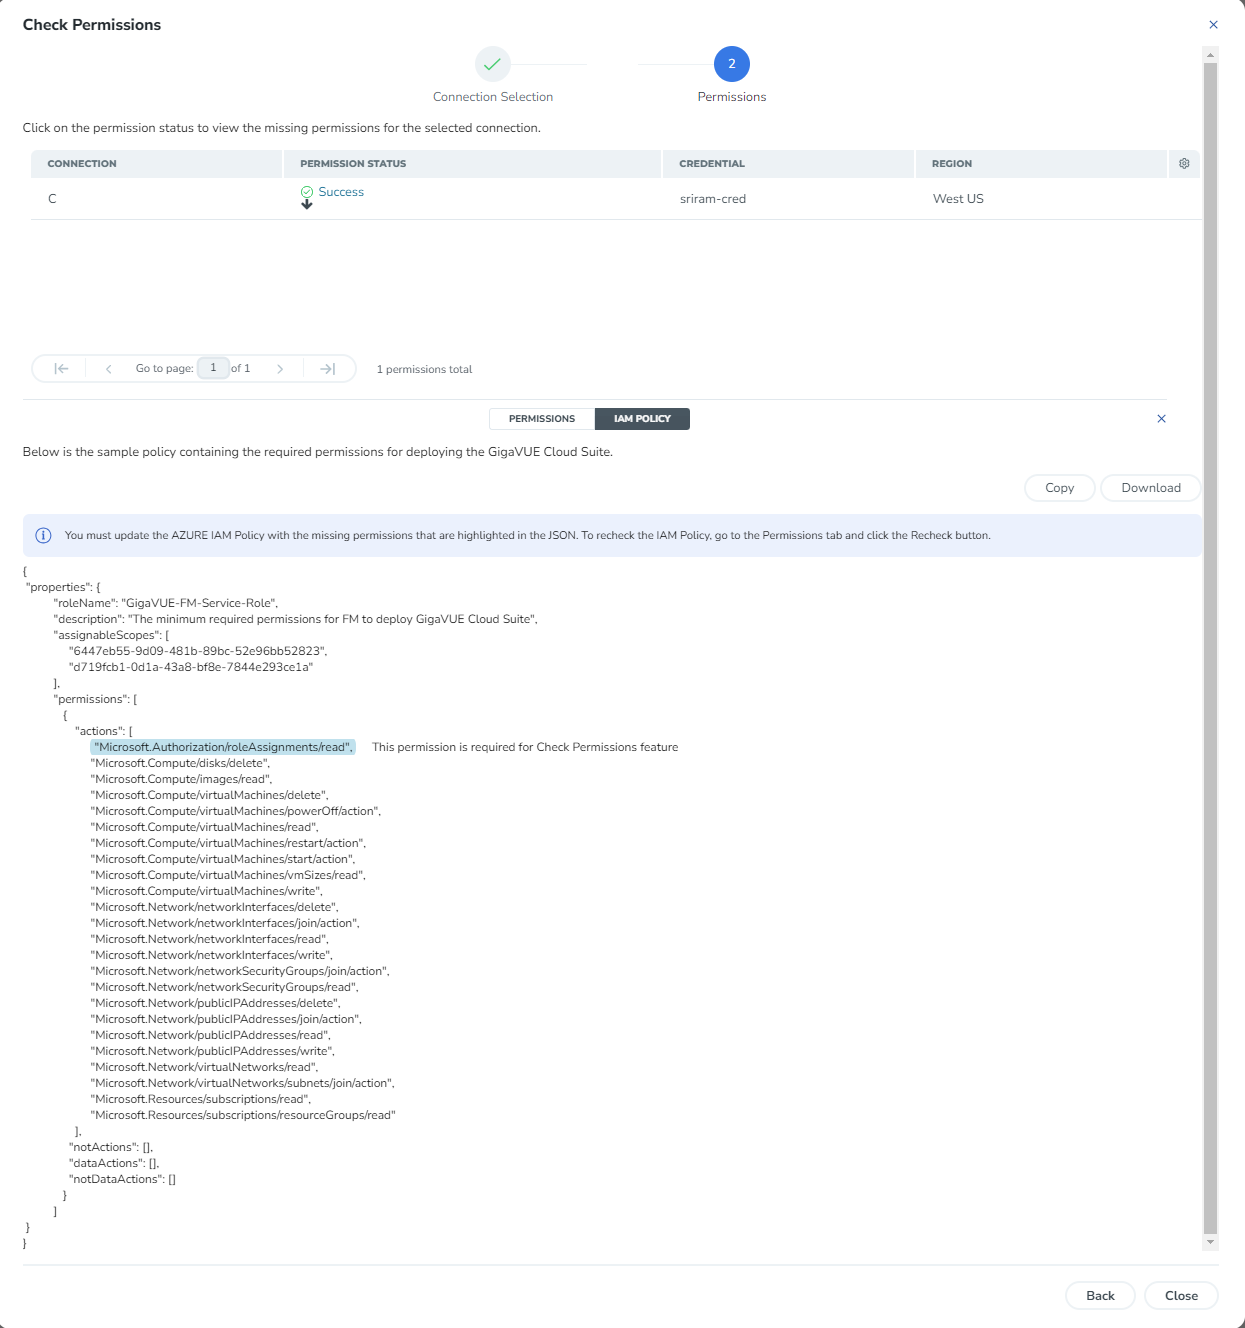
You can use the Copy button to copy the permissions to the clipboard. Also, you can use the Download button to download the permission in JSON format.
Note: After updating the IAM Policy, it takes around 5 minutes for the changes to reflect on the Check Permissions screen.


