Use NTP Time Server for Clock Synchronization
The GigaVUE node can optionally use one or more NTP servers for its time setting. Use the following procedure to add an NTP server to the GigaVUE node’s list and enable the use of NTP.
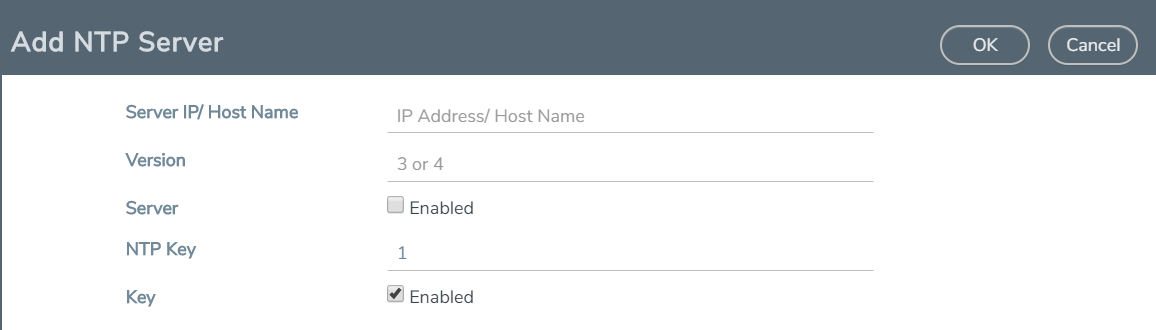
|
1.
|
Select Settings > Date and Time > NTP. |
|
2.
|
Click Add. The Add NTP Server page appears. |
|
3.
|
Specify the address of the time server in the Server IP/Host Name field. Provide the service details for which the device should be synced with the server for updating the clock time and date. |
You can specify an IPv4, IPv6, or hostname. To use IPv6 addresses, IPv6 must be enabled through the CLI. For more information, refer to the GigaVUE-OS CLI Reference Guide.
Note: There are many public NTP servers available on the Internet.
|
4.
|
Select the NTP version in the Version field. NTPv4 is an extension of NTPv3 that supports IPv4 and IPv6. |
|
5.
|
Select Enable to enable the server. If enabled the respective device will be synced with the NTP server to sync up the clock details. |
|
6.
|
Enter the NTP Key. The key is used to secure the exchange with an NTP time server. |
|
7.
|
Select Enable in the Key field to enable the Key. |
The GigaVUE node connects to the specified NTP server and synchronizes to its time. Also, NTP reports times in UTC. Because of this, it is a good idea to specify the GigaVUE HC Series node’s timezone so that UTC can be converted to the local timezone.
Clock Management Best Practice for devices connected to GigaVUE‑FM
Before adding a device to GigaVUE‑FM, you must set up the clock using NTP. Additionally, ensure that both GigaVUE‑FM and the connected devices are synchronized to the same clock to prevent the following issues:
|
■
|
GigaVUE‑FM and connected devices falling out of sync. |
|
■
|
License deletion due to clock fluctuations. |


