Entrust nShield and Thales-Luna Network HSM for TLS/SSL Decryption for Out-of-Band Tools(Passive)
Required License: Included with TLS/SSL Decryption for Out-of-Band Tools (Passive)
Starting in software version 5.3, Entrust nShield Hardware Security Module (HSM) is integrated with decryption for Out-of band Tools (Passive SSL/TLS Decryption). Hardware Security Modules (HSMs) are specialized systems that logically and physically safeguard cryptographic operations and cryptographic keys. HSMs protect sensitive data from being stolen by providing a highly secure operation structure. HSMs are comprehensive, self-contained solutions for cryptographic processing, key generation, and key storage. The hardware and firmware (i.e., software) required for these functions are automatically included in these appliances.
The application could be a web server or a database server, but, in the case of TLS/SSL decryption for out-of-band tools, the application is GigaSMART. The application interfaces with HSM to use the keys that are stored. There must be network connectivity between HSM and the application.
Keys are added to the HSM by an administrator. When an application’s key is on HSM, the HSM creates an application key token. The key token is sent to the application. When the application wants to use a key, the application sends the token to HSM, which establishes a session with HSM to use the key. In this way, the use of keys by the application is secure because only key tokens are exchanged.
You can use Remote File System (RFS), a component in the Entrust nShield HSM to store and manage encrypted keys. The RFS helps to automate the key distribution process. You can enable RFS on the GigaVUE‑OS device using GigaVUE‑FM so that the device can access the encrypted keys stored in RFS. You can synchronize RFS with GigaVUE‑OS device to perform a bulk download of the encrypted keys.
Starting from software version 6.8, decryption for Out-of band Tools (Passive SSL/TLS Decryption) is also enhanced to include the Thales-Luna Network HSM support.
Entrust nShield HSM is supported on GigaVUE‑HC1, GigaVUE‑HC3,Generation 3 GigaSMART card (SMT-HC1-S) and GigaVUE-HCT.
 Entrust nShield and Thales-Luna HSM for TLS/SSL Decryption for Out-of-Band Tools—Rules and Notes Entrust nShield and Thales-Luna HSM for TLS/SSL Decryption for Out-of-Band Tools—Rules and Notes
Keep in mind the following rules and notes before you configure and use HSM to store and manage keys:
|
■
|
GigaSMART uses keys that are already stored on the HSM. There is no key generation. |
|
■
|
The key token that is uploaded to GigaSMART can only be in PKCS11 format. |
|
■
|
Only RSA keys (private keys) are supported. |
|
■
|
When TLS/SSL Decryption for Out-of-Band Tools is configured with HSM, only one map and GigaSMART operations will function. If you configure with more than one map will result in undefined behavior. |
|
■
|
The network connectivity between the HSM and GigaSMART must use a static IP address. Do not use DHCP because the IP address needs to remain the same. |
Note: If the GigaSMART® engine is configured using DHCP, the following issues may arise:
1. Whenever a new DHCP IP is assigned to the GigaSMART® engine, the user must delete and re-create the ISSL App and deploy the solution.
2. Additionally, the user needs to register the new DHCP IP with the HSM server for client use.
|
■
|
Only IPv4 addresses are supported. |
|
■
|
Each GigaSMART card that interfaces with the Entrust nShield HSM will use one Entrust nShield license. |
|
■
|
Clustering is not supported. |
|
■
|
Increase the HSM timeout to 5000ms when using 4K size keys for decryption. |
|
■
|
When uploading RSA keys, validity check for protocol mismatch cannot be performed since the private keys are available on the HSM server. |
|
■
|
If a HSM Decryption deployment is modified follow the below steps: |
|
o
|
Move the Inline Network traffic path to bypass mode. |
|
o
|
Make the desired deployment change such as: |
|
•
|
From non-HSM based decryption to Thales-Luna HSM based decryption. |
|
•
|
From non-HSM based decryption to Entrust nShield HSM based decryption. |
|
•
|
From Entrust nShield HSM based decryption to Thales-Luna HSM based decryption. |
|
•
|
From HSM based decryption to non-HSM based decryption. |
|
o
|
Reboot the GigaSMART card. |
|
o
|
Move the Inline Network out of bypass mode to ‘To inline Tool’ mode. |
|
■
|
There should be at least one active Luna HSM in the High Availability to ensure that the decryption is not interrupted. |
|
■
|
Do not attempt to reload the device, if a partition fails in the Luna HSM configuration and at least one active partition is present. |
Configure HSM for TLS/SSL Decryption for Out-of-Band Tools
This section provides topics on how to configure and use HSM for TLS/SSL decryption for out-of-band tools:
Configure HSM Group
To configure an HSM group ,add at least one HSM appliance by specifying an alias, a static IP address, and port number. Obtain the ESN and KNETI from your HSM administrator.
To access GigaSMART within GigaVUE‑FM, access a device that has been added to GigaVUE‑FM from the GigaVUE‑FM interface. GigaSMART appears in the navigation pane of the device view on supported devices. Refer to the Access GigaSMART from GigaVUE‑FM for details.
To add an HSM appliance, do the following:
- From the device view, go to GigaSMART> Passive SSL > HSM Groups.
- Click New.
|
1
|
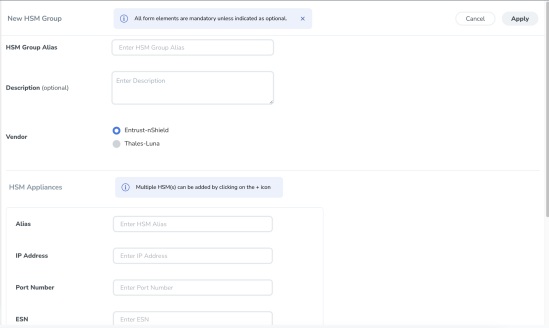
Adding a New HSM Appliance |
- Enter the details in the HSM Group Alias and Description fields under the New HSM Group section.
- Select the required vendor type from the options (Entrust-nShield or Thales-Luna) to create the respective HSM Group. By default, Entrust-nShield will be selected as the vendor type.
- Under the HSM Appliances section, in the Alias field, enter a name for the HSM appliance.
- Enter a valid IP address and Port Number.
Note: For Thales-Luna HSM Group , the port group by default is 1792.
- Configure the following fields for the vendor type Entrust-nShield:
|
a.
|
Enter the ESN (Electronic Serial Number) and KNETI that you obtained from the HSM administrator. |
|
b.
|
Choose one of the following methods to select the required key handler file: |
|
•
|
Install from URL—Enter a valid directory path including the file name and enter the password to access the server. |
Note: SCP, SFTP, HTTP, FTP, and TFTP are the supported protocols from where you can select the key handler file.
|
•
|
Install from Local Directory—Browse and select the key handler file from your local directory. |
- Configure the following fields for the vendor type Thales-Luna:
|
a.
|
Enter the valid username and password in the Server Username and Server Password fields. |
|
b.
|
Enter the valid details in the Partition Label and Partition Password fields. |
Click Apply.
Note: You cannot configure multiple HSM Groups for Passive SSL with HSM solution.
Configure Set Key Handler
|
1.
|
From the device view, go to GigaSMART > Passive SSL > HSM Groups. |
|
2.
|
Select the HSM appliance you just created. |
|
3.
|
Click Configure from the Actions drop down. |
|
4.
|
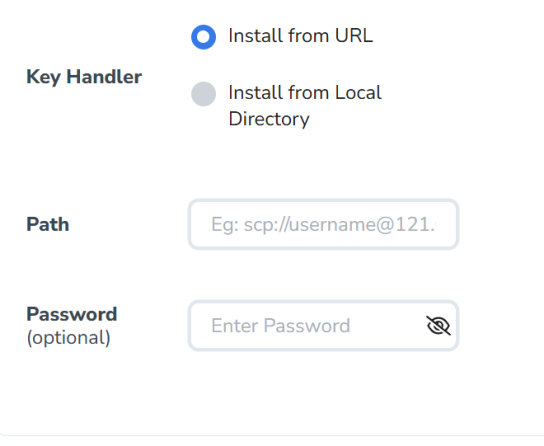
Choose one of the following methods to install the key handler file: |
|
o
|
Install from URL—Enter a valid directory path including the file name and enter the password to access the server. |
Note: SCP, SFTP, HTTP, FTP, and TFTP are the supported protocols from where you can select the key handler file.
|
o
|
Install from Local Directory—Browse and select the key handler file from your local directory. |
Note: Ensure that the file name is "world"
|
2
|
HSM-Configure Key Handler |
Note: Configuring Key Handler is not applicable for a Thales-Luna HSM group.
Configure Passive TLS/SSL Network Access
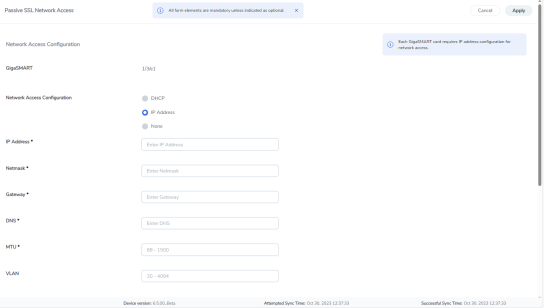
Each GigaSMART card requires IP address configuration for network access. To configure IP address details:
|
1.
|
From the device view, go to GigaSMART > Passive SSL > Network Access. |
|
2.
|
Select the GigaSMART appliance. |
|
4.
|
Select IP Address from the Network Access configuration options. |
Note: For the Thales Luna HSM group, it is preferable to use a static IP address to prevent the Thales Luna registration from expiring.
Note: If the IP address of the GigaSMART engine is changed, the GigaSMART engine needs a reboot to complete the HSM registration with the new IP address.
|
5.
|
Enter IP Address, Netmask, Gateway, DNS, MTU and VLAN parameters. |
|
6.
|
Select the required management interface. |
|
7.
|
Under the Ping Test section, select the GigaSMART port and enter the IP Address / Host Name and the Ping Test parameters. |
|
3
|
Passive TLS/SSL Network Access - IP Configuration |
Use RFS to Manage Encrypted Keys
Use Remote File System (RFS), a component in HSM to store and manage encrypted keys. The RFS helps to automate the key distribution process. You can enable RFS on the GigaVUE‑OS device using GigaVUE‑FM so that the device can access the encrypted keys stored in RFS. You can synchronize RFS with GigaVUE‑OS device to perform a bulk download of the encrypted keys.
Note: Remote File System is not applicable for Thales-Luna HSM.
Refer to the following sections:
Add RFS to GigaVUE‑OS Device
To add and synchronize RFS to the GigaVUE‑OS device:
|
1.
|
From the device view, go to GigaSMART > Passive SSL > RFS-Sync . |
|
2.
|
Select your HSM Group. |
|
3.
|
From the RFS section, select the RFS got to Actions>Sync to automatically synchronize the RFS with the GigaVUE‑OS device. |
|
4.
|
In the Sync Period field, enter the time interval for synchronization in hours. |
The details of the RFS, such as the IP address, sync period, last sync time, next sync time, and the total number of keys stored and managed in the RFS appears in the RFS section. Click the Show Details link next to the Total Keys column to view the key token and key name mapping for the encrypted keys stored in RFS.
You can choose to modify the fields for the RFS you have added. Select the RFS click on Actions > Edit .
Click Sync to manually synchronize the RFS and the GigaVUE‑OS device to fetch the latest encrypted keys from RFS at any point in time.
Map Encrypted Keys with Servers
A key name or a key token must be mapped to a server IP address. A total of up to 1000 key mappings is allowed per RFS. You can either manually map the keys with the servers or do a bulk key mapping using a text file. If a key mapping already exists, the new key mapping will be rejected. You must delete the existing key mapping to add the new mapping.
To map a key name or key token to a server IP address:
|
1.
|
From the device view, go to GigaSMART > Passive SSL > Key Mapping. |
|
2.
|
In the Key Mapping section, click Add. The Add Key Mapping page appears. |
|
3.
|
Choose one of the following types to map the keys with the server IP address: |
|
o
|
Manual—Manually map the key name or key token to the server IP address. You must keep adding the key mapping one at a time. |
|
o
|
From URL—Create a text file with the key mappings and upload it to a server. Enter a valid directory path including the text file name and enter the password to access the server. It is recommended to use a secure protocol, such as SCP or HTTPS to access the URL. |
|
o
|
From Local Directory—Create a text file with the key mappings and save the text file in your local directory. Browse and select the text file from your local directory. |
Configure a GigaSMART Group
Refer to the section GigaSMART Group for more details on GigaSMART Group.
To configure a GigaSMART group for passive TLS/SSL:
|
1.
|
From the device view, go to GigaSMART > GigaSMART Groups. |
|
3.
|
In the Alias field, enter a name for the GigaSMART group that you are creating for Passive TLS/SSL. |
|
4.
|
From the Port List drop-down list, select the required port you want to associate with this group. |
|
5.
|
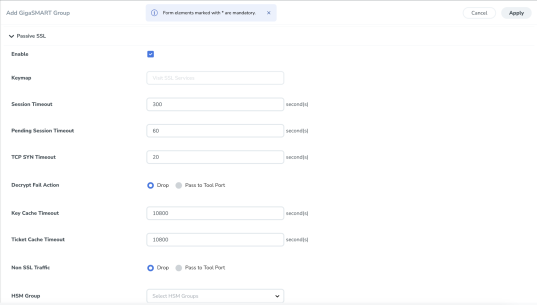
Scroll down to the GigaSMART Parameters > Passive SSL> HSM Group section of the page, and then select the required HSM Group from the drop-down list. |
|
4
|
GigaSMART Group Setup Page |
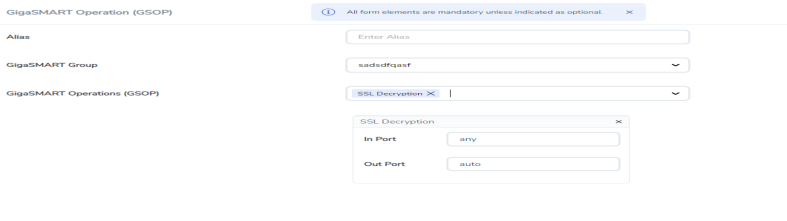
Create a GigaSMART Operation (GSOP)
Refer to the section GSOP for more details on GigaSMART Operation.
To create a GigaSMART operation with an TLS/SSL Decryption component:
|
1.
|
From the device view, go to GigaSMART > GigaSMART Operations (GSOP) > GigaSMART Operation. |
|
3.
|
In the Alias field, enter a name for the GigaSMART operation. |
|
4.
|
From the GigaSMART Group drop-down list, select the GigaSMART group that you have created for passive TLS/SSL. |
|
5.
|
From the GigaSMART Operations (GSOP) drop-down list, select SSL Decryption. |
|
5
|
GigaSMART Operations - Setup Page |
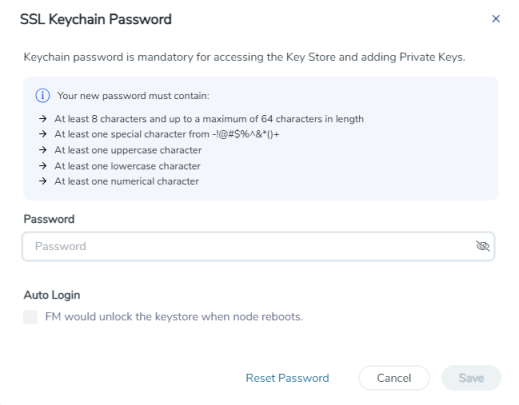
Create TLS/SSL Keychain Password
Before uploading keys or configuring TLS/SSL, you must create an TLS/SSL keychain password. The password is used to encrypt the private keys that you upload to the node.
Note: When uploading TLS/SSL keys, make sure that you are not creating a duplicate key (adding same key with different key alias). Adding a duplicate key can cause errors.
To create an TLS/SSL keychain password:
|
1.
|
From the device view, go to GigaSMART > Passive SSL > Key Store. |
|
2.
|
Click Keychain Password from the Actions drop down list. |
|
6
|
SSL Keychain Password Setup Page |
|
3.
|
In the Password field, enter a valid password. Ensure that the password meets the following specifications: |
|
o
|
Password must be at least eight (8) characters in length. |
|
o
|
Password must contain at least one: |
|
4.
|
Click on the Auto Login check box to allow GigaVUE-OS and GigaVUE‑FM to unlock the keystore when the node reboots. |
Upload TLS/SSL Private Keys
To upload an TLS/SSL private key:
|
1.
|
From the device view, go to GigaSMART >Passive SSL > Key Store to open the Key Store page. |
|
2.
|
Click Add. The SSL Key page appears. |
|
3.
|
In the Alias field, enter a name for the SSL key. |
|
4.
|
Select the Key Upload Type from the options PEM, PKCS12, Entrust nShield, Luna-HSM. |
|
a.
|
Passphrase- SSH passphrases allows you to protect your private key from being used without the passphrase. Enter the passphrase created with the private key. |
|
b.
|
Private key- Enter the Private Key using any of the following options:
|
|
•
|
Install from Local Directory |
|
c.
|
Certificate- Enter the Certificate using any of the following options: |
|
•
|
Install from Local Directory |
|
d.
|
Key Label - The Key label that is imported from the HSM server. This field is applicable when you configure Thales-Luna HSM. |
Note: Ensure that Luna key labels match the correct certificate and decryption keys when using the default service in Passive SSL.
|
e.
|
Path and Password- Configure the file path and password if you select 'Install form URL', or else choose the file if you select 'Install form Local directory'. The supported protocols are HTTP, HTTPS, FTP, TFTP, SCP, and SFTP. |
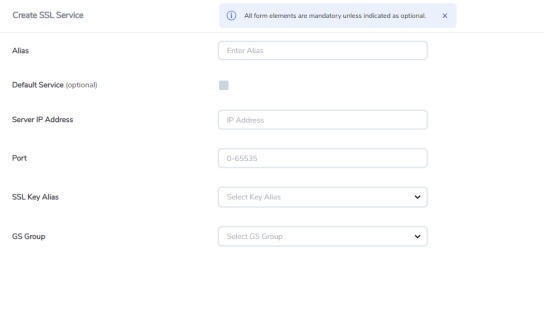
Configure TLS/SSL Service
After you have uploaded a private key, you can add a service. A service maps to a physical server, such as an HTTP server. One server can run multiple services. A service is a combination of an IP address and a server port number. Also, the key and the service must be tied together.
To create an TLS/SSL service:
|
1.
|
From the device view, go to GigaSMART > Passive SSL > SSL Services. |
|
2.
|
Click New. The SSL Service page appears. |
|
3.
|
In the Alias field, enter a name for the SSL service. |
|
4.
|
Map the TLS/SSL service to a server IP address and a server port using one of the following methods: |
|
o
|
Select the Enabled check box next to the Default Service field to dynamically map the server IP address and server port. |
Note: If you select the Enabled check box, the Server IP Address and Server Port fields are disabled.
|
o
|
In the Server IP Address and Server Port fields, enter an IP address and port to which you want to map the TLS/SSL service. |
|
5.
|
From the SSL Key Alias drop-down list, select the name of the SSL Key previously uploaded. |
|
6.
|
From the GS Group drop-down list, select the GigaSMART group with TLS/SSL decryption enabled to associate with this TLS/SSL service. |
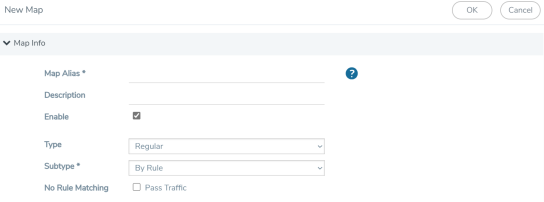
Configure Maps
|
1.
|
From the device view, go to Traffic> Maps > Maps. |
|
o
|
Type map11 in the Alias field. |
|
o
|
Select Regular for Type. |
|
o
|
Select ByRule for Subtype. |
|
o
|
Select the network port for the Source. |
|
o
|
Select Tool port/Hybrid port for Destination. |
|
4.
|
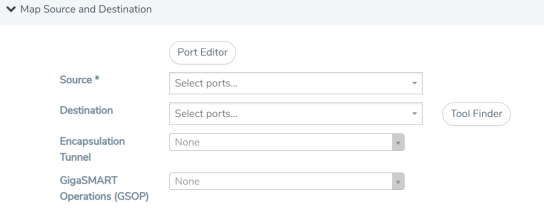
Add Configuration & Rules. |
|
10
|
Figure 20-123: Map Details - Create Rule |
|
a.
|
Under Configurations, select the Apply to All Traffic check box to rewrite the address. |
|
b.
|
Select the address from the drop-down list. |
|
c.
|
Under Map Rules, Click Add a Rule. |
|
d.
|
Select Pass as condition. |
|
e.
|
Select IPv4 Version and set Version to v4. |
To view the configured Thales-Luna HSM Group status, select the Thales Luna profile> Action> Diagnostic. You can view the statistics of the below components:
-
Ping Result
-
Verify
-
High Availability
-
Luna Key Label
|
|


