Acquire Traffic using Traffic Mirroring with Network Load Balancer
This section outlines the workflow for acquiring traffic using Traffic Mirroring with Network Load Balancer. Refer to the following topics for instruction on configuring traffic acquisition, processing, and forwarding to your desired destination.
Note: When GigaVUE‑FM and the workload VMs requiring monitoring are in different AWS accounts, you must configure a load balancer. For steps to configure, refer to Acquire Traffic using Traffic Mirroring with Network Load Balancer or Acquire Traffic using Traffic Mirroring with Gateway Load Balancing for configuration steps.
- Install GigaVUE-FM on AWS
- Configure the permissions required in AWS
- Create the AWS Credentials
- Configure Network Load Balancer and deploy GigaVUE V Series Nodes
- Configure and Deploy Monitoring Session
Install GigaVUE-FM on AWS
This step is optional and applies only when an existing GigaVUE-FM instance is not available.
Refer to Install GigaVUE-FM on AWS for steps to install GigaVUE‑FM on AWS and the steps to start GigaVUE‑FM instance and configure it.
Configure the permissions required in AWS
If you are using inline policy or basic authentication, then you must update the policy with the relevant IAM service. For more information, see Minimum Permissions Required for Inline Policies and Basic Authentication.
These are the minimum permissions that are required to acquire traffic using Traffic Mirroring with Network Load Balancer and authenticate using an IAM instance role.
{
    "Version": "2012-10-17",
    "Statement": [
        {
            "Sid": "VisualEditor0",
            "Effect": "Allow",
            "Action": [
                "autoscaling:DescribeAutoScalingGroups",
                "elasticloadbalancing:DescribeLoadBalancers",
                "elasticloadbalancing:DescribeTargetGroups",
                "elasticloadbalancing:RegisterTargets",
                "elasticloadbalancing:DeregisterTargets",
                "elasticloadbalancing:DescribeTargetHealth",
                "ec2:DescribeVpcs",
                "ec2:DescribeSubnets",
                "ec2:DescribeInstances",
                "ec2:DescribeInstanceTypes",
                "ec2:DescribeAddresses",
                "ec2:DescribeKeyPairs",
                "ec2:DescribeSecurityGroups",
                "ec2:CreateTags",
                "ec2:DeleteTags",
                "ec2:DescribeImages",
                "ec2:DescribeVolumes",
                "ec2:CreateTrafficMirrorFilterRule",
                "ec2:CreateTrafficMirrorTarget",
                "ec2:CreateTrafficMirrorSession",
                "ec2:CreateTrafficMirrorFilter",
                "ec2:DeleteTrafficMirrorTarget",
                "ec2:DeleteTrafficMirrorSession",
                "ec2:DeleteTrafficMirrorFilter",
                "ec2:DescribeTrafficMirrorSessions",
                "ec2:DescribeTrafficMirrorTargets",
                "ec2:DescribeTrafficMirrorFilters",
                "ram:CreateResourceShare",
                "ram:DeleteResourceShare",
                "ram:GetResourceShareInvitations",
                "ram:AcceptResourceShareInvitation",
                "ram:DisassociateResourceShare",
                "iam:GetPolicyVersion",
                "iam:GetPolicy",
                "iam:ListAttachedRolePolicies",
                "iam:ListRolePolicies",
                "iam:ListAccountAliases",
                "kms:GenerateDataKeyWithoutPlaintext",
                "kms:ListAliases",
            ],
            "Resource": "*"
        }
    ]
}
For more information regarding policies and permissions, refer to AWS Documentation.
If you are using inline policy or basic authentication, then you must update the policy with the relevant IAM service. For more information, see GigaVUE-FM Instance Multi Account Support Using Amazon STS.
Create the AWS Credentials
You can monitor workloads across multiple AWS accounts within one Monitoring Domain.
- After launching GigaVUE‑FM in AWS, if the IAM is attached to the running instance of FM, then the EC2 Instance Role authentication credential is automatically added to the Credential page as the default credential. You must attach the IAM prior to creating a Monitoring Domain.
- If you use the Basic Credentials authentication credentials, you must add these to the GigaVUE‑FM on the AWS Settings page, or on the Monitoring Domain creation page.
For details, refer to Create a Monitoring Domain.
To create AWS credentials:
- Go to Inventory > VIRTUAL > AWS, and select Settings > Credentials
- On the Credential page, select Add. The Credential Configure page appears.
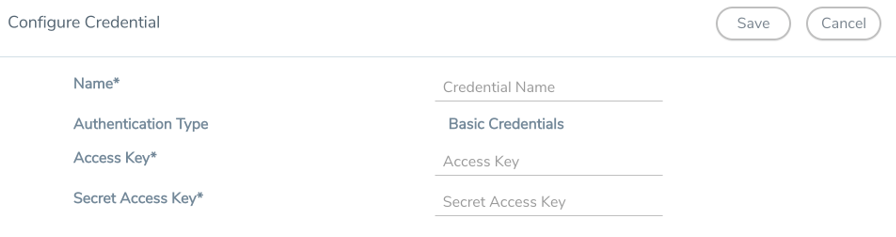
- Enter a name to identify the AWS Credential in the Name Field.
- Basic Credentials is selected as the default Authentication Type. For more information, refer to AWS Security Credentials
- Enter the credential of an IAM user or the AWS account root user in the Access Key field.
- Enter the security password or key in the Secret Access Key field.
- Select Save. You can view the list of available credentials on the AWS Credential page.
Configure Network Load Balancer and deploy GigaVUE V Series Nodes
You can configure an external Network Load Balancer (NLB) in AWS for GigaVUE Cloud Suite.
Prerequisites
- Create or update Security Group policies of GigaVUE Cloud Suite components. For details, refer to Security Group.
- Create or update routes in various VPCs across participating mirrored AWS accounts so that all mirrored account VPCs can connect to the target account VPC where the AWS Network Load Balancer is deployed.
Note: GigaVUE‑FM considers the target account VPC as the centralized VPC. Use the connections towards all other mirrored account VPCs either through 1 : 1 VPC peering or via 1 : M transit gateway (that connects all participating VPCs across mirrored AWS accounts). VPC peering has no bandwidth limitation and no additional cost within the same region (recommended). Transit gateway costs more and also has a limitation of 50 Gbps burst per VPC.
- Create or update existing IAM role for GigaVUE‑FM in the centralized VPC. In addition, you need to create trust relationship between the mirrored and the target account for GigaVUE‑FM to execute the above permissions at the IAM role level. For details, refer to Permissions and Privileges (AWS).
- When configuring Network Load Balancer, you need to deploy the GigaVUE V Series Nodes using Third Party Orchestration.
- You need to configure Token \in the User Management page. For details, refer to Configure Tokens.
Perform the following steps to configure an external network load balancer in AWS:
- Create a Target Group
- Create a Load Balancer
- Create a Launch Template for Auto Scaling group
- Create an Auto Scaling group using a Launch Template
Create a Target Group
Enter or select the following details to configure target groups in AWS.
|
Parameters |
Description |
Reference |
Mandatory field |
|---|---|---|---|
|
Basic Configuration |
|||
|
Choose a target type |
Select IP address as the target type |
Create a target group for your Network Load Balancer
|
Yes |
|
Protocol |
Select UDP as the protocol from the drop-down list |
Yes |
|
|
Port |
Enter 4789 as the port value |
Yes |
|
|
Health Checks |
|||
|
HealthCheckProtocol |
Select TCP as the protocol. |
Health checks for Network Load Balancer target groups
|
Yes |
|
HealthCheckPort |
Enter 8889 as the port. |
Yes |
|
|
HealthCheckIntervalSeconds |
Enter 10 seconds as the approximate amount of time, in seconds. |
Yes |
|
Create a Load Balancer
Enter or select the following details to configure a load balancer in AWS.
|
Parameters |
Description |
Reference |
Mandatory field |
|---|---|---|---|
|
Basic Configuration |
|||
|
Scheme |
Select Internal as the scheme for the load balancer |
Yes |
|
|
Network Mapping |
|||
|
VPC |
Select the VPC for your targets (GigaVUE V Series Node) |
Yes |
|
|
Listeners and routing |
|||
|
Protocol |
Select UDP as the protocol. |
Yes |
|
|
Port |
Enter 4789 as the port. |
Yes |
|
Create a Launch Template for Auto Scaling group
Enter or select the following details to create a launch template for auto scaling groups in AWS.
|
Parameters |
Description |
Reference |
Mandatory field |
|---|---|---|---|
|
Launch Template contents |
|||
|
Application and OS Images (Amazon Machine Image) |
Select the AMI of the GigaVUE V Series Node. |
Create a launch template for an Auto Scaling group
|
Yes |
|
Instance type |
Select t3a.xlarge as the instance type. |
Yes |
|
|
Key pair name |
Select a Key pair for the instance. |
Yes |
|
|
Network Settings |
|||
|
Device Index |
Add 2 Network Interfaces for the GigaVUE V Series Node with device index as 0 and 1 (mgmt and data interface respectively) and for the interfaces, |
Create a launch template for an Auto Scaling group
|
Yes |
|
Firewall (security groups) |
Keep this blank and configure one or more security groups as part of the network interface. |
Yes |
|
|
Advanced Settings |
|||
|
Advanced details |
Enter the User data as text in the following format and deploy the instance. The GigaVUE V Series Nodes uses this user data to generate config file (/etc/gigamon-cloud.conf) used to register with GigaVUE‑FM using Third Party Orchestration. Copy
|
Yes |
|
Create an Auto Scaling group using a Launch Template
Enter or select the following details to create an auto scaling group and launch the fabric components using the launch template in AWS.
In the Instances page, you can view the GigaVUE V Series Node instance that the load balancer deployed.
Configure and Deploy Monitoring Session
In GigaVUE-FM, you must do the following to configure and deploy the Monitoring Session. Refer to Configure Monitoring Session section for more details.
| 1. | Access the Monitoring Session Page: |
| a. | In GigaVUE-FM, go to Traffic > Virtual > Orchestrated Flows > AWS. |
| b. | After creating a new Monitoring Session or on an existing Monitoring Session, navigate to the TRAFFIC PROCESSING tab. The GigaVUE-FM Monitoring Session canvas page appears. |
| 2. | Add components to the canvas: |
| a. | Drag and drop the required components to the canvas. |
| b. | From the Applications expand menu, drag and drop the required applications to the graphical workspace. |
| 3. | Deploy the Monitoring Session: |
| a. | From the Actions menu, select Deploy. |
| b. | After successful deployment on all the V Series Nodes, the status appears as Success on the Monitoring Sessions Sources tab. |
What to do Next
You can view the detailed statistics of an individual traffic processing element in the TRAFFIC PROCESSING tab. For more details, refer to View Monitoring Session Statistics (AWS).
 MORE INFORMATION


