Acquire Traffic using UCT-V - GigaVUE-FM Orchestration
This section outlines the workflow to acquire traffic with UCT-V and deploy GigaVUE Fabric Components using GigaVUE-FM. Refer to the following topics for instructions on configuring traffic acquisition, processing, and forwarding to your desired destination.
- Install GigaVUE-FM on AWS
- Configure the permissions required in AWS
- Create the AWS Credentials
- Install UCT-Vs
- Create a Monitoring Domain
- Deploy GigaVUE Fabric Components in GigaVUE‑FM
- Configure and Deploy Monitoring Session
Install GigaVUE-FM on AWS
This step is optional and applies only when an existing GigaVUE-FM instance is not available.
Refer to Install GigaVUE-FM on AWS for steps to install GigaVUE‑FM on AWS and the steps to start GigaVUE‑FM instance and configure it.
Configure the permissions required in AWS
If you are using inline policy or basic authentication, then you must update the policy with the relevant IAM service. For details, see Minimum Permissions Required for Inline Policies and Basic Authentication.
These are the minimum permissions that are required to acquire traffic using the UCT-V and authenticate using an IAM instance role.
{
    "Version": "2012-10-17",
    "Statement": [
        {
            "Sid": "VisualEditor0",
            "Effect": "Allow",
            "Action": [
                "ec2:CreateTags",
                "ec2:DeleteTags",
                "ec2:RunInstances",
                "ec2:TerminateInstances",
                "ec2:AssociateAddress",
                "ec2:DisassociateAddress",
                "ec2:DescribeImages",
                "ec2:DescribeInstances",
                "ec2:DescribeInstanceTypes",
                "ec2:DescribeVpcs",
                "ec2:DescribeSubnets",
                "ec2:DescribeKeyPairs",
                "ec2:DescribeSecurityGroups",
                "ec2:DescribeVolumes",
                "ec2:DescribeAddresses",
                "ec2:RebootInstances",
                "ec2:StartInstances",
                "ec2:StopInstances",
                "iam:GetPolicyVersion",
                "iam:GetPolicy",
                "iam:ListAttachedRolePolicies",
                "iam:ListAccountAliases",
                "iam:ListRolePolicies",
                "kms:ListAliases",
                "kms:GenerateDataKeyWithoutPlaintext"

            ],
            "Resource": "*"
        }
    ]
}
For more information regarding policies and permissions, refer to AWS Documentation.
Create the AWS Credentials
You can monitor workloads across multiple AWS accounts within one Monitoring Domain.
- After launching GigaVUE‑FM in AWS, if the IAM is attached to the running instance of FM, then the EC2 Instance Role authentication credential is automatically added to the Credential page as the default credential. You must attach the IAM prior to creating a Monitoring Domain.
- If you use the Basic Credentials authentication credentials, you must add these to the GigaVUE‑FM on the AWS Settings page, or on the Monitoring Domain creation page.
For details, refer to Create a Monitoring Domain.
To create AWS credentials:
- Go to Inventory > VIRTUAL > AWS, and select Settings > Credentials
- On the Credential page, select Add. The Credential Configure page appears.
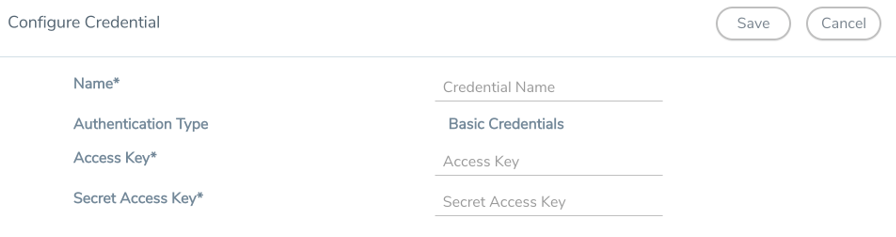
- Enter a name to identify the AWS Credential in the Name Field.
- Basic Credentials is selected as the default Authentication Type. For more information, refer to AWS Security Credentials
- Enter the credential of an IAM user or the AWS account root user in the Access Key field.
- Enter the security password or key in the Secret Access Key field.
- Select Save. You can view the list of available credentials on the AWS Credential page.
Install UCT-Vs
You can install UCT-V on both Linux and Windows environments. For details, refer to the following topics:
Note: If you want to avoid downloading and installing the UCT-Vs every time there is a new instance to be monitored, you can save the UCT-V running on an instance as a private AMI.
To save the UCT-V as an AMI from your EC2 console, right click on the instance and navigate to Image and Templates > Create Image.
Linux UCT-V Installation
You can install UCT-V on various Linux distributions using Debian or RPM packages.
You must have sudo/root access to edit the UCT-V configuration file. Establish an SSH connection to the virtual machine and ensure you have permission to execute the sudo command.
You may need to modify the network configuration files for dual or multiple network interface configurations to ensure that the extra NIC/Network interface initializes at boot time.
Refer to the following sections:
Prerequisites
- UCT-V is a standalone service. By default, most modern Linux operating systems come pre-installed with all the necessary packages for the UCT-V to function without additional configuration.
-
Before registering Linux UCT-V, you should generate a token and place it in the /etc/gigamon-cloud.conf configuration file. Refer to Configure Tokens.
Linux Network Firewall Requirements
If Network Firewall requirements or security groups are configured in your environment, you must open the following ports for the virtual machine. For details, refer to Network Firewall Requirement for GigaVUE Cloud Suite.
|
Direction |
Port |
Protocol |
CIDR |
Purpose |
|---|---|---|---|---|
|
Inbound |
9902 |
TCP |
UCT-V Controller IP |
Allows UCT-V to receive control and management plane traffic from UCT-V Controller |
You can use the following commands to add the Network Firewall rule.
sudo firewall-cmd --add-port=9902/tcp
sudo firewall-cmd --runtime-to-permanent
Install Linux UCT-Vs
You must have sudo/root access to edit the UCT-V configuration file. Establish an SSH connection to the virtual machine and ensure you have permission to execute the sudo command.
You may need to modify the network configuration files for dual or multiple network interface configurations to ensure that the extra NIC/Network interface initializes at boot time.
You can install the UCT-Vs either from Debian or RPM packages using one of the following options:.
| Install Linux UCT-Vs using Installation Script |
| Install Linux UCT-Vs using Manual Configuration |
Refer to the following sections for more detailed information and step-by-step instructions.
Install Linux UCT-Vs using Installation Script
Using installation script, you can complete installation.
Perform the following steps:
- To install UCT-V from Ubuntu/Debian:
a. Download the UCT-V 6.11.00Debian (.deb) package from the Gigamon Customer Portal. For assistance, contact Contact Technical Support.b. Copy this package to your instance and Install the package with root privileges. For example, $ ls gigamon-gigavue-uctv-6.11.00-amd64.deb$ sudo dpkg -i gigamon-gigavue-uctv-6.11.00-amd64.deb - To install UCT-V from RPM, Red Hat Enterprise Linux, and CentOS:
a. Download the UCT-V 6.11.00RPM (.rpm) package from the Gigamon Customer Portal. For assistance, contact Contact Technical Support.b. Copy this package to your instance and install the package with root privileges. For example, $ ls gigamon-gigavue-uctv-6.11.00-x86_64.rpm$ sudo rpm -i gigamon-gigavue-uctv-6.11.00-x86_64.rpm
- Use the command given below to perform pre-check, installation, and configuration functionalities.
sudo uctv-wizardNote: The installation script is not provided with the Debian or RPM packages. You can use the script (installation_wizard.sh/uctv-wizard) only after the UCT-V is installed.
Refer to the table below to know more about uctv-wizard command usage options and functionalities:
Options
Use Command
Description
pre-check
sudo uctv-wizard pre-check
Checks the status of the required packages and firewall requirements.
If any package is missing, it displays an appropriate message with the missing package details.
If installation includes all the packages, it displays a success message indicating that UCT-V is ready for configuration.
pkg-install
sudo uctv-wizard pkg-install
Note: The uctv-wizard install command requires access to a repository, either public (internet-based) or local, that hosts prerequisite packages for installation. If no repository is accessible, you must manually install the required packages. Refer to Acquire Traffic using UCT-V - GigaVUE-FM Orchestration.
Displays the missing package and version details. To proceed with the installation, you can choose between the following:
If you wish to skip the prompts and proceed with the system update, enter your option as y. The console interface installs the missing packages and restarts the UCT-V service.
Enter N if you wish to install it manually. For details, refer to Install Linux UCT-Vs using Manual Configuration.
configure
sudo uctv-wizard configure
First, it checks for any existing configured file in the tmp directory (file named gigamon-cloud.conf in the C:\Users\<username>\AppData\Local location). If available, UCT-V uses that configuration.
If unavailable, UCT-V automatically adds the interface configuration in uctv.conf file, excluding the loopback (lo) interface, with all permissions enabled (source ingress, source egress, and destination).
You can add the required policy for the available port if a firewall is installed.
If you wish to skip the prompts to add the required firewall policy, enter your option as y. The console interface adds the firewall rules automatically.
Enter N if you wish to configure manually. For details, refer to Install Linux UCT-Vs using Manual Configuration section.
uninstall
sudo uctv-wizard uninstall
Automatically stops the UCT-V service, removes the firewall rules, and uninstalls the UCT-V.
| Use the command below to view all the log messages generated from uctv-wizard. These log messages are stored at /var/log/uctv-installation.log |
sudo vi /var/log/uctv-installation.log
| Use the command below to know the usage descriptions for the individual operations. |
sudo uctv-wizard help
Linux UCT-V Installation Scenarios
- Zero Touch Installation - When using a cloud-integrated script to deploy UCT-V in a virtual machine, no interference is required as the script installs and configures everything automatically.
- One Touch Installation - When using .deb or .rpm packages with all prerequisite packages in place, UCT-V determines that all dependencies are met. It performs auto-configuration and restarts the service.
- Two Touch Installation - When using .deb or .rpm packages with missing prerequisite packages, the platform displays a warning message about the missing packages. You need to install the missing packages using the sudo uctv-wizard pkg-install command.
Install Linux UCT-Vs using Manual Configuration
- Install UCT-V from Ubuntu/Debian Package
- Install UCT-V from RPM, Red Hat Enterprise Linux, and CentOS
 Install UCT-V from Ubuntu/Debian Package
To install from a Debian package:
- Download the UCT-V
6.11.00Debian (.deb) package from the Gigamon Customer Portal. For assistance contact Contact Technical Support. - Copy this package to your instance.
- Install the package with root privileges. For example,
$ ls gigamon-gigavue-uctv-6.11.00-amd64.deb$ sudo dpkg -i gigamon-gigavue-uctv-6.11.00-amd64.deb - Modify the file /etc/uctv/uctv.conf to configure and register the source and destination interfaces.
The following examples registers eth0 as the mirror source for both ingress and egress traffic and eth1 as the destination for this traffic:Note: When you have an active, successful monitoring session deployed, any modification to the UCT-V config file made after the initial setup requires a UCT-V restart and an inventory refresh or sync from GigaVUE‑FM to pick up the new changes and re-initiate the traffic mirroring. GigaVUE‑FM does a periodic sync on its own every 15 minutes.
Example 1—Configuration example to monitor ingress and egress traffic at interface eth0 and use the same interface to send out the mirrored packets
# eth0 mirror-src-ingress mirror-src-egress mirror-dstExample 2—Configuration example to monitor ingress and egress traffic at interface eth0 and use the interface eth1 to send out the mirrored packets
# eth0 mirror-src-ingress mirror-src-egress# eth1 mirror-dstExample 3—Configuration example to monitor ingress and egress traffic at interface eth0 and eth 1; use the interface eth1 to send out the mirrored packets
# eth0 mirror-src-ingress mirror-src-egress# eth1 mirror-src-ingress mirror-src-egress mirror-dstExample 4—Configuration example to monitor ingress traffic at iface 'eth0' and egress traffic at iface 'eth1' and use iface 'eth2' to transmit the mirrored packets.
# eth0 mirror-src-ingress# eth1 mirror-src-egress# eth2 mirror-dstExample 5—Configuration example to monitor traffic at iface 'lo' that is always registered as bidirectional traffic regardless of the config and use iface 'eth0' to transmit the mirrored packets.
# lo mirror-src-ingress mirror-src-egress# eth0 mirror-dstNote: Ensure that the configuration for a single interface is provided on a single line.
- Save the file.
- Restart the UCT-V service.
$ systemctl restart uctv.service
The UCT-V status is displayed as running. Verify the status using the following command:
$ systemctl status uctv.service
Install UCT-V from RPM, Red Hat Enterprise Linux, and CentOS
To install from an RPM (.rpm) package on a RedHat, CentOS, or other RPM-based system:
- Download the UCT-V
6.11.00RPM (.rpm) package from the Gigamon Customer Portal.
For assistance contact Contact Technical Support. - Copy this package to your instance.
- Install the package with root privileges. For example,
$ ls gigamon-gigavue-uctv-6.11.00-x86_64.rpm$ sudo rpm -i gigamon-gigavue-uctv-6.11.00-x86_64.rpm - Modify the /etc/uctv/uctv.conf file to configure and register the source and destination interfaces.
The following example registers the eth0 as the mirror source for both ingress and egress traffic and registers eth1 as the destination for this traffic as follows:Note: When you have an active, successful monitoring session deployed, any changes to the UCT-V config file made after the initial setup require an UCT-V restart and an inventory refresh or sync from GigaVUE-FM to pick up the new changes and re-initiate the traffic mirroring. GigaVUE-FM does a periodic sync on its own every 15 minutes.
Example 1—Configuration example to monitor ingress and egress traffic at interface eth0 and use the same interface to send out the mirrored packets
# eth0 mirror-src-ingress mirror-src-egress mirror-dstExample 2—Configuration example to monitor ingress and egress traffic at interface eth0 and use the interface eth1 to send out the mirrored packets
# eth0 mirror-src-ingress mirror-src-egress# eth1 mirror-dstExample 3—Configuration example to monitor ingress and egress traffic at interface eth0 and eth 1; use the interface eth1 to send out the mirrored packets
# eth0 mirror-src-ingress mirror-src-egress# eth1 mirror-src-ingress mirror-src-egress mirror-dstExample 4—Configuration example to monitor ingress traffic at iface 'eth0' and egress traffic at iface 'eth1' and use iface 'eth2' to transmit the mirrored packets.
# eth0 mirror-src-ingress# eth1 mirror-src-egress# eth2 mirror-dstExample 5—Configuration example to monitor traffic at iface 'lo' that is always registered as bidirectional traffic regardless of the config and use iface 'eth0' to transmit the mirrored packets.
# lo mirror-src-ingress mirror-src-egress# eth0 mirror-dstNote: Ensure that the configuration for a single interface is provided on a single line.
- Save the file.
- Restart the UCT-V service.
$ sudo service uctv restart
The UCT-V status is displayed as running. Verify the status with the following command:
$ sudo service uctv status
| When UCT-V fails to start due to a “start-limit-hit” (caused by repeated restarts within 10 minutes), you should correct the underlying issue first. To clear the failure and allow UCT-V to restart, run the following command: |
sudo systemctl reset-failed uctv.service
| After installing UCT-V, refer to Deploy Fabric Components using Generic Mode for platform specific information to configure UCT-V using Third Party Orchestration. |
Post Deployment Check:
After installing UCT-V, you can perform the following to verify the version of UCT-V:
-
Enter the command:
sudo uctvl uctv-show
-
Manually execute the following command:
export LD_LIBRARY_PATH=/usr/lib/uctv/ssl-lib64/
Register Linux UCT-V
It is mandatory to create a cloud configuration file and add the token to authenticate the UCT-V package with GigaVUE‑FM. The token is required only for initial registration before generating the certificate. You can use the token only once and do not need to maintain.
You can register UCT-V in your virtual machine using:
-
GigaVUE-FM Orchestration: Perform the following steps:
-
Log in to the UCT-V.
-
Create a local configuration file and enter the following user data. /etc/gigamon-cloud.conf is the local configuration file in the Linux platform.
CopyRegistration:
token: <Enter the token created in GigaVUE-FM> -
Restart the UCT-V service.
- Linux platform:
$ sudo service uctv restart
- Linux platform:
For more details on how to create tokens, refer to Configure Tokens.
-
Note: If you have already configured gigamon-cloud.conf file in the /tmp directory, you can directly use the uctv-wizard configure command (sudo uctv-wizard configure). This action automatically fetches the configuration file and completes the registration process.
Windows UCT-V Installation
Windows UCT-V allows you to select the network interfaces by subnet/CIDR and modify the corresponding monitoring permissions in the configuration file. This options helps you get granular control over the monitored and mirrored traffic.
Refer to the following sections for the Windows UCT-V installation:
Windows Network Firewall Requirements
If your environment uses network firewall rules or security groups, you must open specific ports for the virtual machine. For details, refer to Network Firewall Requirement for GigaVUE Cloud Suite.
Ensure to use UCT-V Wizard with the configure option to configure Windows local firewall rules. Refer to Install Linux UCT-Vs using Installation Script for more details.
Install Windows UCT-Vs
Rules and Notes:
-
VXLAN is the only tunnel type supported for Windows UCT-V.
- Loopback Interface is not supported for Windows UCT-V.
-
Before registering Windows UCT-V, generate a token and place it in the C:\ProgramData\uctv\gigamon-cloud.conf configuration file. Refer to Configure Tokens.
-
Do not manually edit the UCT-V Windows service registry settings. Use the supported installation and upgrade workflows instead.
You can install the UCT-Vs with MSI package using one of the following options:
| Install Linux UCT-Vs using Installation Script |
| Install Linux UCT-Vs using Manual Configuration |
| Visual C++ Redistributable 2019 (x86) |
| Npcap (v1.81 OEM) |
Before installing the Windows Agent, ensure that Npcap is not already present on the system. If an existing version of Npcap is present, uninstall it manually to avoid conflicts and ensure compatibility with the version bundled in the UCT-V.
Refer to the following sections for more detailed information and instructions.
Install Windows UCT-Vs using Installation Script
- Download the Windows UCT-V
6.11.00MSI package from the Gigamon Customer Portal. For assistance, contact Contact Technical Support. - Install the downloaded MSI package as Administrator.
The UCT-V service starts automatically.
- Use the command below to perform pre-check, adapter setup, adapter restore, and configuration functionalities.
uctv-wizardRefer to the table below to know more about uctv-wizard command usage options and functionalities:
Options
Use Command
Description
pre-check
uctv-wizard pre-check
Checks the network adapter properties and firewall requirements. It notifies the user if the network adapter's send buffer size is smaller than the required size for the Windows UCT-V and if any firewall rules need to be added.
Note: We recommend to Increase the send buffer size of network adapters to 128 MB during the UCT-V installation to optimize performance and minimize traffic disruption.
adapter-setup
uctv-wizard adapter-setup
Checks the compatible network adapters, increases the send buffer size and restarts the service. Before changing the buffer size, the existing configuration is saved as a backup.
You can choose between the following:
If you wish to skip the prompts for changing the buffer size of compatible network adapters, enter the option as y. Enter N if you wish to set it up manually. For details, refer to Acquire Traffic using UCT-V - GigaVUE-FM Orchestration. adapter-restore
uctv-wizard adapter-restore
Using this command, you can restore the backup copy of the network adapter buffer size configuration saved in the in the uctv-wizard adapter-setup step.
Note: You need to manually restart the network adapters for changes to take effect immediately.
You can choose between the following:
If you wish to skip the prompts for restoring the buffer size of the compatible network adapters, enter the option as y. Enter N if you wish to restore it manually. For details, refer to configure
uctv-wizard configure
First, it checks for any existing configured file in the tmp directory (file named gigamon-cloud.conf in the C:\Users\<username>\AppData\Local location). If available, UCT-V will use that configuration.
If unavailable, UCT-V automatically adds the interface configuration in uctv.conf file, excluding the loopback (lo) interface, with all permissions enabled (source ingress, source egress, and destination).
You can add the required policy for the available port if a firewall is installed.
If you wish to skip the prompts to add the required firewall policy, enter your option as y. The console interface adds the firewall rules automatically. Enter N if you wish to configure manually. uninstall
uctv-wizard uninstall
Automatically stops the UCT-V service, removes the firewall rules, and uninstalls the UCT-V.
| The log messages generated from uctv-wizard are stored at /C:\ProgramData\uctv\uctv-installation.txt |
| Use the command below to know the usage descriptions for the individual operations. |
uctv-wizard help
Windows UCT-V Installation Scenarios
- Zero Touch Installation: When using a cloud integrated script to deploy UCT-V in a virtual machine, zero interference is required as the script installs and configures everything automatically.
- One Touch Installation: When using a .msi package with all prerequisite packages in place, UCT-V determines that all dependencies are met. It performs auto-configuration and restarts the service.
Install Windows UCT-Vs using Manual Configuration
- Download the Windows UCT-V
6.11.00MSI package from the Gigamon Customer Portal. For assistance, contact Contact Technical Support. - Install the downloaded MSI package as Administrator. The UCT-V service starts automatically.
- Modify the file C:\ProgramData\Uct-v\uctv.conf to configure and register the source and destination interfaces.
Note: When you have an active, successful monitoring session deployed, any changes to the UCT-V config file made after the initial setup require a UCT-V restart and an inventory refresh or sync from GigaVUE‑FM to pick up the new changes and re-initiate the traffic mirroring. GigaVUE‑FM does a periodic sync on its own every 15 minutes.
Following are the rules to modify the UCT-V configuration file:- Interface is selected by matching its CIDR address with config entries.
- For the VMs with single interface (.conf file modification is optional):
- if neither mirror-src permissions is granted to the interface, both mirror-src-ingress and mirror-src-egress are granted to it.
- mirror-dst is always granted implicitly to the interface.
- For the VMs with multiple interfaces:
- mirror-dst is granted explicitly in the config file. Only the first matched interface is selected for mirror-dst, all other matched interfaces are ignored.
- if none interfaces is granted any mirror-src permission, all interfaces are granted mirror-src-ingress and mirror-src-egress.
Example 1—Configuration example to monitor ingress and egress traffic at interface 192.168.1.0/24 and use the same interface to send out the mirrored packets.
For IPv4:
192.168.1.0/24 mirror-src-ingress mirror-src-egress mirror-dstFor IPv6:
2001:db8:abcd:ef01::/64 mirror-src-ingress mirror-src-egress mirror-dst
Example 2—Configuration example to monitor ingress and egress traffic at interface 192.168.1.0/24 and use the interface 192.168.2.0/24 to send out the mirrored packets.
For IPv4:
192.168.1.0/24 mirror-src-ingress mirror-src-egress192.168.2.0/24 mirror-dstFor IPv6:
2001:db8:abcd:ef01::/64 mirror-src-ingress mirror-src-egress
2001:db8:abcd:ef01::2/64 mirror-dst
- Save the file.
- Restart the Windows UCT-V using one of the following actions:
- From the command prompt, run sc stop uctv and sc start uctv.
- From the Windows Task Manager, restart the UCT-V.
You can verify the status of the UCT-V in the Service tab of the Windows Task Manager.
Note: After installing UCT-V, refer to Deploy Fabric Components using Generic Mode for platform specific information to configure UCT-V using Third Party Orchestration.
Register Windows UCT-V
It is mandatory to create a cloud configuration file and add the token to authenticate the UCT-V package with GigaVUE‑FM. The token is required only for initial registration before generating the certificate. You can use the token only once and do not need to maintain.
You can register UCT-V in your virtual machine using:
-
GigaVUE-FM Orchestration: Refer to the following steps:
-
Log in to the UCT-V.
-
Create a local configuration file and enter the following user data. C:\ProgramData\uctv\gigamon-cloud.conf is the local configuration file in Windows platform.
CopyRegistration:
token: <Enter the token created in GigaVUE-FM> -
Restart the UCT-V service.
- Windows platform: Restart from the Task Manager Service
For more details on how to create tokens, refer to Configure Tokens.
-
Note: If you have already configured gigamon-cloud.conf file in the directory (C:\Users\<username>\AppData\Local), you can directly use the uctv-wizard configure command (sudo uctv-wizard configure). This action automatically fetches the configuration file and complete the registration process.
Create a Monitoring Domain
GigaVUE-FM connects to the AWS Platform through the public API endpoint and uses HTTPS, the default protocol to communicate with API. For more information about the endpoint and the protocol used, refer to AWS service endpoints.
GigaVUE-FM provides you the flexibility to monitor multiple VPCs. You can choose the VPC ID and launch the GigaVUE fabric components in the desired VPCs.
Note: To configure the Monitoring Domain and launch the fabric components in AWS, you must have the fm_super_admin role or the write access to the Infrastructure Management category. For details, refer to Role Based Access Control.
To create a Monitoring Domain:
- Go to Inventory > VIRTUAL > AWS , and select Monitoring Domain.
- On the Monitoring Domain page, select New. The Monitoring Domain Configuration page appears.
- Select Check Permissions and validate whether you have the required permissions.
- In the Monitoring Domain field, enter an alias used to identify the Monitoring Domain.
- From the Traffic Acquisition Method drop-down list, select one of the following tapping methods:
- UCT-V: UCT-Vs are deployed on your VMs to acquire the traffic and forward the acquired traffic to the GigaVUE V Series Nodes. If you select UCT-V as the tapping method, you must configure the UCT-V Controller to communicate to the UCT-Vs from GigaVUE-FM.
You can also configure the UCT-V Controller and UCT-Vs from your own orchestrator. For details, refer to Configure GigaVUE Fabric Components in AWS using Third Party Orchestration - Integrated Mode. - VPC Traffic Mirroring: If you select the Traffic Mirroring option, the mirrored traffic from your workloads is directed to the GigaVUE V Series nodes, and you need not configure the UCT-Vs and UCT-V Controllers.
For more information on VPC Peering, refer to VPC peering connections in the AWS Documentation. Peering is required to send mirrored traffic from other VPCs into a centralized GigaVUE V Series deployment. You can choose to use an external load balancer for Traffic Mirroring. Select Yes to use load balancer. For details, refer to Configure AWS Elastic Load Balancing. - UCT-V Controller configuration is not applicable for Traffic Mirroring.
- Traffic Mirroring does not support cross-account solutions without a load balancer.
- For VPC Traffic Mirroring option, additional permissions are required. For details, refer to the Permissions and Privileges (AWS).
- After deploying the Monitoring Session, a traffic mirror session is created in your AWS VPC consisting of a session, a filter, sources, and targets. For more details, refer to Traffic Mirroring in AWS Documentation.
NOTE:
- UCT-V: UCT-Vs are deployed on your VMs to acquire the traffic and forward the acquired traffic to the GigaVUE V Series Nodes. If you select UCT-V as the tapping method, you must configure the UCT-V Controller to communicate to the UCT-Vs from GigaVUE-FM.
- In the Traffic Acquisition Tunnel MTU, enter the MTU value. The Maximum Transmission Unit (MTU) is the maximum size of each packet that the tunnel endpoint can carry from the UCT-V to the GigaVUE V Series Node. The default value is 8951.
When using IPv4 tunnels, the maximum MTU value is 8951. Ensure that the UCT-V tunnel MTU is 50 bytes less than the destination interface MTU size of the UCT-V.
When using IPv6 tunnels, the maximum MTU value is 8931. Ensure that UCT-V tunnel MTU is 70 bytes less than the destination interface MTU size of the UCT-V.
- Enable the Use FM to Launch Fabric toggle, to deploy GigaVUE Fabric Components using GigaVUE‑FM.
- Disable the Use FM to Launch Fabric toggle, to deploy GigaVUE Fabric Components using Third Party Orchestration.
- Turn on the Enable IPv6 Preference toggle to create IPv6 tunnels between UCT-V and the GigaVUE V Series Nodes.
Note: This appears only when Use FM to Launch Fabric is disabled and Traffic Acquisition Method is UCT-V.
- Under Connections, in the Name field, enter an alias used to identify the connection.
- From the Credential drop-down list, select an AWS credential. For details, refer to Create AWS Credentials.
- From the Region drop-down list, select AWS region for the Monitoring Domain. For example, US West.
Note: China regions are not supported.
- From the Accounts drop-down list, select the AWS accounts.
- From the VPCs drop-down list, select the VPCs to monitor.
- Click Save.
| Ensure that all V Series Nodes within a single Monitoring Domain are running the same version. Mixing different versions in the same Monitoring Domain may lead to inconsistencies when configuring Monitoring Session traffic elements. |
| Similarly, when upgrading a V Series Node, ensure that the GigaVUE‑FM version is the same or higher than the V Series Node version. |
You can view the new Monitoring Domain in the Monitoring Domain page list view.
To edit a Monitoring Domain, select the deployed Monitoring Domain and select Actions. From the drop-down list, select Edit and the Monitoring Domain Configuration page appears.
For details regarding the Check permissions while creating a Monitoring Domain, refer to Manage a Monitoring Domain .
Deploy GigaVUE Fabric Components in GigaVUE‑FM
You can configure the following fabric components:
| UCT-V Controller |
| GigaVUE V Series Proxy |
| GigaVUE V Series Node |
Prerequisite
Before you begin, create a monitoring domain in GigaVUE‑FM to establish connection between your AWS environment and GigaVUE‑FM. For details, refer to Create a Monitoring Domain.
To configure,
| 1. | Go to Inventory > VIRTUAL > AWS. |
| 2. | Select the required Monitoring Domain and select Actions > Deploy Fabric. |
The AWS Fabric Launch Configuration page appears.
| 3. | From the Centralized VPC drop-down list, select the alias of the centralized VPC. |
| 4. | Centralized VPC refers to the launch location of UCT-V Controller, V Series Proxies, and the GigaVUE V Series Nodes. |
Note: Select Check Permissions to ensure you have the required permissions for inventory, security groups, fabric launch, and IAM policy. For details, refer to Acquire Traffic using UCT-V - GigaVUE-FM Orchestration.
| 5. | From the EBS Volume Type drop-down list, select one of the following Elastic Block Store (EBS) volume that you can attach to the fabric components: |
| gp2 (General Purpose SSD) |
| gp3 (General Purpose SSD) |
| io1 (Provisioned IOPS SSD) |
| io2 (Provisioned IOPS SSD) |
| Standard (Magnetic) |
Note: The default EBS Volume Type is gp3 (General Purpose SSD).
| 6. | Turn on the Enable Encryption toggle to encrypt the EBS volume with AWS Key Management Service (KMS). |
| 7. | From the KMS Key drop-down list, select the required KMS key. For details, refer to the Create a KMS Key section in the AWS Documentation. |
| 8. | From the SSH Key Pair drop-down list, select the key pair that you created to launch the UCT-V Controller, GigaVUE V Series node, and GigaVUE V Series Proxy from GigaVUE‑FM. For details, refer to the Create a key pair section in the AWS Documentation. |
| 9. | From the Management Subnet drop-down list, select the subnet you use for communication between the controllers and the nodes and with GigaVUE‑FM. |
| 10. | From the Security Groups drop-down list, select one or more security groups you created for the GigaVUE fabric nodes. For details, refer to Security Group. |
| 11. | Turn on the Enable Custom Certificates toggle to validate the custom certificate during SSL Communication. |
GigaVUE‑FM validates the Custom certificate with the Trust Store. If the certificate is unavailable in the Trust Store, communication does not happen, and a handshake error occurs.
Note: If the certificate expires after the successful deployment of the fabric components, the fabric components move to the failed state.
| 12. | From the Custom SSL Certificate drop-down list, select the custom certificate that you have already installed. |
Note: You can also select Create New to upload the custom certificate for GigaVUE V Series Nodes, GigaVUE V Series Proxy, and UCT-V Controllers. For details, refer to Install Custom Certificate on AWS.
| 13. | Turn on the Prefer IPv6 toggle to deploy all the fabric controllers and the tunnel between the hypervisor and GigaVUE V Series Nodes using an IPv6 address. |
If the IPv6 address is unavailable, it uses an IPv4 address.
Note: You can enable this option only when deploying a new GigaVUE V Series Node. If you want to enable this option after deploying the GigaVUE V Series Node, you must delete the existing GigaVUE V Series Node and deploy it again with this option enabled.
| 14. | Complete the required fields to configure the following GigaVUE Fabric Components: |
| UCT-V Controller – Configure UCT-V Controllers in the AWS cloud only if you want to capture traffic using UCT-Vs. A UCT-V Controller can manage only UCT-Vs that have the same version. If the version of UCT-V Controllers do not match the version of UCT-Vs, GigaVUE‑FM cannot detect the UCT-Vs in the instances. |
| GigaVUE V Series Proxy – Turn on the Configure a V Series Proxy toggle, if GigaVUE-FM cannot directly reach the GigaVUE V Series Nodes (management interface) directly over the network. |
| GigaVUE V Series Node – Creating a GigaVUE V Series Node profile automatically launches the GigaVUE V Series Nodes. |
Note: Refer to GigaVUE Fabric Components Configuration – Field References.
| 15. | Select Save. |
GigaVUE Fabric Components Configuration – Field References
The following table lists and describes the fields you must complete to configure the UCT-V Controller, GigaVUE V Series Proxy, and GigaVUE V Series Node.
|
Field |
Description |
||||||||||||
|---|---|---|---|---|---|---|---|---|---|---|---|---|---|
|
UCT-V Controller • Configure UCT-V Controllers in the AWS cloud only if you want to capture traffic using UCT-Vs. • A UCT-V Controller can manage only UCT-Vs that have the same version. If there is a version mismatch between the UCT-V Controllers and UCT-Vs, GigaVUE-FM cannot detect the UCT-Vs in the instances. |
|||||||||||||
|
Controller Version(s) |
To add UCT-V Controllers:
|
||||||||||||
|
Agent Tunnel Type |
Select one of the following tunnel types to send the traffic from UCT-Vs to GigaVUE V Series Nodes:
|
||||||||||||
|
Agent CA |
Select the Certificate Authority (CA) you want to use to connect the tunnel. UCT-V uses this CA to verify the server-side certificate of the GigaVUE V Series Node. Note: Use this field only when configuring secure tunnels. |
||||||||||||
|
IP Address Type |
Select one of the following IP address types: • Private – If you want to assign an IP address that is not reachable over Internet. You can use private IP address for communication between the UCT-V Controller and GigaVUE-FM. • Public – If you want the IP address to be assigned from Amazon’s pool of public IP address. The public IP address changes every time the instance is stopped and restarted. • Elastic—If you want a static public IP address for your instance, ensure that you have the elastic IP address available in your VPC. The elastic IP address does not change when you stop or start the instance. o From the Elastic IPs drop-down list, select the required IP addresses. |
||||||||||||
|
Additional Subnets |
(Optional) If UCT-Vs are available on networks that are not IP routable from the management network, you must specify additional networks or subnets so that the UCT-V Controller can communicate with all the UCT-Vs. Click Add Subnet to select additional networks (subnets) if needed. Make sure to select a list of security groups for each additional network. |
||||||||||||
|
Tags |
(Optional) The key name and value that helps to identify the UCT-V Controller instances in your environment. For example, you might have deployed UCT-V Controller in many regions. To distinguish these UCT-V Controllers based on the regions, you can provide a name (also known as a tag) that is easy to identify such as us-west-2- uctvcontrollers. To add a tag, select Add, and enter a Key and Value. For example, enter Name as your Key and us-west-2-uctv-controllers as the Value. |
||||||||||||
|
GigaVUE V Series Proxy
|
|||||||||||||
|
Version |
GigaVUE V Series Proxy version. |
||||||||||||
|
Instance Type |
Instance type for the GigaVUE V Series Proxy. The recommended minimum instance type is t2.micro. You can review and modify the number of instances for the nitro-based instance types in the Configure AWS Settings page. |
||||||||||||
|
Number of Instances |
Number of GigaVUE V Series Proxy to deploy in the monitoring domain. |
||||||||||||
|
Set Management Subnet |
Use the toggle button to select a management subnet.
|
||||||||||||
|
Set Security Groups |
Toggle option to Yes to set the security group that is created for the GigaVUE V Series Proxy. Refer to Security Group for more details. |
||||||||||||
|
IP Address Type |
Select one of the following IP address types:
The elastic IP address does not change when you stop or start the instance. |
||||||||||||
|
Additional Subnets |
(Optional) If there are GigaVUE V Series Nodes on subnets that are not IP routable from the management subnet, additional subnets must be specified so that the GigaVUE V Series Proxy can communicate with all the GigaVUE V Series Nodes. Select Add to specify additional subnets, if needed. Also, make sure that you specify a list of security groups for each additional subnet. |
||||||||||||
|
Tags |
(Optional) The key name and value that help to identify the GigaVUE V Series Proxy instances in your AWS environment. |
||||||||||||
| GigaVUE V Series Node | |||||||||||||
|
SSL Key |
Select the SSL key from the drop-down list. |
||||||||||||
|
Version |
Enter the GigaVUE V Series Node version. |
||||||||||||
|
Instance Type |
The instance type for the GigaVUE V Series Node. For details, refer to Recommended and Supported Instance Types for AWS. You can review and modify the number of instances for the nitro-based instance types in the Configure AWS Settings page. |
||||||||||||
|
Volume Size |
The size of the storage disk. The default volume size is 8. The recommended volume size is 80. Note: When using Application Metadata Exporter, the minimum recommended Volume Size is 80GB. |
||||||||||||
|
IP Address Type |
Select one of the following IP address types:
The elastic IP address does not change when you stop or start the instance. |
||||||||||||
|
Min Number of Instances |
The minimum number of GigaVUE V Series Nodes in the Monitoring Domain. 1- The minimum number of instances must be 1. Note: If the minimum number of instances is set as ‘0’, then the GigaVUE V Series nodes launch only when GigaVUE-FM discovers some targets to monitor and deploys a monitoring session. |
||||||||||||
|
Max Number of Instances |
The maximum number of GigaVUE V Series Nodes deployed in the Monitoring Domain. |
||||||||||||
|
Data Subnets |
The subnet that receives the mirrored GRE or VXLAN tunnel traffic from the UCT-Vs. Note: Using the Tool Subnet check box, you can indicate the subnets the GigaVUE V Series uses to egress the aggregated/manipulated traffic to the tools. |
||||||||||||
|
Tags |
(Optional) The key name and value that helps to identify the GigaVUE V Series Node instances in your AWS environment. For example, you might have GigaVUE V Series Node deployed in many regions. To distinguish these GigaVUE V Series Node based on the regions, you can provide a name that is easy to identify, such as us-west-2-vseries. To add a tag:
|
||||||||||||
For details regarding the Check permissions to validate IAM and security-group settings, refer to Check Permissions while Configuring GigaVUE Fabric Components using GigaVUE‑FM.
Configure and Deploy Monitoring Session
In GigaVUE-FM, you must do the following to configure and deploy the Monitoring Session. Refer to Configure Monitoring Session section for more details.
| 1. | Access the Monitoring Session Page: |
| a. | In GigaVUE-FM, go to Traffic > Virtual > Orchestrated Flows > AWS. |
| b. | After creating a new Monitoring Session or on an existing Monitoring Session, navigate to the TRAFFIC PROCESSING tab. The GigaVUE-FM Monitoring Session canvas page appears. |
| 2. | Add components to the canvas: |
| a. | Drag and drop the required components to the canvas. |
| b. | From the Applications expand menu, drag and drop the required applications to the graphical workspace. |
| 3. | Deploy the Monitoring Session: |
| a. | From the Actions menu, select Deploy. |
| b. | After successful deployment on all the V Series Nodes, the status appears as Success on the Monitoring Sessions Sources tab. |
What to do Next
You can view the detailed statistics of an individual traffic processing element in the TRAFFIC PROCESSING tab. For more details, refer to View Monitoring Session Statistics (AWS).


