Working with GigaVUE-FM APIs
The GigaVUE-FM APIs can be used as part of IT Operations Management (ITOM) or implemented in a tool to perform a number of tasks. This chapter describes some ITOM use cases. The use cases described are as follows:
Working with Nodes
An application can use the GigaVUE-FM APIs to get nodes, ports, and their status in the Visibility Fabric.
This section describes the following:
| • | Adding Nodes |
| • | Getting Node Information |
| • | Getting Chassis Information |
Adding Nodes
To add nodes, an application does the following:
| 1. | Makes the following request to add nodes or clusters: |
POST <fmip>/api/<api_version>/nodes
| 2. | Rediscovers the nodes and clusters with the following request: |
PUT <fmip>/api/<api_version>/nodes
The following is a code example that creates three nodes and then rediscovers the nodes managed by GigaVUE-FM after each node is added:
nodeAddresses = ["10.115.152.50", "10.115.152.51",
"10.115.152.54"]
for address in nodeAddresses:
payload = { "nodeAddSpecs": [{"nodeAddress": address,
"username": "",
"password": ""
}]
}
POST https://10.115.152.46/api/<api_version>/nodes
Authorization: Basic 'dXNlcm5hbWU6cGFzc3dvcmQ='
Content-Type : application/json
Accept : application/json
Content-Length : 82
#On success, make a PUT request to rediscover nodes
if status = 200:
PUT https://10.115.152.46/api/<api_version>/nodes
Authorization: Basic 'dXNlcm5hbWU6cGFzc3dvcmQ='
Accept : application/json
else:
print response.content #If not successful, display response.
exit()
Getting Node Information
The following example requests the information for all nodes as a flat list:
GET https://10.115.142.46/api/<api_version>/nodes/flat
Authorization: Basic 'dXNlcm5hbWU6cGFzc3dvcmQ='
Accept: application/json
On success, the response returns the following data in JSON format, showing that there are six nodes. Three nodes are standalone nodes and three nodes belong to a cluster.
{ "nodes" : [ {"deviceId" : "10.115.152.50",
"deviceIp" : "10.115.152.50",
"dnsName" : "hc2-c04-29.gigamon.com",
"hostname" : "HC2-C04-29",
...
"clusterMode" : "Standalone",
"clusterId" : "10.115.152.50",
...
}, {"deviceId" : "10.115.152.51",
"deviceIp" : "10.115.152.51",
"dnsName" : "ta1-c04-35.gigamon.com",
"hostname" : "TA1-C04-35",
...
"clusterMode" : "Standalone",
"clusterId" : "10.115.152.51",
...
}, {"deviceId" : "10.115.152.54",
"deviceIp" : "10.115.152.54",
"hostname" : "HB1-C03-21",
...
"clusterMode" : "Standalone",
"clusterId" : "10.115.152.54",
...
}, {"deviceId" : "10.115.152.55",
"deviceIp" : "10.115.152.55",
"hostname" : "HB1-C03-22",
...
"clusterMode" : "Standalone",
"clusterId" : "10.115.152.55",
...
}, {"deviceId" : "10.115.155.3",
"deviceIp" : "10.115.155.3",
"hostname" : "HB1-Team1",
"family" : "H",
...
"clusterMode" : "Slave",
"clusterMaster" : "10.115.155.4",
"clusterId" : "GCC-1",
...
}, {"deviceId" : "10.115.155.4",
"deviceIp" : "10.115.155.4",
"hostname" : "HC2-Team1",
...
"clusterMode" : "Master",
"clusterMaster" : "10.115.155.4",
"clusterId" : "GCC-1",
...
}, {"deviceId" : "10.115.155.5",
"deviceIp" : "10.115.155.5",
"hostname" : "HD8-Team1",
...
"clusterMode" : "Standby",
"clusterMaster" : "10.115.155.4",
"clusterId" : "GCC-1",
...
} ]
}
The following example requests the information for all nodes:
GET https://10.115.142.46/api/<api_version>/nodes
Authorization: Basic 'dXNlcm5hbWU6cGFzc3dvcmQ='
Accept: application/json
On success, the response returns the following data in JSON format, showing the nodes grouped by cluster IDs. The response shows three standalone nodes and a node cluster named GCC-1 with three nodes.
{ "clusters" : [ {"family" : "H",
"clusterId" : "10.115.152.50",
"members" : [ {"deviceId" : "10.115.152.50",
"deviceIp" : "10.115.152.50",
"dnsName" : "hc2-c04-29.gigamon.com",
"hostname" : "HC2-C04-29",
...
"clusterMode" : "Standalone",
"clusterId" : "10.115.152.50",
...
} ]
}, {"family" : "H",
"clusterId" : "10.115.152.51",
"members" : [ {"deviceId" : "10.115.152.51",
"deviceIp" : "10.115.152.51",
"dnsName" : "ta1-c04-35.gigamon.com",
"hostname" : "TA1-C04-35",
...
"clusterMode" : "Standalone",
"clusterId" : "10.115.152.51",
...
} ]
}, {"family" : "H",
"clusterId" : "10.115.152.54",
"members" : [ {"deviceId" : "10.115.152.54",
"deviceIp" : "10.115.152.54",
"hostname" : "HB1-C03-21",
...
"clusterMode" : "Standalone",
"clusterId" : "10.115.152.54",
...
} ]
}, {"family" : "H",
"clusterId" : "10.115.152.55",
"members" : [ {"deviceId" : "10.115.152.55",
"deviceIp" : "10.115.152.55",
"hostname" : "HB1-C03-22",
...
"clusterMode" : "Standalone",
"clusterId" : "10.115.152.55",
...
} ]
}, {"family" : "H",
"clusterId" : "GCC-1",
"clusterVip" : "10.115.155.2",
"masterId" : "10.115.155.4",
"members" : [ {"deviceId" : "10.115.155.3",
"deviceIp" : "10.115.155.3",
"hostname" : "HB1-Team1",
...
"clusterMode" : "Slave",
"clusterMaster" : "10.115.155.4",
"clusterId" : "GCC-1",
...
}, {"deviceId" : "10.115.155.4",
"deviceIp" : "10.115.155.4",
"hostname" : "HC2-Team1",
...
"clusterMode" : "Master",
"clusterMaster" : "10.115.155.4",
"clusterId" : "GCC-1",
...
}, {"deviceId" : "10.115.155.5",
"deviceIp" : "10.115.155.5",
"hostname" : "HD8-Team1",
...
"clusterMode" : "Standby",
"clusterMaster" : "10.115.155.4",
"clusterId" : "GCC-1",
...
} ]
} ]
}
Getting Chassis Information
Queries to the /node resource provides only general information about a node or cluster. To get more detailed information, an application can make queries to the resource/inventory/chassis.
The following example queries the /inventory/chassis resource, and then retrieves card information from the response:
GET https://10.115.152.46/api/<api_version>/inventory/chassis?clusterId=10.115.152.50
Authorization: Basic 'dXNlcm5hbWU6cGFzc3dvcmQ='
Accept : application/json
#On success, display the card information.
if status_code == 200:
chassisInfo = json.loads(response.text)#Deserialize JSON
chassisList = chassisInfo['chassisList']
cards = chassisList[0]['cards']
for card in cards:
print 'Slot ID: ' + card['slotId']
print 'HW Type: ' + card['hwType']
print 'Operational State: ' + card['operStatus']
print 'State: ' + card['healthState']
Example: Checking for a GigaSMART Card
To use a GigaSMART operation (gsop), a GigaSMART card must be installed. An application can check for a card before adding the operation.
To check for a card and then add a gsop, an application performs the following steps:
| 1. | Makes an inventory of the chassis by sending the following request: |
GET https://10.115.152.46/api/<api_version>/inventory/ chassis?clusterId=clusterId=10.115.152.50
The response contains a list of the cards.
| 2. | On success of the request (that is, the request returns status code 200), the application looks for the GigaSMART card in the card list. |
The following code example looks for the card in the JSON data returned in the response and prints information about the card:
chassisInfo = json.loads(r.text) #Deserialize JSON
chassisList = chassisInfo['chassisList']
cards = chassisList[0]['cards']
for card in cards:
if card['hwType'] == 'HC2-GigaSMART':installed = True
print 'Slot ID: ' + card['slotId']
print 'HW Type: ' + card['hwType']
print 'Amin Status' + card['adminStatus']
print 'Operational Status: ' + card['operStatus']
print 'Health: ' + card['healthState']
| 3. | If the card exists, the application adds the gsop to a gsgroup with the following request: |
if installed:
POST https://10.115.152.46/api/<api_version> /gsops?clusterId=clusterId=10.115.152.50
The following is an example of the payload included in the request to add a gsop for SSL decryption.
{"alias" : "GSOP_SSL_RSA",
"gsGroup" : "GS5",
"gsApps" : { "sslDecrypt" : {"inPort" : 0,
"outPort" : 0
}
},
"clusterName" : "10.115.152.50"
}
Working with Ports
In addition to using the GigaVUE-FM APIs to configure ports as described in GigaVUE-FM API Workflows an application can also use the /inventory/ports resource to retrieve port information and change port types.
Getting Port Information
An application can use the GigaVUE-FM APIs to get information about ports. The following example inventories the ports and displays the ports with an administrative status of down:
GET https://10.115.152.46/api/<api_version>/inventory/ports?nodeId=10.115.152.50
Authorization: Basic 'dXNlcm5hbWU6cGFzc3dvcmQ='
Content-Type : application/json
#On success, display the port information.
if code_status == 200:
portInventory = json.loads(r.text) #Deserialize JSON.
ports = portInventory["ports"]
status = 'down'
print 'Administrative status ' + status
for port in ports:
adminStatus = port['adminStatus']
operStatus = port ['operStatus']
if adminStatus == status:
print 'Port %s' % port['portId']
print ' Admin Status: %s' % port['adminStatus']
print ' Op Status: %s' % port['operStatus']
print ' Health: %s' % port['healthState']
Changing the Port Type and Enabling
An application can use the /inventory/port resource to change a port to a different type and change its status, such as change a port to a network port and enable its administrative status.
The following example changes port 5/2/x8 to a network port and port 5/2/x16 to a tool port by using a PATCH operation with /inventory/ports/{portId}.
Note: When specifying a port ID in a request, replace the forward slash character “/” with the underline character “_”. For example, 5/2/x8 becomes 5_2_x8.
#List of ports with port type
portList = {'5/2/x8':'network', '5/2/x16':'tool'}payload = {'portId' : 'id', 'portType" : 'type', 'adminStatus' : 'up'}#Loop through list of ports
for portId, type in portList.iteritems():
#Put port ID and port type into payload
payload["portId"] = portId
payload["portType"] = type
#Get content length for request
length = len(json.dumps(payload))
pid = portId.replace['/', '_'] #Change characters in ID.
#For example, 5/2/x8 becomes 5_2_x8.
PATCH https://10.115.152.46/api/<api_version>/inventory/ports/ pid?clusterId=10.115.152.50
Authorization: Basic 'dXNlcm5hbWU6cGFzc3dvcmQ='
Content-Type : application/json
Accept : application/json
Content-Length : length
#Display changes to port if PATCH request succeeds
if status_code = 200:
GET https://10.115.152.46/api/<api_version>/inventory/ports/ pid?clusterId=10.115.152.50
Authorization: Basic 'dXNlcm5hbWU6cGFzc3dvcmQ='
Accept : application/json
portInventory = json.loads(r.text)#Deserialize JSON
port = portInventory["port"]
print 'Port %s' % port['portId']
print ' Port Type: %s' % port['portType']
print ' Admin Status: %s' % port['adminStatus']
print ' Op Status: %s' % port['operStatus']
else:
#Handle error if return status is not 200
gigaErrors = json.loads(resp.text)#Deserialize JSON
errors = gigaErrors['errors']
for err in errors:
print 'GigaError ' + err['code']
print err['msg']
exit()
Creating, Modifying, and Deleting Maps
This section provides information about how an application can use the GigaVUE-FM APIs to work with maps. This section covers the following topics:
| • | Creating Maps |
| • | Modifying Maps |
| • | Deleting Maps |
Creating Maps
The following section shows some examples of creating maps with the GigaVUE-FM APIs. The examples are as follows:
| • | Creating a Map By Rule |
In this example, a map by rule is created, which is later used in the section Modifying Maps.
| • | Creating Maps for Dropping Traffic on a Session |
In this example, a first-level, a second-level, and a collector map are created.
| • | Creating Maps for Masking Data |
In this example, first- and second-level maps are created.
Creating a Map By Rule
The following example creates a map by rule that passes IPv4 and IPv6 traffic between the source network port 5/2/x8 and the destination tool port 5/2/x16. An application can set the port types of these ports and their administrative status as described in Changing the Port Type and Enabling before creating the map.
payload = {'alias': 'Map_RSA_Traffic',
'rules': {'dropRules': [],
'passRules': [{'comment': '',
'matches': [{'type': 'ipVer',
'value': 'v4'
}],
'ruleId': 1
},{'comment': '',
'matches': [{'type': 'ipVer',
'value': 'v6'}],
'ruleId': 2
]},
'subType': 'byRule',
'clusterName': '10.115.152.50',
'srcPorts': ['5/2/x8'],
'ruleMatching': 'normal',
'type': 'regular',
'order': 1,
'dstPorts': [ '5/2/x16' ]
}
POST https://10.115.152.46/api/<api_version>/maps?clusterId=10.115.152.50
Authorization: Basic 'dXNlcm5hbWU6cGFzc3dvcmQ='
Content-Type : application/json
Accept : application/json
Content-Length : 384
Creating Maps for Dropping Traffic on a Session
This section shows an example of how to use the /map APIs to create maps that drop traffic for a session. In this use case, an application does the following:
| 1. | Creates a first-level map that passes any MAC address and connects the map to a network port and a virtual port. |
| 2. | Creates a second level map that implements a Session-aware Adaptive Packet Filtering (SAPF) gsop and connects this map to the virtual port in the previous step and a tool port. |
| 3. | Creates a collector map connected to the same virtual port and tool port as the second level map. |
Figure 1Maps for Dropping Traffic shows the maps and their relation to the ports resulting from the previous three steps.
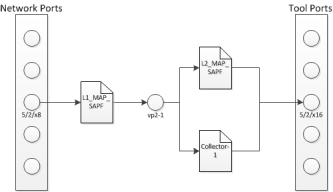
| Figure 4 | Maps for Dropping Traffic |
Creating the First-level Map
The following example creates a first-level map that passes any MAC address. The source port (srcPorts) is 5/2/x8. The destination port (dstPorts) is a virtual port, vp2-1.
payload = {"alias": "L1_Map_SAPF",
"rules": { "passRules": [{"comment": " ",
"ruleId": 1,
"matches": [{"type": "macSrc",
"mask": "0000.0000.0000",
"value": "0000.0000.0000"
}]
}]
},
"dstPorts": [ "vp2-1" ],
"subType": "byRule",
"srcPorts": [ "5/2/x8" ],
"type": "firstLevel",
"order": 1
}
POST https://10.115.152.46/api/<api_version>/maps?clusterId=10.115.152.50
Authorization: Basic 'dXNlcm5hbWU6cGFzc3dvcmQ='
Content-Type : application/json
Accept : application/json
Content-Length : 263
Creating the Second-level Map
The following example shows how to create a second-level map with a SAPF gsop. The source port (srcPorts) is vp2-1. The destination port (dstPorts) is 5/2/x16.
payload = {"alias": "L2_Map_SAPF",
"srcPorts": [ "vp2-1" ],
"subType": "byRule",
"dstPorts": [ "5/2/x16" ],
"type": "secondLevel",
"gsop": "GSOP_GS2_APF",
"gsRules": { "dropRules": [{ "matches": [{ "matchOffset": {"offsetStart": 1,
"offsetEnd": 1750,
"protocol": {"protocol": "tcp",
"pos": 1
}
},
"value": "netflix|nflxvideo|nflximg|Netflix|nflxext",
"matchType": "regex",
"type": "pmatch"
}],
"ruleId": 1
}]
}
}
POST https://10.115.152.46/api/<api_version>/maps?clusterId=10.115.152.50
Authorization: Basic 'dXNlcm5hbWU6cGFzc3dvcmQ='
Content-Type : application/json
Accept : application/json
Content-Length : 376
Creating the Collector Map
The following example creates a shared collector map. The source port is (srcPorts) is vp2-1. The destination port (dstPOrts) is a virtual port, 5/2/x16.
payload = {"alias": "Collector-1",
"dstPorts": [ "5/2/x16" ],
"subType": "collector",
"srcPorts": [ "vp2-1" ],
"type": "secondLevel"
}
POST https://10.115.152.46/api/<api_version>/maps?clusterId=10.115.152.50
Authorization: Basic 'dXNlcm5hbWU6cGFzc3dvcmQ='
Content-Type : application/json
Accept : application/json
Content-Length : 119
Creating Maps for Masking Data
Often certain fields must be masked with a pattern to protect sensitive information during network analysis. In this use case, an application creates maps that mask the data when the data matches a certain pattern. To create the maps and mask the data, an application performs the following steps:
| 1. | Creates a first-level map that is connected a network port and a virtual port. This map passes any MAC address. |
| 2. | Creates a second-level map that is connected to the virtual port in step 1 and a tool port. This second-level map implements a masking gsop. |
Creating the First-level Map
The following example creates a first-level map that passes any MAC address. The source port (srcPorts) is 5/2/x8. The destination port (dstPorts) is a virtual port, vp5-1.
payload = {"alias": "L1_Map_Mask",
"rules": { "passRules": [{"comment": "",
"ruleId": 1,
"matches": [{"type": "macSrc",
"mask": "0000.0000.0000",
"value": "0000.0000.0000"
}]
}]
},
"dstPorts": [ "vp5-1" ],
"subType": "byRule",
"srcPorts": [ "5/2/x8" ],
"type": "firstLevel",
"order": 1
}
POST https://10.115.152.46/api/<api_version>/maps?clusterId=10.115.152.50
Authorization: Basic 'dXNlcm5hbWU6cGFzc3dvcmQ='
Content-Type : application/json
Accept : application/json
Content-Length : 264
Creating the Second-level Map
The following example creates a second-level map with an APF gsop and masking, where 0 replaces the numbers in an identification number. The source port (srcPorts) is vp2-5. The destination port (dstPorts) is 5/2/x16.
payload = {"alias": "L2_Map_Mask",
"srcPorts": [ "vp5-1" ],
"subType": "byRule",
"dstPorts": [ "5/2/x16" ],
"type": "secondLevel",
"gsop": "GSOP_GS5_APF_Mask",
"gsRules": { "passRules": [{ "matches": [{ "matchOffset": {"offsetStart": 1,
"offsetEnd": 1750,
"protocol": {"pos": 1,
"protocol": "tcp"
}
},
"mask": {"pattern": "0",
},
"value": "\\d{3}-?\\d{7}-?\\d{7}","matchType": "regex",
"type": "pmatch"
}],
"ruleId": 2
}]
}
}
POST https://10.115.152.46/api/<api_version>/maps?clusterId=10.115.152.50
Authorization : Basic 'YWRtaW4gYWRtaW4xMjNBIQ=='
Content-Type : application/json
Accept : application/json
Content-Length : 389
Modifying Maps
An application can use the GigaVUE-FM APIs to modify a map when a tool detects an event in the traffic flow. In the use case described in this section, traffic is flowing between two hosts after a flow map was created. The tool detects SSL traffic with clear text. However, the tool that is monitoring the traffic needs the flow decrypted. It indicates to the application that it needs to add an SSL decryption GSOP to the existing map. Figure 2GigaVUE-FM API Application Modifying a Map illustrates the process.
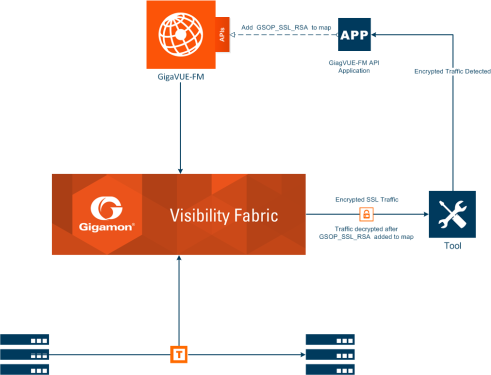
| Figure 5 | GigaVUE-FM API Application Modifying a Map |
To modify the map, the application uses a PUT operation to modify the map, specifying the map by its alias. In this example, the map Map_RSA_Traffic previously described in Creating a Map By Rule is modified.
The following is an example of a request and payload that the application can send to GigaVUE-FM to modify the map with the alias Map_RSA_Traffic. The request adds the SSL RSA gsop, changes the order to 2 from 1, and the IP from IPv6 to IPv4.
payload = {"alias" : "Map_RSA_Traffic",
"clusterName" : "10.115.152.50",
"type" : "regular",
"subType" : "byRule",
"srcPorts" : [ "5/2/x8" ],
"dstPorts" : [ "5/2/x16" ],
"gsop" : "GSOP_SSL_RSA",
"order" : 2,
"rules" : {"dropRules" : [ ],
"passRules" : [ {"ruleId" : 1,
"comment" : "",
"matches" : [ {"type" : "ipVer",
"value" : "v4"} ]
} ]
},
"ruleMatching" : "normal"
}
PUT https://10.115.152.46/api/<api_version>/maps/ Map_RSA_Traffic?clusterId=10.115.152.50
Authorization: Basic 'dXNlcm5hbWU6cGFzc3dvcmQ='
Content-Type : application/json
Accept : application/json
Content-Length : 340
By making a GET request to the /map resource, the application shows that the map now includes the SSL RSA gsop and the other changes.
Get https://10.115.152.46/api/<api_version>/maps/ Map_RSA_Traffic?clusterId=10.115.152.50
Authorization: Basic 'dXNlcm5hbWU6cGFzc3dvcmQ='
Accept : application/json
The following is the content in the response:
{ "map" : {"alias" : "Map_RSA_Traffic",
"clusterId" : "10.115.152.50",
"type" : "regular",
"subType" : "byRule",
"srcPorts" : [ "5/2/x8" ],
"dstPorts" : [ "5/2/x16" ],
"gsop" : "GSOP_SSL_RSA", "order" : 2, "rules" : {"dropRules" : [ ],
"passRules" : [ {"ruleId" : 1,
"comment" : "",
"bidi" : false,
"matches" : [ {"type" : "ipVer",
"value" : "v4"} ]
} ]
},
"roles" : {"owners" : [ "admin" ],
"viewers" : [ ],
"editors" : [ ],
"listeners" : [ ]
},
"ruleMatching" : "normal"
}
}
Deleting Maps
To delete maps, an application uses the DELETE operation on the /maps resource. The following example deletes three maps by their alias:
mapList = ["L1_Map_SAPF", "L1_Map_SAPF", "Collector-1"]
for mapAlias in mapList:
DELETE https://10.115.152.46/api/<api_version>/maps/mapAlias ?clusterId=10.115.152.50
Authorization: Basic 'dXNlcm5hbWU6cGFzc3dvcmQ='
Accept : application/json
#Display status code and message if request does not delete map.
if code_status != 200:
print 'Request failed...'
gigaErrors = json.loads(resp.text)
errors = gigaErrors['errors']
for err in errors:
print 'GigaError ' + err['code']
print err['msg'] + '\n'
exit()
GigaVUE-FM API Reference
The the GigaVUE-FM API Reference is available as part of the GigaVUE-FM Online Help. To view the reference, select API Reference in the Navigation pane under Support.