Configure a GigaSMART Group using the following steps. you will use this GigaSMART Group in Configuration Netflow Generation Example, where you assign a NetFlow Monitor to the group.
|
1.
|
From the device view, select GigaSMART > GigaSMART Groups. |
|
2.
|
Click New to create a new GigaSMART Group or select an existing GigaSMART Group and click Edit. |
|
3.
|
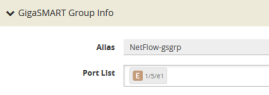
Enter an alias to help identify this GigaSMART group. For example, Netflow-gsgrp |
|
4.
|
Select an engine port (the e port references the GigaSMART line card or module) Your GigaSMART group should look similar to the example shown in the following figure. |
Notes:
|
■
|
The GigaSMART Group can contain multiple GigaSMART engine ports. |
|
■
|
Only one NetFlow Generation Monitor can be configured per GigaSMART Group. |


