Step 2: Deploy V Series nodes on VMware ESXi
This chapter describes how to create a monitoring domain for deploying V Series node in VMware ESXi hosts. You must establish a connection between GigaVUE‑FMand your vCenter environment before you can perform the configuration steps for V Series node. After a connection is established, GigaVUE‑FM launches the configuration for the V Series node.
Refer to the following sections for details:
Connect to VMware vCenter
To configure VMware vCenter in GigaVUE‑FM:
- From the left pane, select Inventory > VIRTUAL > VMware > Monitoring Domain. The Monitoring Domain page appears.
- On the Monitoring Domain page, select New.
The VMware Configuration page appears.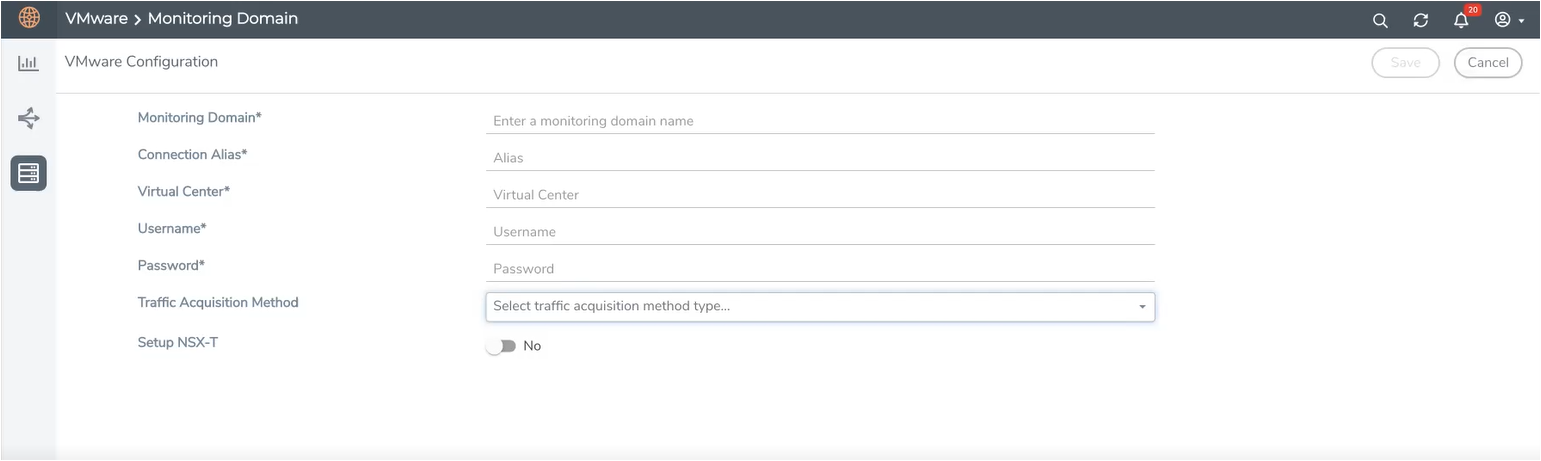
-
In the VMware Configuration page, enter or select the following details:
Field
Description
Monitoring Domain Name of the monitoring domain Connection Alias Name of the connection Virtual Center IP address or FQDN of the vCenter Username Username of the vCenter user with minimum privileges as described in Required VMware Virtual Center Privileges section. Password vCenter password used to connect to the vCenter Traffic Acquisition Method Select a Tapping method.
Note: When using AMX application select the traffic acquisition Method as Customer Orchestrated Source.
Setup NSX-T Enable to setup NSX-T and the fields of NSX-T to appear. Refer to Configure V Series Node on NSX-T for detailed information. - Click Save.
VMware Fabric Launch Configuration
To deploy V Series Nodes, follow these steps:
- Perform one of the following to go to VMware Fabric Launch Configuration page:
After VMware Configuration in GigaVUE‑FM, you are navigated to the VMware Fabric Launch Configuration page.
From the monitoring domain, select Fabric and select Deploy Fabric from the drop-down.
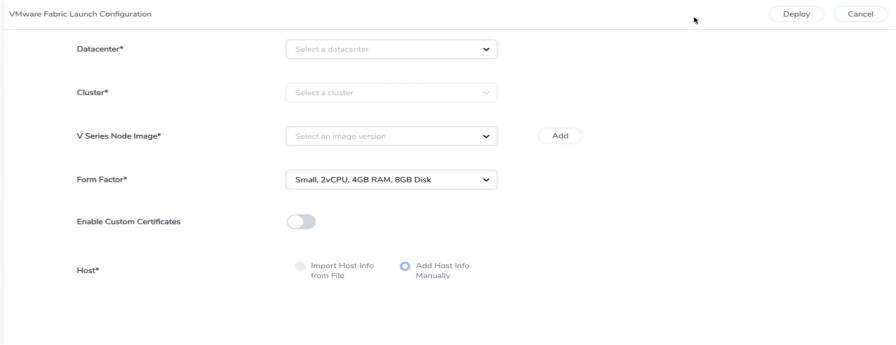
- On the VMware Fabric Launch Configuration page, enter or select the following details:
Field
Description
Datacenter vCenter Data Center with the ESXi hosts to be provisioned with V Series nodes Cluster
Cluster where you want to deploy V Series nodes Hosts
Select the ESXi hosts for V Series deployment.
Select Import Host Info from file or Add Host Info Manually.
Import Host Info from file:
To import host details from a .csv file:
- Download the .csv template file.
- Enter the required values in the Excel sheet and save the file.
- Click Browse and select the .csv file saved in the previous step.
Add Host Info Manually:
Select the ESXi hosts for V Series deployment.
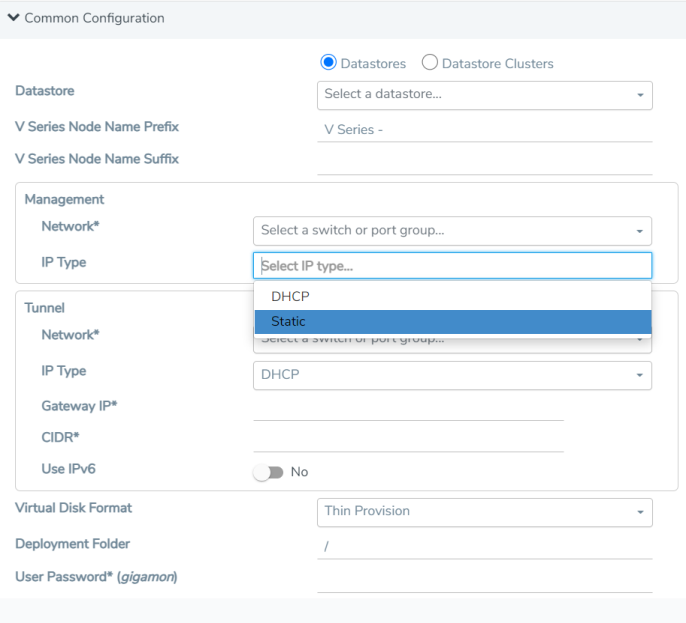
The Common Configuration drop-down wizard appears. Select the Datastores or Datastore Clusters and enter the required values. Click Apply to all to apply the selected values to all the selected hosts.
Select the IP type as Static if you wish to deploy a node using a Static IP address.
Note: The Tunnel Gateway IP field is optional.
V Series Node Image From the drop-down menu, select the OVA file uploaded in the Upload GigaVUE V Series Node Image into GigaVUE‑FM.
Form Factor Instance size of the V Series node. For more information, refer to Prerequisites for Integrating V Series Nodes with VMware vCenter. - Select Deploy. After deployment in vCenter, the V Series node appears under Fabric tab of the selected Monitoring Domain on the Monitoring Domain page.
To view the fabric launch configuration specification of a fabric component, select a V Series Node, and a quick view of the Fabric Launch Configuration appears on the Monitoring Domain page.
Upgrade V Series Node in GigaVUE-FM
Before upgrading the V Series Nodes, ensure the following:- All the current V Series nodes are of the same version.
- Latest V Series Node OVA image must be uploaded to GigaVUE-FM. For more information, refer to Upload GigaVUE V Series Node Image into GigaVUE‑FM.
- In GigaVUE-FM, on the left navigation pane, select Inventory > VIRTUAL > VMware > Monitoring Domain. The Monitoring Domain page appears.
- Select a deployed monitoring domain and select Fabric.
- From the drop-down list, select Upgrade Fabric, and the V Series Node Upgrade dialog box appears.
The V Series Node Upgrade dialog box displays the current V Series Node image version. - Select the latest V Series Node OVA image from the Image drop-down list.
- If you want to modify the form factor (instance) size, select the Change Form Factors check box.
- When you are upgrading more than one V Series node, you can modify the form factors of each V Series node individually using the drop-down list.
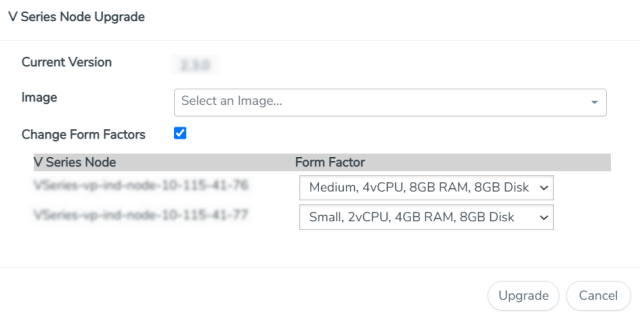
Note: All the V Series node with Static IP address retain their old IP address even after the upgrade.
- Enter the required information for all the available V Series nodes and select Upgrade to launch the V Series Node upgrade.
Note: Both the new and the current V Series nodes appear in the same Monitoring Domain until the new nodes replace the current, and the status changes to Ok.
You can view the status of the upgrade in the Status column of the Monitoring Domain page.

To view the detailed upgrade status, select Upgrade in progress or Upgrade successful, and the V Series Node Upgrade Status dialog box appears.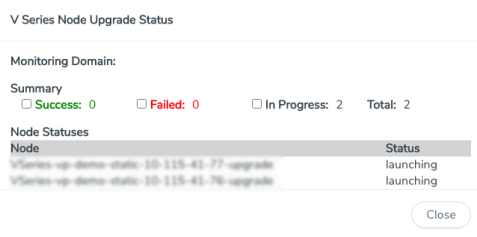
- Select Clear to delete the monitoring domain upgrade status history of successfully upgraded nodes.
- If the V Series Node Upgrade failed or interrupted for any reason, under Fabric drop-down click Continue Fabric Upgrade to continue the V Series Node upgrade process.
Note: You cannot modify the form factor or the V Series image when you are using the Continue Fabric Upgrade option. GigaVUE‑FM uses the same values defined in the initial fabric upgrade configuration.


