Check for Required IAM Permissions
GigaVUE‑FM allows you to validate whether policy attached to the GigaVUE-FM using "EC2 Instance Role" or "Access Credential" has the required IAM permissions and notifies the users about the missing permissions. You can check permissions while creating Monitoring Domain and deploying GigaVUE Fabric Components using GigaVUE-FM, by clicking the Check Permissions button on the Create Monitoring Domain page and AWS Fabric Launch page. The GigaVUE‑FM displays the minimum required IAM permissions.
The following are the prerequisites that are required to deploy GigaVUE Cloud Suite for AWS:
- IAM permissions - Checks whether the minimum required permissions are granted for the instance where the GigaVUE‑FM is deployed. Refer to Permissions and Privileges (AWS) for more detailed information on how to configure the required permissions in AWS.
- Access to public cloud end points - Check for access to the AWS cloud end point APIs.
- Subscription to the GigaVUE Cloud Suite for AWS- Before deploying the solution, you must subscribe to the GigaVUE Cloud Suite components from the AWS marketplace. It checks whether the required components are subscribed in the marketplace. Refer to Subscribe to GigaVUE Products for more detailed information on how to subscribe to the Gigamon Products.
- Security Group - Checks whether the required ports are configured in the security group. For more information on the security groups, seeSecurity Group Network Security Groups
Note: Security group rules validation does not validate prefix List and user groups. For a successful validation, the ports and CIDR range should be updated in the Security Group.
After you press the Check Permissions button, GigaVUE‑FM will verify the minimum required permissions. Any missing permissions will be highlighted with the respective message against the permission in a dialog box. You can use the displayed IAM Policy JSON as a reference and update the policy that is attached to the GigaVUE‑FM.
Refer to the following sections for more detailed information:
- Check Permissions while Creating a Monitoring Domain
- Check Permissions while Configuring GigaVUE Fabric Components using GigaVUE‑FM
- View Permission Status Reports
Check Permissions while Creating a Monitoring Domain
To check the permissions while creating a monitoring domain, follow the steps given below:
- Go to Inventory > VIRTUAL > AWS, and then click Monitoring Domain. The Monitoring Domain page appears.
- Click New. The Monitoring Domain Configuration page appears.
- Enter the details as mentioned in the Create a Monitoring Domain section.
- Click the Check Permission button. The Check Permissions widget opens.
- Select the connection for which you wish to check the required permissions and then click Next.
- Click on the Permission Status to view the missing permissions.
- The ACCOUNTS tab lists the accounts and the permissions status. Review the accounts that has an error in the permission status.
- The PERMISSIONS tab lists the permissions required to run GigaVUE Cloud Suite for AWS. Make sure to include all the permissions with Access Status as 'Denied' in the IAM policy.
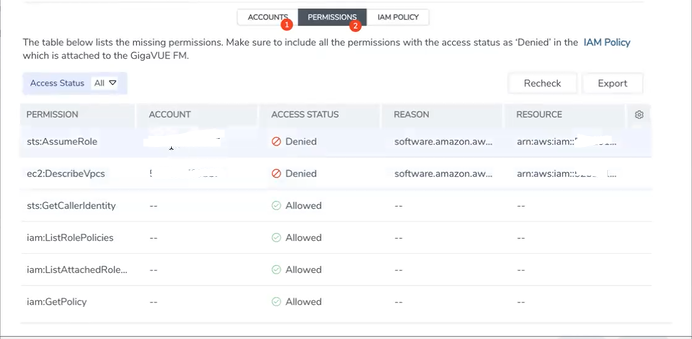
- The IAM POLICY tab lists the sample policy containing the required permissions for deploying the GigaVUE Cloud Suite for AWS. You must update the AWS IAM policy with the missing permissions that are highlighted in the JSON. To recheck the IAM policy, go to the PERMISSIONS tab and click the Recheck button.
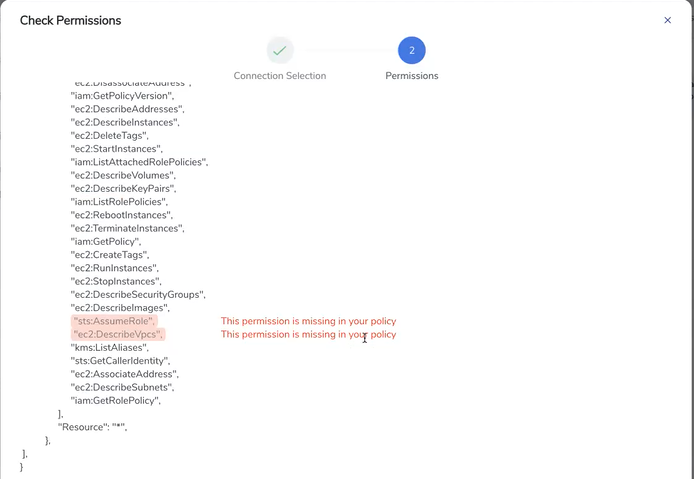
When you click Copy or Download, the entire JSON will be copied or downloaded.
Note: After updating the IAM Policy, it takes around 5 minutes for the changes to reflect on the Check Permissions screen.
Check Permissions while Configuring GigaVUE Fabric Components using GigaVUE‑FM
To check for permissions from the AWS Fabric Launch page, do the following:
- In the AWS Fabric Launch page, click Check Permissions
- The permission status for Inventory, Security Group and Fabric Launch is displayed.
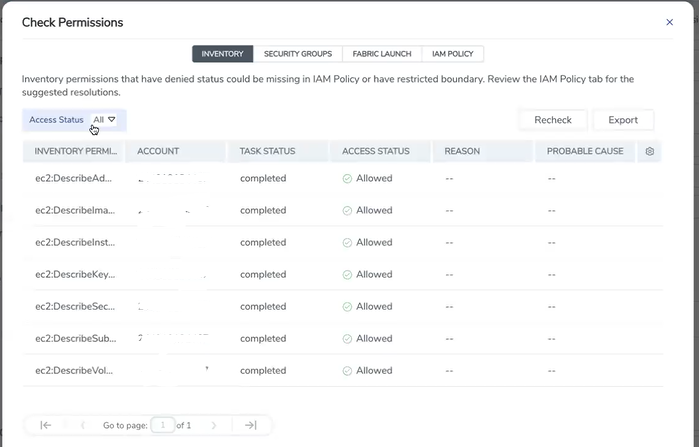
Note: Populating permissions status for Fabric launch takes a longer duration.
View Permission Status Reports
Permission status reports consist of previously run Check permissions reports. They are auto purged once every 30 days. You can change the purge interval from the Advanced Settings page. Refer to Configure AWS Settingsfor more detailed information.
You can view the Permission Status Report in the following two ways:
- In the Monitoring Domain page, click Actions > View Permission Status Report.
- In the Monitoring Domain page, you can navigate to Settings and then click Permission Status Report
In the Permission Status Report page, you can use the Filter button to filter the reports based on File Name, Type and Date.
To view or delete individual reports, select the report and click Actions button.


