Create Monitoring Domain for VMware NSX-T
This chapter describes how to create a monitoring domain for deploying GigaVUE V Series Nodes in VMware NSX-T environment through GigaVUE-FM. You must establish a connection between GigaVUE‑FM and VMware NSX-T environment. Creating a monitoring domain in GigaVUE-FM allows you to establish a connection between yourVMware NSX-T environment and GigaVUE-FM.
Points to Note:
- Each NSX-T manager can support a maximum of one monitoring domain.
- When editing a Monitoring domain that has GigaVUE V Series Nodes deployed, the Use External Image and Use FM to Launch Fabric toggle buttons are disabled. However, for a monitoring domain which does not have any GigaVUE V Series Nodes deployed the Use External Image toggle button is enabled.
Prerequisites:
- If you wish to use Use External Image option, before create a monitoring domain ensure all the contents of the OVA file are extracted into VMDK and OVF files and are placed in the directory which represents the Image URL.
- If you wish to use GigaVUE-FM as your image server, then before creating a monitoring domain save the OVA files to the dedicated directory. Refer to Upload GigaVUE V Series Node Image into GigaVUE-FMfor more detailed instructions on how to upload the OVA files to GigaVUE-FM.
To create monitoring domain in GigaVUE-FM for VMware NSX-T:
- Go to Inventory > VIRTUAL > VMware NSX-T (V Series), and then click Monitoring Domain. The Monitoring Domain page appears.
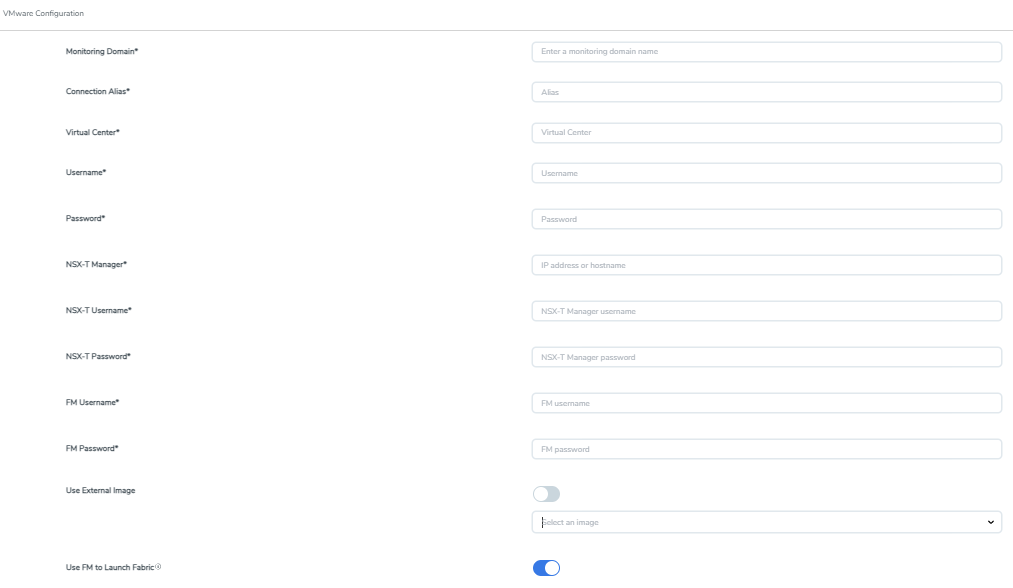
- On the Monitoring Domain page, click New. The VMware Configuration page appears.
-
In the VMware Configuration page, enter or select the following details:
Field
Description
Monitoring Domain Name of the monitoring domain. Connection Alias Name of the connection. Virtual Center IP address or Hostname of the vCenter. Username Username of the vCenter user. Password vCenter password used to connect to the vCenter NSX-T Manager IP address or Hostname of your VMware NSX-T. NSX-T Username Username of your NSX-T account. NSX-T Password Password of your NSX-T account. FM Username Username of your GigaVUE-FM account FM Password Password of your GigaVUE-FM account. Use External Image This toggle button allows you to choose between an external image or internal image. If you wish to use the Use External Image option, you can use an external server (http or https server) to place all the OVF files and provide the URL of the web server. Else you can upload the OVA files to GigaVUE-FM and use it as an internal image server. - Yes to use an external image. To use an external image, enter the web server URL of the directory where VMDK, and OVF files are available. The Web Server URL must be in the following format: http(s)://<server-IP:port>/<path to where the OVF files are saved> and the port can be any valid number. The default port number is 80.
- No to use an internal image. To use an internal image, select the uploaded OVA files from the Select an image drop-down menu.
Use FM to Launch Fabric Enable this toggle button if you wish to deploy GigaVUE V Series Nodes using GigaVUE-FM.
Note: If you disable this option, then you must deploy GigaVUE V Series Nodes using VMware NSX-T manager. Refer to Deploy GigaVUE V Series Nodes using VMware NSX-T Manager section for more detailed information.
- Click Save.
The newly created monitoring domain appears in the list view of the Monitoring Domain page.
To edit a monitoring domain, select the deployed monitoring domain and click Actions. From the drop-down list, select Edit, the VMware configuration page appears.
Next Steps:
- Use FM to Launch Fabric is enabled: You are navigated to the VMware NSX-T Fabric Deployment page. Refer to Deploy GigaVUE V Series Nodes using GigaVUE-FM for more detailed information on how to deploy GigaVUE V Series Node using GigaVUE-FM.
- Use FM to Launch Fabric is disabled: You must deploy GigaVUE V Series Nodes using VMware NSX-T Manager. Refer to Deploy GigaVUE V Series Nodes using VMware NSX-T Manager for more detailed instruction on how to deploy GigaVUE V Series Nodes using VMware NSX-T manager.


