Orchestrated Upgrade of Devices from GigaVUE-FM
Upgrading devices from GigaVUE-FM GUI is an internal task and has few limitations1 which makes it difficult for the users performing the upgrade. Starting from software version 6.3.00, you can perform orchestrated upgrade of the devices using the GigaVUE-FM GUI, in which the upgrade is performed in stages. The orchestrated upgrade process provides the following advantages:
- Ability to upgrade a maximum of six hundred (600) devices at a time.
- Monitor the device upgrade status using the dashboard page.
- Re-run possible stages or execute specific stages later based on the maintenance windows.
Note: For the orchestrated upgrade functionality to work, GigaVUE-FM must be running software version 6.3.00. Devices must be running software version 5.4.00 and above.
How Orchestrated Upgrade Works
In the orchestrated upgrade process, the tasks that happen internally during the upgrade are available as options in the Node Upgrade page. This provides control for the users on the entire upgrade process.
The orchestrated upgrade consists of the following stages:
| Fetch |
Device image is fetched. |
|||||||||
| Install |
Device image is installed. |
|||||||||
| Activate |
|
|||||||||
| Verify |
Post upgrade verifications are performed. |
The order of stage execution in the orchestrated upgrade for a specific standalone or cluster node is sequential. That is, after selecting the required standalone nodes and cluster nodes, you must first execute the Fetch and Install stages. You will be allowed to proceed with the Activate and Verification stages only on successful completion of these stages. Refer to the Upgrade Images for Standalone Nodes and Clusters for detailed information about the stages.
- During the Activate and Verify stages, the device moves in to the maintenance window and you cannot perform any operation on the device using GigaVUE-FM. It is not recommended to not perform any operation using device CLI.
- The device moves out of the maintenance window only upon successful completion of the orchestrated upgrade.
- To manually move the device out of the maintenance window:
| 1. | On the left navigation pane, click on  and select Physical > Nodes. and select Physical > Nodes. |
| 2. | Select the required node, and click Connect Node. |
Rules, Notes, and Limitations
Refer to the following rules, notes and limitations:
- With orchestrated upgrade, you can upgrade up to 600 nodes at a time. Ensure to accordingly select the number of clusters and standalone nodes so that the total number of nodes does not exceed 600.
- You can also upgrade the nodes using the existing node upgrade process. In case the orchestrated upgrade process fails or if you intentionally want to switch over to the existing upgrade process, you must reset (using the Reset button) the orchestrated upgrade process prior to switching over to the existing upgrade process. Refer to the Upgrade Control Options section for details.
- During the upgrade process, all devices belonging to a cluster will be in the same stage of the upgrade. For example: Consider a cluster with 10 devices. Trigger orchestrated upgrade on the cluster by selecting Fetch and Install. Image fetch will happen on all 10 devices. Image install will happen only if all the members in the cluster complete the image fetch stage. That is, even if some of the members have completed fetching the image (and for some of the members the fetch is in progress) the upgrade stage of all the devices will be displayed as Fetch.
-
As upgrade is performed in a staged manner, you cannot combine different devices pending for different stages of upgrade. All devices in a single upgrade schedule must belong to the same stage.
For example: Consider Cluster 1 with five devices and Cluster 2 with seven devices. Trigger orchestrated upgrade on the clusters. The upgrade stage of the devices is as follows:
- Cluster 1: All five devices in the cluster are in fetch stage.
- Cluster 2: All seven devices in the cluster are in fetch and install stage.
- You cannot resume upgrade by selecting all 12 devices. To resume upgrade:
- Select all devices in Cluster 1 that have completed fetch, and resume upgrade.
- Select all devices in Cluster 2 that have completed fetch and install, and resume upgrade.
- In a GigaVUE-FM High Availability group: During the upgrade process, if one of the GigaVUE-FM instance becomes not-reachable or in case of FM HA failover, the upgrade stage of the devices at the time of failover of GigaVUE-FM instance will be marked as 'Failed'. Retry the upgrade process using the Retry option.
- Step upgrade2 is not supported in this release. You must perform multiple GigaVUE-OS upgrades on the same device using sequential non-overlapping orchestrated upgrade schedules.
- The GigaSMART image is upgraded in conjunction with the GigaVUE-OS software upgrade. Orchestrated upgrade of standalone GigaSMART image is not supported. Use the legacy upgrade option in the Nodes page to upgrade the GigaSMART image.
- During scheduled upgrade, nodes might become unreachable at the time of execution. Refer to the Upgrade Cluster with Not-reachable Nodes in the Fabric Management Guide for more details.
- Important Recommendations
- Reset the upgrade process for the cluster if new nodes are added to the cluster during the orchestrated upgrade process.
- Manually remove the PCAP configuration (for Tx traffic) before initiating the orchestrated upgrade process. Failure to do so will result in Post Upgrade Verification failure due to a mismatch in the operational status of the channel port.
Upgrade Images for Standalone Nodes and Clusters
To perform orchestrated upgrade of stand alone nodes and clusters, perform the following steps.
- On the left navigation pane, click
 , and then select Physical > Node Upgrade. The Dashboard Page appears with the list of devices managed in GigaVUE-FM.
 - Select the required devices that you want to upgrade. You can filter the devices as required. You can also filter the devices based on the tags (you cannot sort the devices based on the Tags field).
- Click the drop-down icon in the first column to select the devices. Use one of the options listed below:
- Select All: All nodes in a particular page are selected.
- Unselect All: All nodes in a particular page are unselected.
- Select <number of nodes> across <no of pages>: All nodes across all the pages are selected.
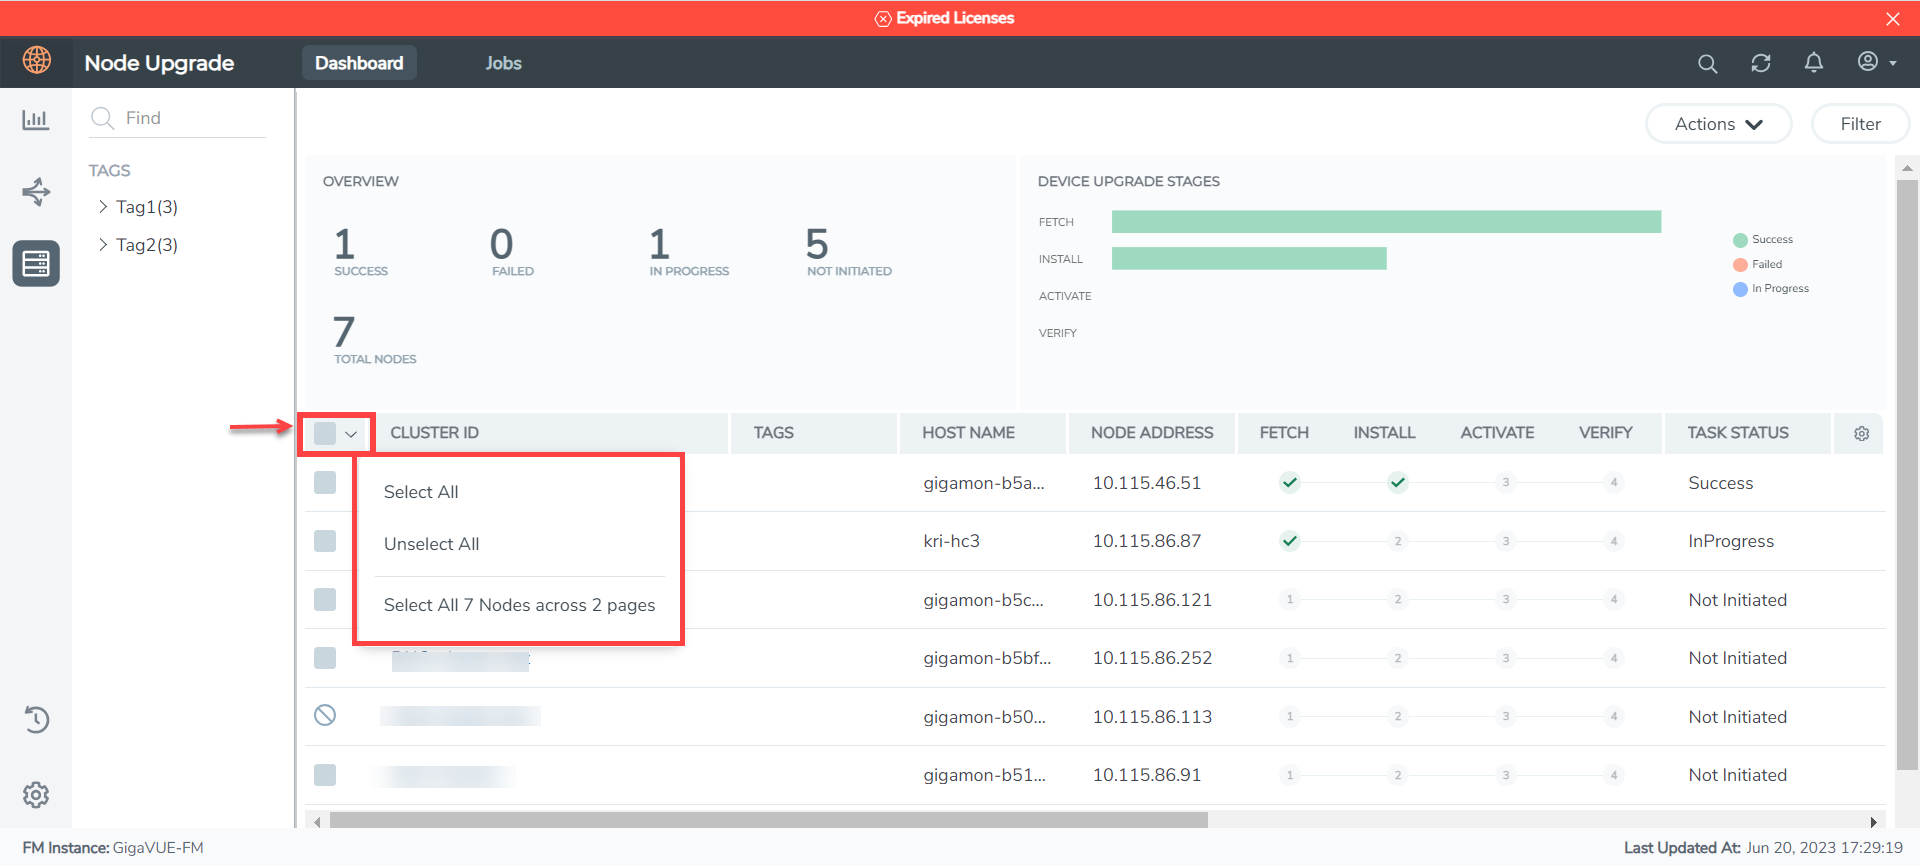
Once you select all nodes across all pages, you cannot deselect individual nodes. Use the Clear button to clear the selection.
Note: If the number of filtered nodes exceeds 600, then this option will be disabled.
- Click Actions and select Upgrade. The Node Upgrade page appears.
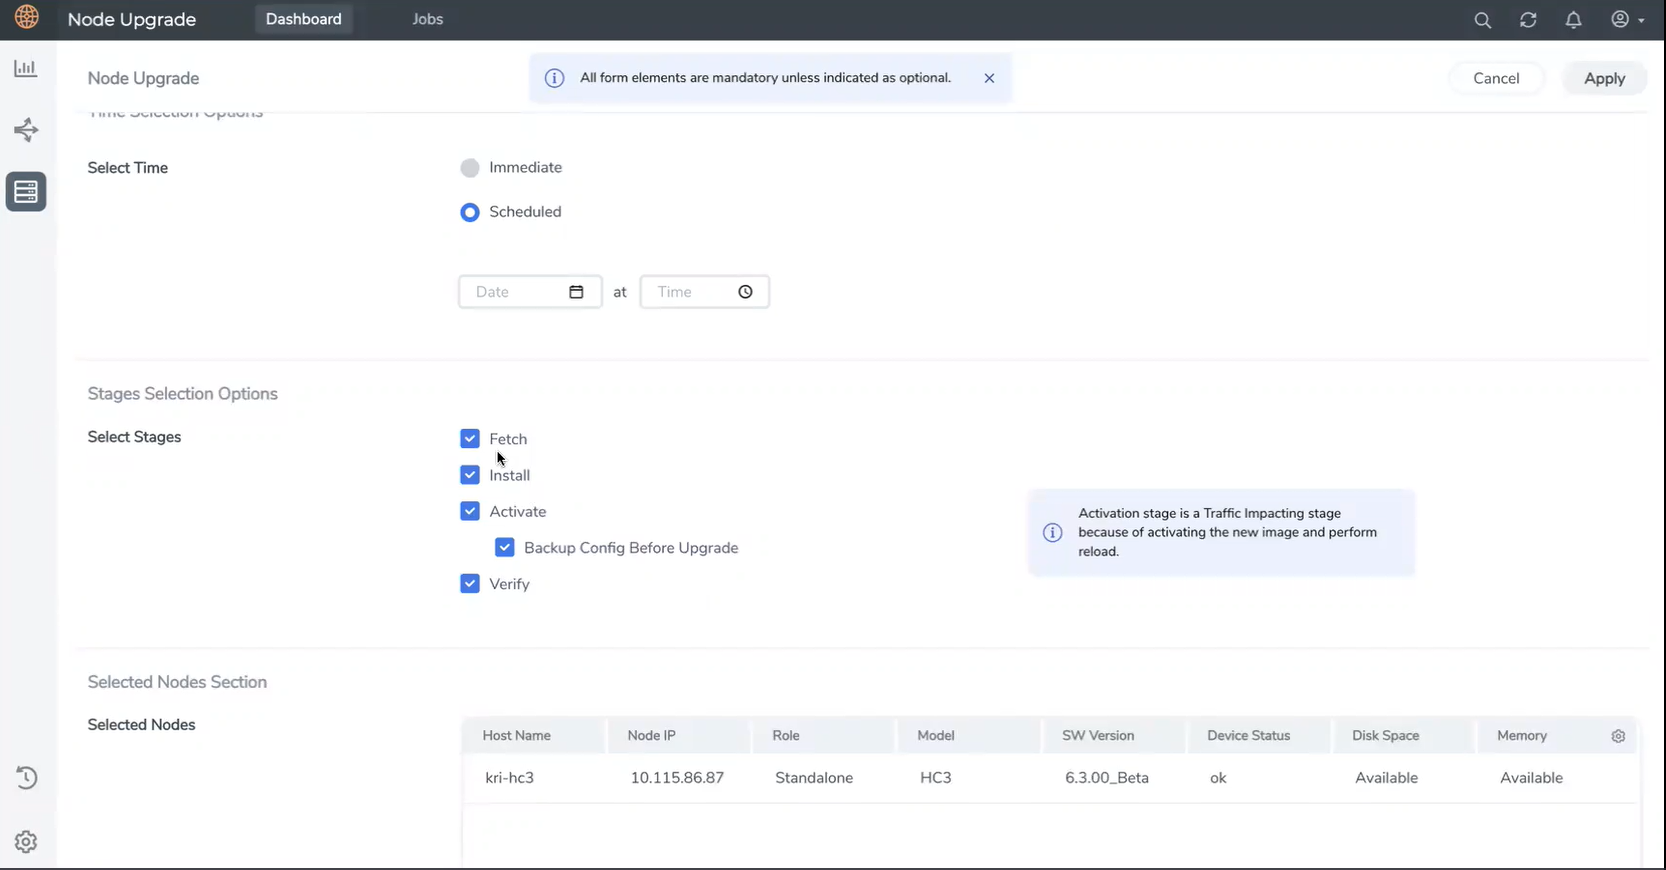
- Select or enter the following details:
- Click Apply to start the upgrade.
|
Menu |
Description |
||||||||||||||||||
|
Task Name |
The name of the upgrade task. |
||||||||||||||||||
|
Task Type |
Type of upgrade task. For this release version, only software option is supported. |
||||||||||||||||||
|
Image Server Type |
The location from where the image can be uploaded. Available options are:
|
||||||||||||||||||
|
- Internal Server |
Internal Server: If you select Internal Server, GigaVUE-FM acts as the internal server. You must have downloaded the images from the Gigamon website and placed them from where they can be available for uploading to GigaVUE‑FM. Refer to the "Images" section in the GigaVUE Administration Guide for details. Note: To obtain software images, register on the Gigamon Customer Portal and download the software. You must provide the serial number for each node you want to update. To view the chassis serial number, login to GigaVUE‑OS and select Chassis from the navigation pane. Click List View.
If the image file is missing, click Upload image button. In the Upload Internal Images Files quick view, click Choose File and select the image files that you downloaded. Click OK |
||||||||||||||||||
|
- External Server |
External Server: From the drop-down list, select the external image server added to GigaVUE‑FM. If the external image server is not available, click Add External Server. In the Add External Server quick view, enter the following:
Note: For a cluster, the images can reside on different paths. However, the image server should be the same for all the nodes. |
||||||||||||||||||
|
Time |
The time for performing the upgrade. There are two options:
|
||||||||||||||||||
|
Select Stages |
Select the required stage for performing the upgrade.
|
||||||||||||||||||
|
The image file is downloaded from the selected image server.
|
|||||||||||||||||||
|
Installs the image file on the device. When you install a new image, it automatically installs on the “next” partition (the one that is not currently being used). Note: Boot next is not set at this stage. Therefore, any unplanned device reboot that happens outside the context of orchestrated device upgrade after the execution of Install stage and prior to the execution of Activate stage will not load the new image. |
|||||||||||||||||||
|
The Activate stage involves the following:
Note: Traffic flow is interrupted in this stage. You cannot perform any operation on the device at this stage. Enable the Backup Config Before Upgrade checkbox to perform a backup of the device configuration before the device is rebooted. |
|||||||||||||||||||
|
- Verify |
Performs upgrade sanity check on the selected devices. This includes the following tasks:
|
||||||||||||||||||
|
Selected Nodes section |
You can view the list of nodes selected for the upgrade task. This section provides an overview of the nodes/cluster health status, available disk space and memory information. |
Device upgrade is initiated. You can view the status of the upgrade from the following pages:
- Dashboard page. Refer to the View Upgrade Status section for details.
- Jobs page. Refer to the View Orchestrated Upgrade Tasks section for details.
Upgrade Control Options
Use the following buttons in the Node Upgrade Dashboard page to perform specific actions:
| Button | Description | |||||
|---|---|---|---|---|---|---|
| Actions |
Select the required nodes and clusters. Click the Actions drop-down to perform the following actions: |
|||||
|
Upgrade: Use to upgrade the standalone nodes and clusters. |
||||||
|
Resume Upgrade: Use to resume the upgrade operation after a specific stage is completed. |
||||||
|
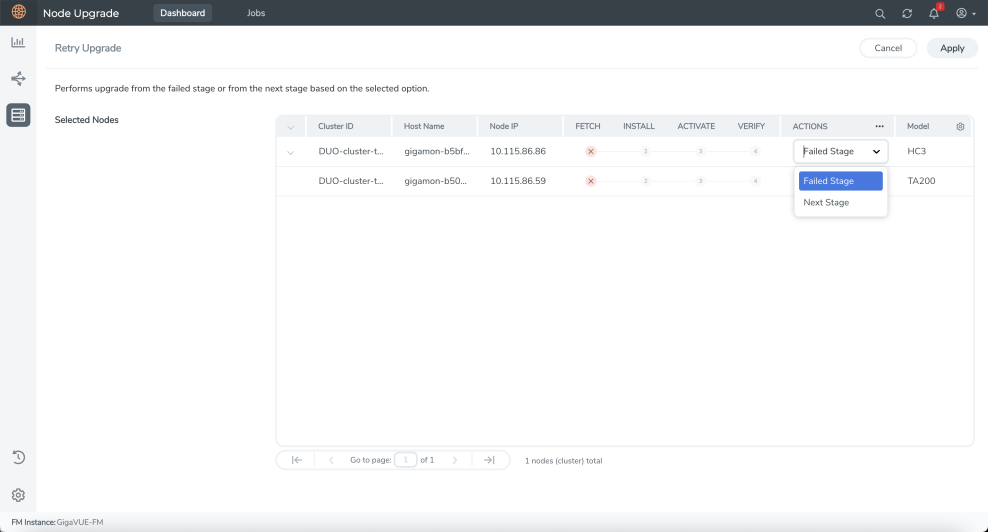
Retry: Use to retry the orchestrated upgrade. You can retry from failed stage or from the next stage.
Note: Ensure to manually resolve the current stage before using the Retry from Next Stage option. |
||||||
|
|
||||||
Use the Reset button to clear the existing upgrade for the cluster. The Reset button does the following:
|
||||||
| Filter |
Use to filter the nodes based on the following criteria:
|
View Upgrade Status
You can view the status of the upgrade from the Dashboard page.

The Dashboard page provides the following details:
- The Overview tab displays the metrics on the number of nodes that got upgraded successfully, number of nodes that failed to upgrade, number of nodes that are in the upgrade progress, and the total number of nodes. Click on the number to filter the devices in the table below.
- The Device Upgrade Stages tab is a graphical representation of the number of nodes that are in the various upgrade stages. Hover over the horizontal bars to know the status of the upgrade. Click on the bar to filter the nodes based on the criteria.
- Click on a Cluster-id in the Dashboard page. The page split view appears with the Summary and Execution Timeline tabs at the bottom of the page.
- Summary: Displays details of the current upgrade process.
- Execution Timeline: Displays details about the past three upgrades on the selected node.


