Configure GigaVUE Fabric Components in GigaVUE-FM
After configuring the Monitoring Domain, you will be navigated to the AWS Fabric Launch Configuration page.
In the AWS Fabric Launch Configuration page, you can configure the following fabric components:
In the AWS Fabric Launch Configuration page, enter or select the required information as described in the following table.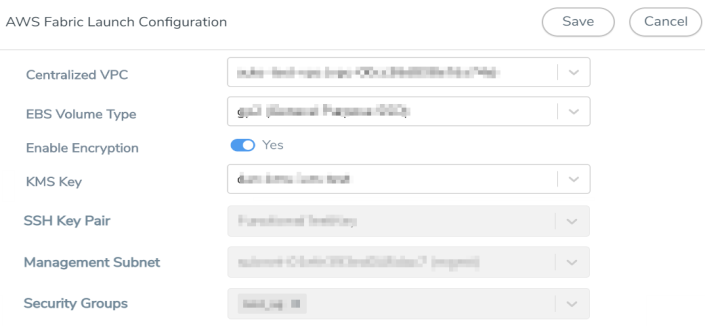
|
Fields |
Description |
|||||||||
|
Centralized VPC |
Alias of the centralized VPC in which the UCT-V Controllers, V Series Proxies and the GigaVUE V Series Nodes are launched. |
|||||||||
|
EBS Volume Type |
The Elastic Block Store (EBS) volume that you can attach to the fabric components. The available options are:
|
|||||||||
|
Enable Encryption |
Select Yes to enable encryption or select No to disable encryption. On selecting Yes to enable encryption, a KMS Key field appears. Enter the KMS key for the encryption. |
|||||||||
|
SSH Key Pair |
The SSH key pair for the GigaVUE fabric nodes. For more information on Key Pairs, refer to Key Pair. |
|||||||||
|
Management Subnet |
The subnet that is used for communication between the controllers and the nodes, as well as to communicate with GigaVUE-FM. This is a required field. |
|||||||||
|
Security Groups |
The security group created for the GigaVUE fabric nodes. For more information on security groups, refer to Security Group |
|||||||||
|
Enable Custom Certificates |
Enable this option to validate the custom certificate during SSL Communication. GigaVUE-FM validates the Custom certificate with the trust store. If the certificate is not available in Trust Store, communication does not happen, and an handshake error occurs. Note: If the certificate expires after the successful deployment of the fabric components, then the fabric components moves to failed state. |
|||||||||
|
Certificate |
Select the custom certificate from the drop-down menu. You can also upload the custom certificate for GigaVUE V Series Nodes, GigaVUE V Series Proxy, and UCT-V Controllers. For more detailed information, refer to Install Custom Certificate on AWS. |
|||||||||
|
Prefer IPv6 |
Enables IPv6 to deploy all the Fabric Controllers, and the tunnel between hypervisor to V Series node using IPv6 address. If the IPv6 address is unavailable, it uses an IPv4 address. This functionality is supported only in OVS Mirroring. |
Configure UCT-V Controller
A UCT-V Controller manages multiple UCT-Vs and orchestrates the flow of mirrored traffic to GigaVUE V Series Nodes. While configuring the UCT-V Controllers, you can also specify the tunnel type to be used for carrying the mirrored traffic from the UCT-Vs to the GigaVUE V Series Nodes.
- UCT-V Controller configuration is not applicable for VPC Traffic Mirroring selected as the traffic acquisition method.
- A UCT-V Controller can only manage UCT-Vs of the same version.
Select Yes for the Configure a UCT-V Controller field.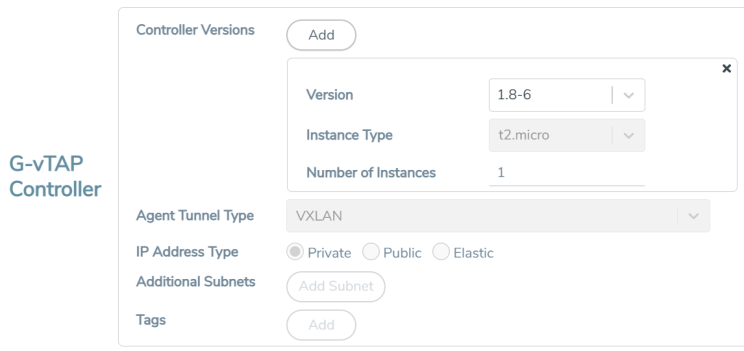
Enter or select the required information in the UCT-V Controller section as described in the following table.
Configure GigaVUE V Series Proxy
Select Yes for the Configure a GigaVUE V Series Proxy field. GigaVUE V Series Proxy is optional for the GigaVUE Cloud Suite for AWS.
Enter or select the appropriate information as described in the following table for GigaVUE V Series Proxy Configuration.
Fields | Description | |||||||||
Version | GigaVUE V Series Proxy version. | |||||||||
Instance Type | Instance type for the GigaVUE V Series Proxy. The recommended minimum instance type is t2.micro. You can review and modify the number of instances for the nitro-based instance types in the Configure AWS Settings page. | |||||||||
Number of Instances | Number of GigaVUE V Series Proxy to deploy in the monitoring domain. | |||||||||
Set Management Subnet | Use the toggle button to select a management subnet.
| |||||||||
Set Security Groups | Toggle option to Yes to set the security group that is created for the GigaVUE V Series Proxy. Refer to Security Group for more details. | |||||||||
IP Address Type | Select one of the following IP address types:
The elastic IP address does not change when you stop or start the instance. | |||||||||
Additional Subnets | (Optional) If there are GigaVUE V Series Nodes on subnets that are not IP routable from the management subnet, additional subnets must be specified so that the GigaVUE V Series Proxy can communicate with all the GigaVUE V Series Nodes. Click Add to specify additional subnets, if needed. Also, make sure that you specify a list of security groups for each additional subnet. | |||||||||
Tags | (Optional) The key name and value that helps to identify the GigaVUE V Series Proxy instances in your AWS environment. |
Configure GigaVUE V Series Node
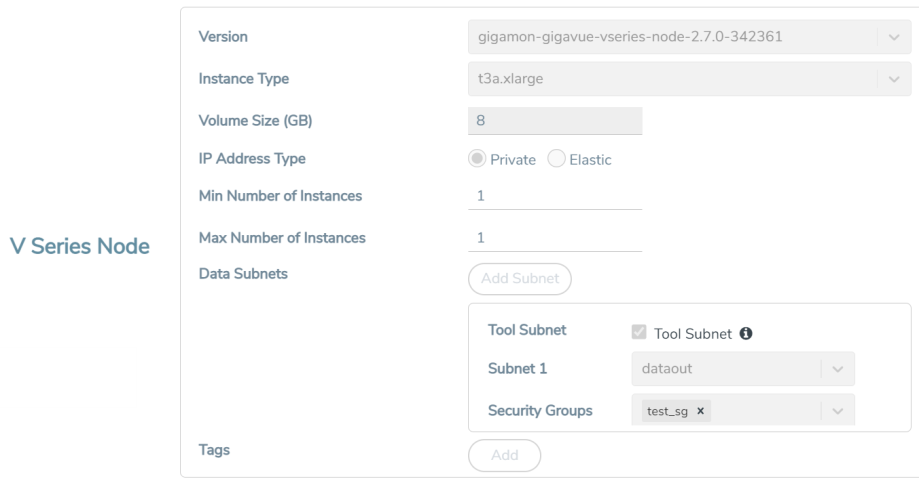
Enter or select appropriate information as described in the following table for GigaVUE V Series Node Configuration.
Fields | Description | ||||||
Version | GigaVUE V Series Node version. | ||||||
Instance Type | The instance type for the GigaVUE V Series Node. The default instance type is nitro-based t3a.xlarge. The recommended instance type is c5n.xlarge for 4 vCPU and c5n.2xlarge for 8vcpu. You can review and modify the number of instances for the nitro-based instance types in the Configure AWS Settings page. | ||||||
Volume Size | The size of the storage disk. The default volume size is 8. The recommended volume size is 80. Note: When using Application Metadata Exporter, the minimum recommended Volume Size is 80GB. | ||||||
IP Address Type | Select one of the following IP address types:
The elastic IP address does not change when you stop or start the instance. | ||||||
Min Number of Instances | The minimum number of GigaVUE V Series Nodes that must be deployed in the monitoring domain. The minimum number of instances must be 1. When 0 is entered, no GigaVUE V Series Node is launched. Note: If the minimum number of instances is set as ‘0’, then the nodes will be launched when a monitoring session is deployed if GigaVUE-FM discovers some targets to monitor. | ||||||
Max Number of Instances | The maximum number of GigaVUE V Series Nodes that can be deployed in the monitoring domain. | ||||||
Data Subnets | The subnet that receives the mirrored GRE or VXLAN tunnel traffic from the UCT-Vs. Note: Using the Tool Subnet checkbox you can indicate the subnets to be used by theGigaVUE V Series to egress the aggregated/manipulated traffic to the tools. | ||||||
Tags | (Optional) The key name and value that helps to identify the GigaVUE V Series Node instances in your AWS environment. For example, you might have GigaVUE V Series Node deployed in many regions. To distinguish these GigaVUE V Series Node based on the regions, you can provide a name that is easy to identify such as us-west-2-vseries. To add a tag:
|
Click Save to save the AWS Fabric Launch Configuration.
To view the fabric launch configuration specification of a fabric node, click on a fabric node or proxy, and a quick view of the Fabric Launch Configuration appears on the Monitoring Domain page.


