Secure Tunnels
Secure Tunnels allow the traffic to be transported securely between a GigaVUE V Series to a GigaVUE HC Series or a GigaVUE HC Series to a GigaVUE HC Series device. The encapsulated traffic is sent to the GigaVUE HC Series device via secure tunnels in PCAPng format over a TLS connection.
Refer to the PCAPng Application section for more.
Secure Tunnels in GigaVUE HC Series has three primary use cases:
Secure Tunnels from GigaVUE V Series to GigaVUE HC Series
In this scenario, the encrypted traffic originating from a GigaVUE V Series node is transmitted to a remote GigaVUE HC Series device. This device then strips off the encryption, processes the traffic by utilizing GigaSMART applications (optional) and then forwards it to the tool. The GigaVUE HC Series can have a single map, multiple map rules, or multiple tools, as shown below.
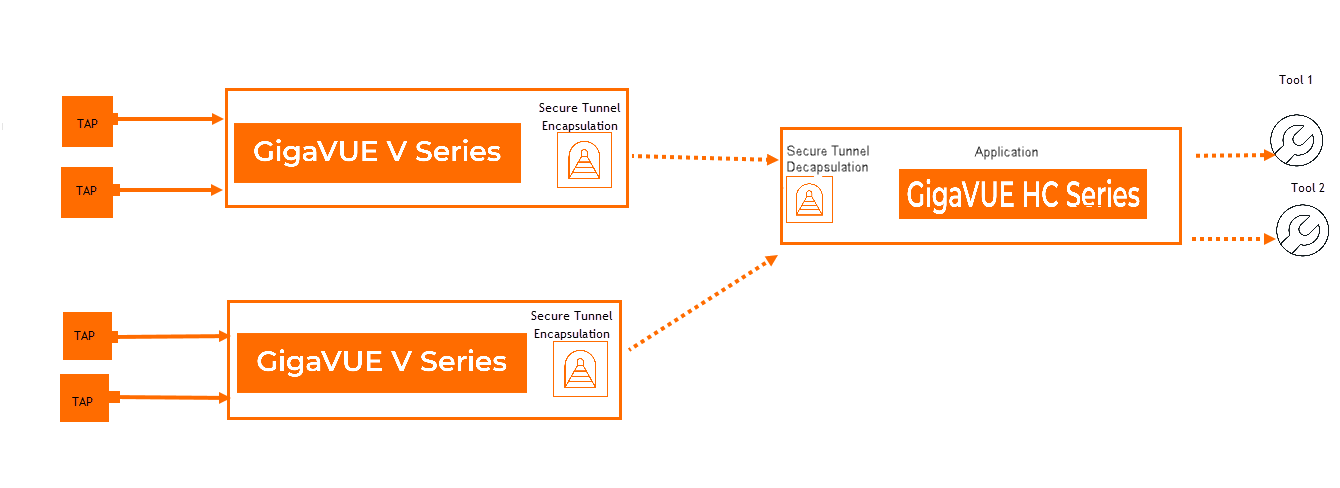
| 1 | GigaVUE HC Series with a single IP Interface and multiple Map rules |
Note: Utilizing GigaSMART applications on the traffic is optional.
Secure Tunnels between the GigaVUE HC Series and a remote GigaVUE HC Series
In this scenario, encrypted traffic is sent from the GigaVUE HC Series devices to a remote GigaVUE HC Series via secure tunnels, where it is decrypted, and forwarded to the tool.
In locally available GigaVUE HC Series devices you can utilize physical connectivity to securely send the traffic.

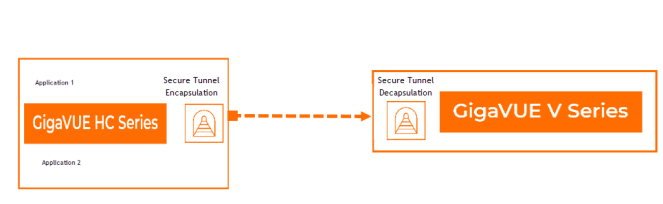
Secure Tunnels between GigaVUE HC Series to a GigaVUE V Series.
In this scenario , the encapsulated traffic from the GigaVUE HC Series is transported to GigaVUE V Series node. The GigaVUE V Series node decapsulates and processes the packet per the configuration.
Supported Platforms
Secure Tunnels is supported in the following platforms:
| GigaVUE-HC3 Gen3 ( SMT-HC30C08) |
| GigaVUE-HC1 Gen3 ( SMT-HC1-S) |
| GigaVUE-HCT ( SMT-HC1-S) |
| GigaVUE-HC1-PLUS (onboard Gen3 GigaSMART engine). |
Configure Secure Tunnels
To configure Secure Tunnels follow the below steps:
| In GigaVUE‑FM go to Traffic>Physical> Orchestrated Flows> Tunnels. |
| Click on New. The New Tunnel configuration page appears. Enter the required information as described below: |
|
Field |
Description |
|||||||||||||||||||||
|---|---|---|---|---|---|---|---|---|---|---|---|---|---|---|---|---|---|---|---|---|---|---|
|
Tunnel Name |
The name of the tunnel. Note: Alias must not have spaces or any of these characters: *"?;:,/%@. |
|||||||||||||||||||||
|
Tunnel Description
|
The description of the tunnel endpoint. |
|||||||||||||||||||||
|
Tunnel Type |
The tunnel type TLS-PCAPNG is selected by default.
|
|||||||||||||||||||||
|
Traffic Direction |
Select the traffic direction of the tunnel. Choose DECAP for decapsulation or choose ENCAP for encapsulation.
Note: In the scenario where secure tunnels needs to be established between GigaVUE V Series to a GigaVUE HC Series , you can utilize the Configure Physical Tunnel option provided at the GigaVUE V Series Secure Tunnel page. This allows you to conveniently configure secure tunnels at your physical device . Refer to Create Ingress and Egress Tunnels section. |
|||||||||||||||||||||
|
Nodes |
Select the Nodes on which you intend to create the tunnel. |
|||||||||||||||||||||
|
GigaSMART Group |
Select the GigaSMART groups created. If you do not have any groups, you can configure them using the Create GS Groups option. Refer Create GigaSMART Operations – A Summary to know more about configure groups. Note: Secure tunnels can be configured only for Gen 3 nodes. |
|||||||||||||||||||||
|
TCP Profile |
Configure the TCP profile parameters such as:
|
|||||||||||||||||||||
|
SSL Profile |
Enter the following SSL Profile parameters:
|
|||||||||||||||||||||
|
Listener Port |
For a decapsulation , specify the Listener port range. The range value is between 1- 30000. Note: If you update the Listener Ports in an existing secure tunnel destination, the tunnel will be re-established by deleting and recreating the maps. |
|||||||||||||||||||||
|
Destination Node |
Select the destination node for the decapsulation tunnel. |
|||||||||||||||||||||
|
Destination Port |
Select the destination port for the decapsulation tunnel. You can edit the port details from the Port editor screen. |
|||||||||||||||||||||
|
DSCP |
Enter the Differentiated Services Code Point (DSCP) value for an encapsulation. |
|||||||||||||||||||||
|
Time to Live |
For encapsulation tunnel, enter the value of the time interval till which the session needs to be available. The value ranges from 1 to 255. The default value is 64. Note: This is ignored for IPv6 based tunnel. |
|||||||||||||||||||||
|
Encapsulation IP interface |
Enter the interface IP address of the node (Destination IP) for an encapsulation tunnel. |
|||||||||||||||||||||
|
Remote Tunnel IP, L4 Port & Source Port |
Enter the IP address , L4 Port and Source Port values for an encapsulation tunnel. The Source Port range is from 30001 - 65535. Note: For decapsulation tunnel, It is recommended to match your L4 destination port rule to your listener port range. Note: The 50 ports from the configured exporter Source Port will be reserved for multi-engine GigaSMART group. |
|||||||||||||||||||||
|
Rules |
Configure the map rules that needs to be adhered to while decapsulating or encapsulating the traffic. Click on Rules Editor to configure the rules. |
|||||||||||||||||||||
|
Additional GigaSMART operations |
Enable this option to add GigaSMART operations. When enabled you will be provided with GigaSMART Operations section which would allow you to choose among the following:
|
| Click on Save. |
The configured Secure tunnels will be displayed. To get a quick view of the secure tunnel configuration go to  >View Details or click on the tunnel name. To know if your Secure tunnel is healthy refer the Health Status column.

Edit Secure Tunnel
To edit a Secure Tunnel follow the below steps:
| Select the secure tunnel from the tunnels page. |
| Click on Actions > Edit . |
| Edit your tunnel parameters. |
| Click Save. |
Delete Secure Tunnel
Select the secure tunnel from the tunnels page.
| Click on Actions> Delete. |
| Delete your tunnel. |
Export Secure Tunnels
To export the configured Secure Tunnels, click Export. The secure tunnels is downloaded in either CSV or XLSX format.
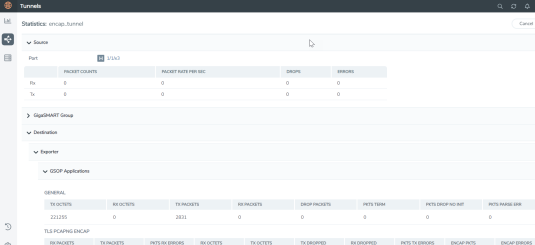
View Statistics
To view the secure tunnel statistics click on >View Statistics. The tunnel related statistics will be as shown below.
Limitations
The following limitations are applicable when you configure Secure Tunnel in GigaVUE HC Series.
| Secure-tunnel is not supported with the following applications: |
| GTP Correlation |
| Passive SSL |
| Inline SSL |
| Internet Content Adaptation Protocol (ICAP) |
| GigaSMART operations with Secure Tunnel configuration is supported only with a regular map. |
| The Tunnel Decapsulation listener port cannot be same as the Tunnel Encapsulation Source Port. |


