Manage Maps
This section provides the basic steps for doing the following tasks:
| Create a new map |
| Clone Map |
| Edit Maps |
| Delete Maps |
| Create Map Groups |
It also includes information about the following:
| Description to Map Rules |
| How to Use the Quick Editor for Pass and Drop Rules |
Create a new map
Prerequisites:
| 1. | Check the status of the nodes and ports that you plan to use with the map. For information about how to check the status of the nodes and ports, refer to Status of Line Cards/Nodes and Ports. |
| 2. | From the device view, go to Maps > Maps to open the Maps page. |
| 3. | Click New. |
Create a new map – Field References
The following table lists and describes the fields you must complete to configure new map.
|
Field |
Description |
|---|---|
|
Map Info |
|
| Map Alias |
A map alias specifies the name of the map. The alias must be unique and can contain up to 128 alphanumeric characters. Aliases are case-sensitive. Most special characters are supported in map aliases. However, map aliases that are only one period (.) or two periods (..) should not be created. These aliases cannot be accessed for editing. Use an alias that helps identify the task and destination. For example netflix_traffic_to_wireshark. |
| Description |
(Optional) The description for the map. When adding description, consider the following:
See also Description to Map Rules. |
| Enable | Checkbox to enable or disable the map. |
| Type |
Select the map type. The map type can be Regular, First Level, Second Level, Inline, Inline First Level, Inline Second Level, or Transit Level. For detailed information about the types of maps, refer to Map Types |
| Subtype |
Select the subtype. The map subtype can be By Rule, Pass All, or Collector. For detailed information about Pass All, refer to About Map-passall Maps. For detailed information about Collector, refer to About Shared Collectors. |
| No Rule Matching | Checkbox for excluding rule-based matching. Enable the Pass Traffic checkbox if no rules are matching. |
| Control Traffic |
Enable the Control Traffic checkbox to pass the GTP control traffic (GTP-c) to all GigaSMART engines in a GTP engine group. A GTP engine group has multiple GigaSMART engine port members. Note: The Control Traffic checkbox is applicable only for GTP and is displayed only if the map type is configured as First level, and the map sub type is configured as By Rule. |
|
Map Source and Destination Map
|
|
| Source |
From the Source drop-down list, select the required source ports for the map. To create a port list, click Port Editor. Note: You can add a maximum of 324 ports in the Source drop-down list, if the ports are not attached to a GigaStream. Note: For details about port types that are supported for the different types of maps, refer to Port Lists. |
| Destination | From the Destination drop-down list, select the required destination ports for the map. To create a port list, click Port Editor. |
| Encapsulation Tunnel |
If you have selected a circuit port in the Destination drop-down list, select the required circuit tunnel from the Encapsulation Tunnel drop-down list to encapsulate the traffic. If the map is used to redirect the decapsulated traffic to the required tool ports, ensure that you select the IP interface in the Source drop-down list. You must have attached the IP interface to the VXLAN or L2GRE tunnel. For details about VXLAN or L2GRE tunnels, refer to About Virtual Extensible LAN (VXLAN) Tunnels and About Layer 2 Generic Routing Encapsulation (L2GRE) Tunnels. From the Destination drop-down list, select the required tool ports. |
| GigaSMART Operations (GSOP) | If the map will use a GigaSMART operation, select the operation from the GigaSMART Operations (GSOP) drop-down list. |
|
Map Configuration and Rules
|
|
| Address Rewrite |
(Optional) Enable the address rewrite checkbox and select either MAC Address or IPv4 Address. For detailed information about MAC Address Rewrite, Refer to MAC Address Rewrite. For detailed information about IP Address Rewrite, Refer to IP Address Rewrite. |
| VLAN Action |
Select Add option from the VLAN Action field to add a new VLAN tag to the outgoing traffic. For detailed information about VLAN Manipulation, Refer to VLAN Manipulation. |
| Map Rules |
To add rules to the map, do any of the following:
For detailed information about map rules, refer to Map Rules. |
| Map Order | |
|
Priority |
Set the Map Order by selecting the priority from the Priority list. For details about map priority, refer to Map Priority. |
| Map Permissions | |
| Owner | Select user group(s) who own the map. |
| Edit | Select user group(s) who can edit the map. |
| Listen | Select user group(s) who can listen to the traffic. |
| View | Select user group(s) who can view the map. |
| Map Tag | |
|
Tags |
Select the required tag key and tag value to which the map must be associated. The tag key and the associated tag values must be created in advance in GigaVUE- FM. Refer to the "Tags" and "Role Based Access Control" sections in the GigaVUE Administration Guide for more details. Note: When you associate a map to a tag value, then the ports, port groups, port pairs, GigaStreams that belong to the map are also associated to the tags. |
Clone Map
You can create a copy of an existing map by doing the following:
| 1. | Select Maps > Maps to open the Maps page. |
| 2. | Select the check box of the map that you to clone. |
| 3. | Click Clone. |
| 4. | Make changes to the map as necessary, such as specifying an alias. |
| 5. | Click Save. |
Edit Maps
| 1. | Click the List view button. |
| 2. | Select the map on the Maps page by either selecting the check box and then clicking Edit, or click on the row in the table and clicking Edit in the Map Quick View. |
| 3. | Make the changes to the map. |
When editing a map, you can only modify the following:
| Map alias |
| Description |
| Change the source and destination. |
| Select a different GS Operation. |
| Modify rules. |
| Add rules. |
| Delete rules. |
| Permissions as allowed. |
| 4. | Click Save. |
Delete Maps
Keep in mind the following rules and notes before you delete a map:
- If you have configured an Active Visibility policy action for a map, ensure that you delete the Active Visibility policy before you delete the map. If you delete the map before deleting the Active Visibility policy, it would result in errors in the policy action.
- If you delete a map, which has a network port that is shared with another map, the map statistics will be reset for the other map.
To delete a map or maps, do the following:
| 1. | Go to Maps, select Maps > Maps to open the Maps page. |
| 2. | Select the check box for the map or maps to delete, and then Click Delete. |
| 3. | When the message appears, asking if you want to delete the selected maps, click OK. |
Note: In the GRIP configuration, when you delete a map on the primary node, irrespective of the inline-network traffic-path, the traffic is switched to the secondary node. The port utilization must be 0% on the primary node and active on the secondary node.
Create Map Groups
Map Groups are a collection of maps that are used with GTP Flow Sampling Overlap and GTP Whitelisting Overlap GigaSMART solutions.
Use the Map Groups page to create a group of maps for GTP forward listing and GTP flow sampling. All the maps in a map group receive traffic according to map rules, rather than map priority. Thus, multiple copies of a GTP packet can be sent to more than one tool. This functionality is referred to as overlapping maps.
The virtual port for specified as the source for GTP forward listing and GTP flow sampling must have GTP Overlap enabled.
When creating Map Groups keep the following in mind:
| A map group can be associated with only one GigaSMART group (gsgroup). |
| All maps within a map group must be connected to the same vport. |
| A map group can consist of only one GTP forward listing map or only one GTP flow sampling map but it cannot contains two maps of the same type. |
| Once you have created a map group, you cannot edit it to change the type or subtype of the map. However, you can add or edit the map rules for a map, which is configured in a map group. Similarly, you cannot edit the map group alias but you can edit the aliases of the maps that are configured in the map group. |
| If multiple map groups are configured, the maps within each map group must point to the same port groups as the other map groups. |
To create a Map Group, do the following:
| 1. | Go to Maps, select Maps > Map Groups to open the Maps page. |
| 2. | Click New. |
| 3. | Enter an alias for the map group. |
Use an alias that helps identify the map group.
| 4. | (Optional) Enter a description about the map group. Refer to Description to Map Rules for the considerations regarding description. |
| 5. | Click in the Maps field and select the maps to add to the map group. |
| 6. | Click Apply. |
Description to Map Rules
Use description to label the purpose of a rule or the type of traffic covered by a rule. To add a map rule description to a map select Maps > Maps > Edit.
Consider the following when adding map rule description:
| Use up to 128 characters, including spaces. |
| Enclose the description in quotation marks, if the description is longer than one word. |
| To include double quotation marks (") inside the quotation marks, precede the quote mark with a backslash (\). |
Error Messages
Error messages are displayed when a description is invalid, for example:
| if the description is longer than one word and does not include double quotation marks |
| if the description is longer than 128 characters |
| if the rule with which the description is included is not valid. |
Edit Map Rule Description
To edit a map rule description, do the following:
| 1. | Select Maps > Maps |
| 2. | Select the map to edit. |
| 3. | Click Edit. |
| 4. | Change the description in the Description field |
| 5. | Click Save to recreate with a different description. |
How to Use the Quick Editor for Pass and Drop Rules
When creating a map, you can use the Quick Rule Editor to quickly select custom port numbers for a map rule or add a range of IP address.
When manually configuring an Inline Bypass rule-based map in the device, it's important to understand how the Quick Rule Editor behaves based on the map's configuration mode:
| a. | If the map type is set to 'Inline' mode before using the Quick Rule Editor. Any rules added through the Quick Rule Editor will be applied with default, non-editable values, resulting in "read-only" rules. |
| b. | If the map remains in its default mode (not set to 'Inline') when using the Quick Rule Editor. Rules can be added and subsequently edited as needed. |
How to Use the Quick Editor to Add Port Numbers
To use the Quick Rule Editor, do the following:
| 1. | While on an Edit Map or New Map page, click Quick Editor under Map Rules. This opens the Quick Rule Editor. |
| 2. | On the Quick Rule Editor view, select the port number or numbers to add for a pass or drop rule or both. |
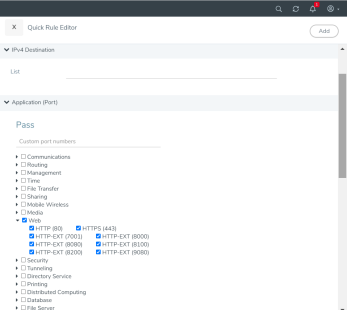
The Quick Rule Editor has two columns of custom port numbers, one for pass rules and one for drop rules. In each column, the ports are categorized by type. For example, Web provides a list of HTTP ports as shown in the following figure, where HTTPS port 443 is selected for pass and HTTP port 80 is selected for drop.
| 3. | Click Add. |
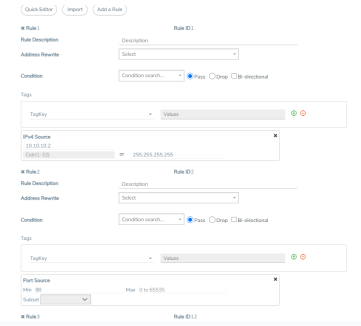
A rule with a port source is added for each custom port number selected in the Quick Rule Editor. If the port was selected from the custom port numbers under Pass, the rule is a pass rule. If the port was selected from the port numbers under Drop, the rule is a drop rule. The following figure shows two rules added by the example shown in the previous step.
How to Use the Quick Port Editor to Add IP Address
Rather than enter IP address for map rules one at a time, the Quick Rule Editor makes it possible to enter a range to quickly add the IP addresses, saving time.
To enter a range of IP address with the Quick Rule Editor, do the following:
| 1. | While on an Edit Map or New Map page, click Quick Editor under Map Rules. This opens the Quick Rule Editor. |
| 2. | Enter an IP address range in the List field under IPv4 Source or IPv4 Destination or both. For example, 10.10.10.9..11/32 in the List field under IPv4 Source . |
| 3. | Click Add. |
The Quick Rule Editor adds the IPv4 Source rules with the IP addresses. For example, if you entered 10.10.9..11 for the IPv4 Source, the editor adds three Ipv4 Source rules with the IP addresses 10.10.10.9/32, 10.10.10.10/32, 10.1010.11/32.


