Refer to Access GigaSMART from GigaVUE‑FM for details.
Configure ports
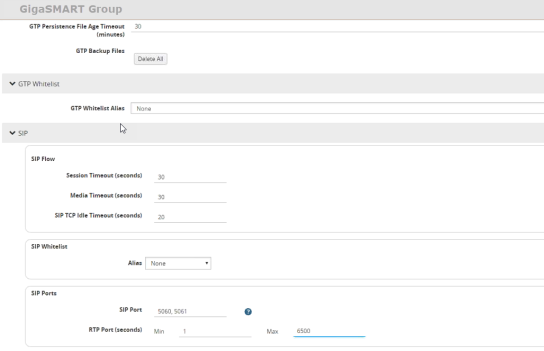
To configure a GigaSMART group and associate it with a GigaSMART engine port do the following.
|
1.
|
From the left navigation pane, go to System > GigaSMART > GigaSMART Groups. |
|
3.
|
Type an alias in the Alias field and enter an engine port in the Port List field. |
|
5.
|
Scroll drown the page to select SIP Port parameters. |
|
6.
|
Type parameters for SIP Port and RTP Port. |
|
7.
|
Enter parameters for SIP Session Timeout and the SIP TCP Idle Timeout. |

Create Virtual Ports
Refer to Access GigaSMART from GigaVUE‑FM for details.
To create virtual ports, do the following:
|
1.
|
From the device view, select GigaSMART > Virtual Ports. |

|
3.
|
Enter an alias in the Alias field to identify the virtual port. |
|
4.
|
In the GigaSMART Groups field, select the GigaSMART Group configured in Step 1: of Configure a GigaSMART Group. |
Configure GigaSMART Operation
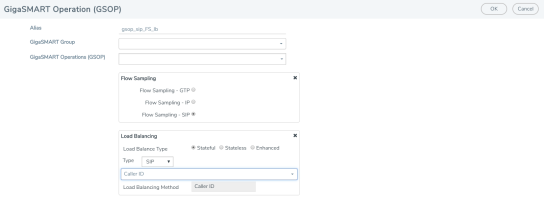
Define a GigaSMART operation to enable SIP Flow Sampling. If combining Flow Sampling with Load Balancing GSOPs, make sure that you select both operations when creating the GigaSMART Operation.
Refer to Access GigaSMART from GigaVUE‑FM for details.
To configure the GigaSMART Operation, do the following:
|
1.
|
From the left navigation pane, go to System > GigaSMART > GigaSMART Operations (GSOP). |
|
2.
|
Click New. On the GigaSMART Operations page, do the following: |
|
3.
|
In the Alias field, enter an alias to help identify this GSOP. |
|
4.
|
In the GigaSMART Groups field, select the GigaSMARTgroup configured in Step 1: Configure a GigaSMART Group. |
|
5.
|
In the GigaSMART Operations (GSOP) field, select Flow Samplingfor SIP. |
|
6.
|
Using the GSOP drop down list, select Load Balancing as the next GSOP operation. |

|
4
|
GigaSMART Operations - Load Balancing |
Options:
- Stateful
- Stateless
- Enhanced
|
8.
|
For Type, select SIP as the stateful application within a group of GigaSMART operations. |
|
9.
|
Select Caller ID as the Load Balancing Method. |
Create first level map
|
1.
|
On the left navigation pane, click on  select Physical> Orchestrated Flows > Flow Maps, and then select the required cluster or node ID. select Physical> Orchestrated Flows > Flow Maps, and then select the required cluster or node ID. |
|
2.
|
On the Maps page, click New. |
|
3.
|
Type map-level1 in the Alias field. |
|
4.
|
Select First Level for Type and By Rule for Subtype. |
|
5.
|
Select port 1/1/x1 for the Source. |

|
6.
|
Select virtual port vport1 for the Destination. |
|
7.
|
Click Adda Rule to add Rule 1 |
Create second level map for SIP Flow Sampling.
|
1.
|
On the left navigation pane, click on  select Physical> Orchestrated Flows > Flow Maps, and then select the required cluster or node ID. select Physical> Orchestrated Flows > Flow Maps, and then select the required cluster or node ID. |
|
2.
|
On the Maps page, click New. |
|
3.
|
Type an alias in the Alias field. |
|
4.
|
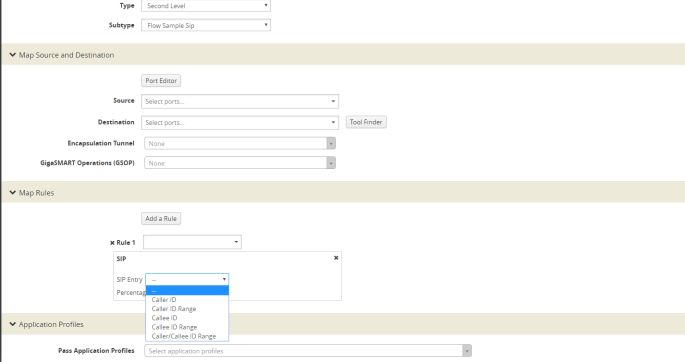
Select Second Level for Type and Flow Sample SIP for Subtype. |
|
5.
|
Select virtual port vport1 for the Source. |
|
6.
|
Select port group for the Destination. |
|
7.
|
Select the group from the GSOP list. |
|
9.
|
Select SIP for the condition. |
|
10.
|
Select any of the following options: |
|
o
|
Caller ID-For example, enter 408* for Caller ID. |

|
6
|
Create Second Level Map |
|
11.
|
Enter a percentage for amount the traffic you want to be affected by SIP flow sampling. |
|
13.
|
Select SIP for the condition |
|
14.
|
Enter 6501234* for Caller ID. |
|
15.
|
Enter a percentage for amount the traffic you want to be affected by SIP flow sampling. |
Create the SIP whitelist
|
1.
|
From the left navigation pane, go to System > GigaSMART >GTP Whitelist. |
|
3.
|
Type an alias in the Alias field. |
|
4.
|
From the GigaSMART Groups drop-down list, select a .the GigaSMART group. |
|
5.
|
Load whitelist files from a specified location to populate the SIP whitelist. |
|
a.
|
On the SIP Whitelist page, select Bulk Upload. |
|
b.
|
Select Bulk Entry Operation for Upload Type |
|
c.
|
Select Upload from URL from the Bulk Upload Type list. |
|
d.
|
Enter the URL in the Enter Remote URL field. |
Associate the GigaSMART group to the SIP whitelist.
|
1.
|
Navigate to GigaSMART Groups > GigaSMART Groups. |
|
2.
|
Select the GigaSMART Group you previously created and click Edit. |
|
3.
|
From the GigaSMART Groups drop-down list, select a GigaSMART group previously created. |
|
4.
|
Under SIP Whitelist, click on the SIP Whitelist Alias field and select the alias previously created from the available list. |
Configure GigaSMART operation for SIP whitelisting
|
1.
|
Navigate to GigaSMART Operations > GigaSMART Operation. |
|
3.
|
Type an alias in the Alias field. |
|
4.
|
Select the GigaSMART group created in task 1. |
|
5.
|
From the GigaSMART Operations (GSOP) drop-down list, select the following: |
|
o
|
SIP Whitelist and select Enabled. |
|
6.
|
For Load Balancing, do the following: |
7. Click OK.
Configure first level map
|
1.
|
On the left navigation pane, click on  select Physical> Orchestrated Flows > Flow Maps, and then select the required cluster or node ID. select Physical> Orchestrated Flows > Flow Maps, and then select the required cluster or node ID. |
|
b.
|
Type: First Level, Sub Type: By Rule |
Create another second level map for SIP flow whitelist
|
1.
|
On the left navigation pane, click on  select Physical> Orchestrated Flows > Flow Maps, and then select the required cluster or node ID. select Physical> Orchestrated Flows > Flow Maps, and then select the required cluster or node ID. |
|
b.
|
Type: Second Level, Sub Type: Flow Whitelist SIP |
|
e.
|
Select from the GSOP list. |
|
5.
|
Select SIP. In SIP type, you can choose any of the following options: |


 select Physical> Orchestrated Flows > Flow Maps, and then select the required cluster or node ID.
 select Physical> Orchestrated Flows > Flow Maps, and then select the required cluster or node ID.
 select Physical> Orchestrated Flows > Flow Maps, and then select the required cluster or node ID.
 select Physical> Orchestrated Flows > Flow Maps, and then select the required cluster or node ID.


