Processors and heat sinks
This describes the procedure to install and remove Processors and Heat Sinks.
WARNING: The heat sink may be hot to touch for some time after the system is powered down. Allow the heat sink to cool before removing it.
-
Follow the safety guidelines listed in Safety instructions.
-
Follow the procedure listed in Before working inside your system.
-
If applicable, remove the air shroud.
Removing Processor and Heat Sink Module
Follow the below steps to remove a Processor and Heat Sink module:
1. Using a Torx #T30 screwdriver, loosen the screws on the heat sink in the order below:
| a. | Loosen the first screw three turns. |
| b. | Loosen the second screw completely. |
| c. | Return to the first screw and loosen it completely. |
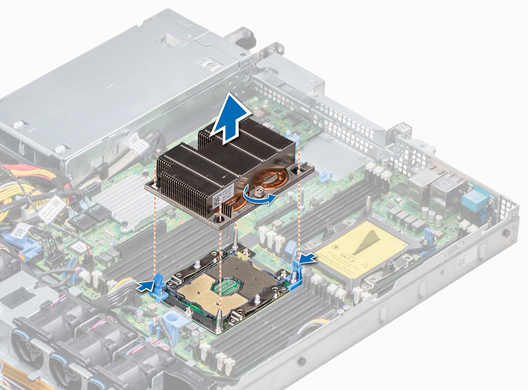
2. Pushing both blue retention clips simultaneously, lift the processor and heat sink module (PHM) processor and heat sink module
3. Set the PHM aside with the processor side facing up.
Installing a Processor and Heat Sink Module
CAUTION: Never remove the heat sink from a processor unless you intend to replace the processor. The heat sink is necessary to maintain proper thermal conditions.
-
Follow the safety guidelines listed in Safety instructions.
-
If installed, remove the processor blank and CPU dust cover.
Follow the below steps to install a Processor and Heat Sink module:
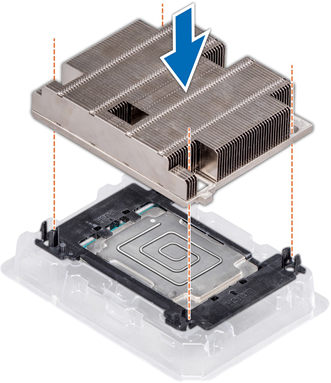
1. Align the pin 1 indicator of the heat sink to the system board and then place the processor and heat sink module (PHM) on the processor socket.
CAUTION: To avoid damaging the fins on the heat sink, do not press down on the heat sink fins.
Note: Ensure that the PHM is held parallel to the system board to prevent damaging the components.
2. Push the blue retention clips inward to allow the heat sink to drop into place.
3. Using the Torx #T30 screwdriver, tighten the screws on the heat sink in the order below:
| a. | Partially tighten the first screw (approximately 3 turns). |
| b. | Tighten the second screw completely. |
| c. | Return to the first screw and tighten it completely. |
4.If the PHM slips off the blue retention clips when the screws are partially tightened, follow these steps to secure the PHM:
| a. | Loosen both the heat sink screws completely. |
| b. | Lower the PHM on to the blue retention clips, following the procedure described in step 2. |
| c. | Secure the PHM to the system board, following the replacement instructions listed in this step above. |
Note: The processor and heat sink module retention screws should not be tightened to more than 0.13 kgf-m (1.35N.m or 12 in-lbf).

After installing the Processor Heat Sink Module follow the procedure listed in After working inside your system.
Removing the Processor from the Processor and Heat Sink Module
Note: Only remove the processor from the processor and heat sink module if you are replacing the processor or heat sink. This procedure is not required when replacing a system board.
-
Follow the safety guidelines listed in Safety instructions.
-
Follow the procedure listed in Before working inside your system.
-
Remove the air shroud.
-
Remove the processor and heat sink module.
Follow the below steps to remove a Processor from a Processor and Heat Sink module:
1. Place the heat sink with the processor side facing up.
2. Insert a flat blade screwdriver into the release slot marked with a yellow label. Twist (do not pry) the screwdriver to break the thermal paste seal.
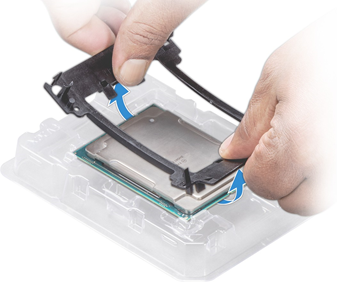
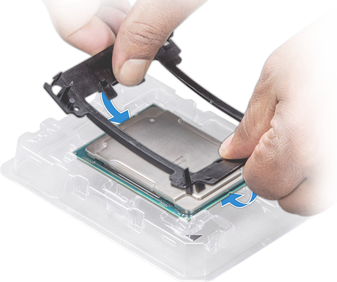
3. Push the retaining clips on the processor bracket to unlock the bracket from the heat sink.
4. Lift the bracket and the processor away from the heat sink, and place the processor connector side down on the processor tray.
5. Flex the outer edges of the bracket to release the bracket from the processor.
Note: Ensure that the processor and the bracket are placed in the tray after you remove the heat sink.
Installing the Processor into a Processor and Heat Sink Module
-
Follow the safety guidelines listed in Safety instructions
Follow the below steps to install a Processor from a Processor and Heat Sink module:
1. Place the processor in the processor tray.
Note: Ensure that the pin 1 indicator on the processor tray is aligned with the pin 1 indicator on the processor.
2. Flex the outer edges of the bracket around the processor ensuring that the processor is locked into the clips on the bracket.
Note: Ensure that the pin 1 indicator on the bracket is aligned with the pin 1 indicator on the processor before placing the bracket on the processor.
Note: Ensure that the processor and the bracket are placed in the tray before you install the heat sink.
3. If you are using an existing heat sink, remove the thermal grease from the heat sink by using a clean lint-free cloth.
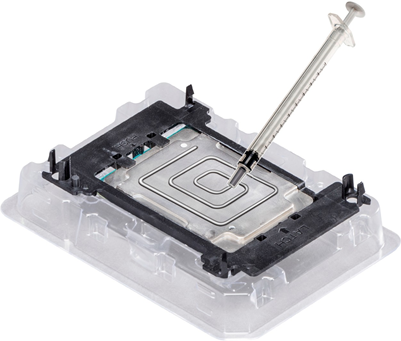
4. Use the thermal grease syringe included with your processor kit to apply the grease in a quadrilateral design on the top of the processor.
CAUTION: Applying too much thermal grease can result in excess grease coming in contact with and contaminating the processor socket.
Note: The thermal grease syringe is intended for single use only. Dispose the syringe after you use it.
5. Place the heat sink on the processor and push down on the base of the heat sink until the bracket locks onto the heat sink.
Note: ● Ensure that the two guide pin holes on the bracket match the guide holes on the heat sink. ● Do not press on the heat sink fins. ● Ensure that the pin 1 indicator on the heat sink is aligned with the pin 1 indicator on the bracket before placing the heat sink onto the processor and bracket.