Power supply units
Note: For more information, see the PowerEdge R440 Technical Specs at www.dell.com/poweredgemanuals.
CAUTION: If two PSUs are installed, both the PSUs must have the same type of label. For example,
Extended Power Performance (EPP) label. Mixing PSUs from previous generations of PowerEdge servers is not supported, even if the PSUs have the same power rating. Mixing PSUs will result in mismatch condition or failure to turn the system on.
Note: When two identical PSUs are installed, power supply redundancy (1+1 – with redundancy or 2+0 – without redundancy) is configured in system BIOS. In redundant mode, power is supplied to the system equally from both PSUs when Hot Spare is disabled. When Hot Spare is enabled, one of the PSUs is put into the sleep mode when system utilization is low in order to maximize efficiency.
Note: If two PSUs are used, they must be of the same maximum output power.
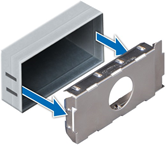
Removing a Power Supply unit blank
-
Follow the safety guidelines listed in Safety instructions.
Follow the below steps to remove the Power Supply Unit blank:
If you are installing a second power supply unit, remove the power supply unit blank in the bay by pulling the blank outward.
CAUTION: To ensure proper system cooling, the power supply unit blank must be installed in the second power supply unit bay in a non-redundant configuration. Remove the power supply unit blank only if you are installing a second power supply unit.
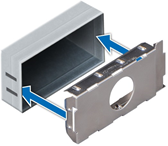
Installing a Power Supply Unit blank
-
Follow the safety guidelines listed in Safety instructions.
Note: Install the power supply unit (PSU) blank only in the second PSU bay.
Follow the below steps to install the Power Supply Unit blank:
-
Align the PSU blank with the PSU slot and push it into the PSU slot until it clicks into place.
After installing a Power Supply Unit follow the procedure listed in After working inside your system.
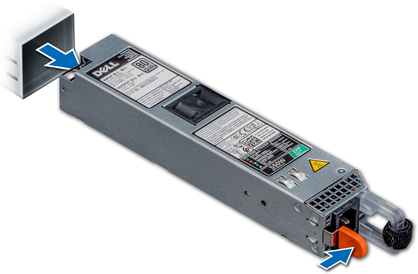
Removing a Power Supply Unit
CAUTION: The system needs one power supply unit (PSU) for normal operation. On power-redundant systems, remove and replace only one PSU at a time in a system that is powered on.
-
Follow the safety guidelines listed in Safety instructions.
-
Disconnect the power cable from the power source and from the PSU you intend to remove, and then remove the cable from the strap on the PSU handle.
-
Unlatch and lift the optional cable management arm if it interferes with the PSU removal.
Follow the below steps to remove the Power Supply Unit blank:
-
Press the release latch and slide the PSU out of the system by using the PSU handle.
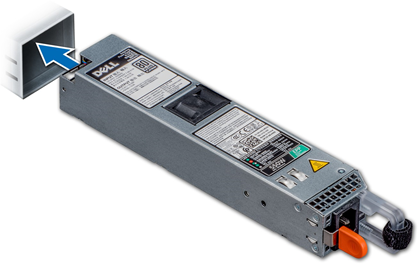
Installing a Power Supply Unit
-
Follow the safety guidelines listed in Safety instructions
-
For systems that support redundant PSU, ensure that both the PSUs are of the same type and have the same maximum output power.
Note: The maximum output power (shown in watts) is listed on the PSU label.
Follow the below steps to install the Power Supply Unit :
-
Slide the PSU into the system until the PSU is fully seated and the release latch snaps into place.
1. If you have unlatched the cable management arm, relatch it.
2. Connect the power cable to the PSU, and plug the cable into a power outlet.
CAUTION: When connecting the power cable to the PSU, secure the cable to the PSU with the strap.
Note: When installing, hot swapping, or hot adding a new PSU, wait for 15 seconds for the system to recognize the PSU and determine its status. The PSU redundancy may not occur until discovery is complete. Wait until the new PSU is discovered and enabled before you remove the other PSU. The PSU status indicator turns green to signify that the PSU is functioning properly.
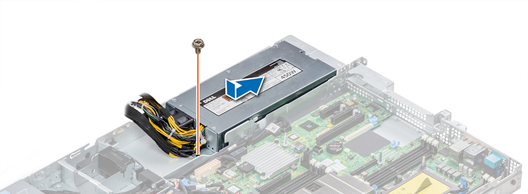
Removing a non-redundant cabled AC power supply unit
-
Follow the safety guidelines listed in Safety instructions.
-
Follow the procedure listed in Before working inside your system.
-
Remove the air shroud
-
Disconnect the system from the electrical outlet.
-
Disconnect all the cables connected from the PSU to the system board.
-
If applicable, remove the expansion card riser.
Follow the below steps to remove a non-redundant cabled AC power supply unit :
1. Using a Phillips #2 screwdriver, remove the screw securing the PSU to the system.
2. Slide the PSU out of the PSU cage.

Installing a non-redundant cabled AC power supply unit
-
Follow the safety guidelines listed in Safety instructions.
Follow the below steps to install a non-redundant cabled AC power supply unit :
1. Unpack the new power supply unit (PSU).
2. Slide the new PSU into the PSU cage until the PSU is fully seated.
3. Using a Phillips #2 screwdriver, replace the screw to secure the PSU to the system.
After installing you do the following:
1. Connect the PSU cables to the connectors on the system board.
2. If applicable, install the expansion card riser.
3. Install the air shroud.
4. Follow the procedure listed in After working inside your system.


