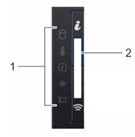
Left Control Panel View
|
Item |
Indicator, button, or connector |
Icon |
Description |
|---|---|---|---|
|
1 |
Status LED indicators |
N/A |
Indicate the status of the system. |
|
2 |
System health and system ID indicator |
i |
Indicates the system health. |
Status LED indicators
Note: The indicators display solid amber if any error occurs.
Table 5. Status LED indicators and descriptions
|
Icon |
Description |
Condition |
Corrective Action |
|---|---|---|---|
|
|
Drive indicator |
The indicator turns solid amber, if there is a drive error. |
● Check the System event log to determine if the drive has an error. ● Run the appropriate Online Diagnostics test. Restart the system, and run embedded diagnostics (ePSA). ● If the drives are configured in a RAID array, restart the system, and enter the host adapter configuration utility program. |
|
|
Temperature indicator |
The indicator turns solid amber, if the system experiences a thermal error (for example, the ambient temperature is out of range or there is a fan failure). |
Ensure that none of the following conditions exist: ● A cooling fan has been removed or has failed. ● System cover, air shroud, or back filler bracket is removed. ● Ambient temperature is too high. ● External airflow is obstructed. |
|
|
Electrical indicator |
The indicator turns solid amber, if the system experiences an electrical error (for example, voltage out of range, or a failed power supply unit (PSU) or voltage regulator). |
Check the System event log or system messages for the specific issue. If it is due to a problem with the PSU, check the LED on the PSU. Reseat the PSU. |
|
|
Memory indicator |
The indicator turns solid amber if a memory error occurs. |
Check the System event log or system messages for the location of the failed memory. Reseat the memory module. |
|
|
PCIe indicator |
The indicator turns solid amber, if a PCIe card experiences an error. |
Restart the system. Update any required drivers for the PCIe card. Reinstall the card. |


Right Control Panel View
Table 8. Right control panel
|
Item |
Indicator or Button |
Icon |
Description |
|---|---|---|---|
|
1 |
Power button |
|
Indicates if the system is powered on or off. Press the power button to manually power on or off the system. Press the power button to gracefully shut down an ACPI-compliant operating system. |
|
2 |
USB port |
|
The USB ports are 4-pin, 2.0- compliant. This port enables you to connect USB devices to the system. |
|
3 |
iDRAC Direct LED |
N/A |
The iDRAC Direct LED indicator lights up to indicate that the iDRAC Direct port is actively connected to a device |
|
4 |
iDRAC Direct port (Micro-AB USB) |
|
The iDRAC Direct (Micro- USB) AB USB) port enables you to access the iDRAC Direct (Micro-AB) features. |


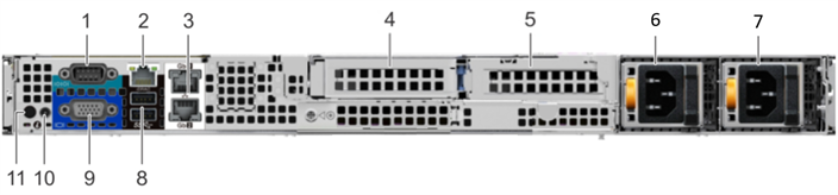
Back View of the System
The back view displays the features available on the back of the system.
|
Item |
Ports, panels, or slots |
Icon |
Description |
|---|---|---|---|
|
1 |
Serial port |
|
Use the serial port to connect a serial device to the system. |
|
2 |
iDRAC9 dedicated network port |
N/A |
Use the iDRAC9 dedicated network port to securely access the embedded iDRAC on a separate management network. |
|
3 |
Ethernet ports (2) |
|
Use the Ethernet ports to connect Local Area Networks (LANs) to the system. |
|
4 |
Low profile riser right slot |
N/A |
Use the card slot to connect half-height PCIe expansion card on low profile riser. |
|
5 |
Low profile riser left slot |
N/A |
Use the card slot to connect half-height PCIe expansion card on low profile riser. |
|
6 |
Power supply unit (PSU) |
N/A |
For more information about the PSU configurations, see the PowerEdge R440 Technical Specs. |
|
7 |
Power supply unit (PSU) |
N/A |
For more information about the PSU configurations, see the PowerEdge R440 Technical Specs. |
|
8 |
USB 3.0 port (2) |
|
Use the USB 3.0 port to connect USB devices to the system. These ports are 4-pin, USB 3.0-compliant. |
|
9 |
VGA port |
|
Use the VGA port to connect a display to the system. |
|
10 |
System status indicator cable port |
N/A |
Enables you to connect the status indicator cable and view system status when the CMA is installed. |
|
11 |
System identification button |
|
Press the system ID button: ● To locate a particular system within a rack. ● To turn the system ID on or off. To reset iDRAC, press and hold the button for more than 15 seconds. NOTE: To reset iDRAC using system ID, ensure that the system ID button is enabled in the iDRAC setup. |


