Upgrade GigaVUE Fabric Components in GigaVUE-FM for Azure
This chapter describes how to upgrade GigaVUE V Series Proxy and GigaVUE V Series Node. For more detailed information about UCT-V Controller, GigaVUE V Series Proxy and Node Version refer GigaVUE‑FM Version Compatibility Matrix.
Refer to the following topic for more information:
Prerequisite
Before you upgrade the GigaVUE V Series Proxy and GigaVUE V Series Node, you must upgrade GigaVUE‑FM to software version 5.13.01 or above.
Upgrade UCT-V Controller
Note: UCT-V Controllers cannot be upgraded. Only a new version that is compatible with the UCT-V's version can be added or removed in the Azure Fabric Launch Configuration page.
To change the UCT-V Controller version follow the steps given below:
To change UCT-V Controller version between different major versions
Note: You can only add UCT-V Controllers which has different major versions. For example, you can only add UCT-V Controller version 1.8-x if your existing version is 1.7-x.
- In the Azure Fabric Launch Configuration page, under Controller Versions, click Add.
- From the Image drop-down list, select a UCT-V Controller image that matches with the version number of UCT-Vs installed in the instances.
- From the Size drop-down list, select a size for the UCT-V Controller. The default size is Standard_B1s.
- In Number of Instances, specify the number of UCT-V Controllers to launch. The minimum number you can specify is 1.

You cannot change the IP Address Type and the Additional Subnets details, provided at the time of UCT-V Controller configuration.
After installing the new version of UCT-V Controller, follow the steps given below:
- Install UCT-V with the version same as the UCT-V Controller.
- Delete the UCT-V Controller with older version.
To change UCT-V Controller version with in the same major version:
Note: This is only applicable, if you wish to change your UCT-V Controller version from one minor version to another with in the same major version. For example, from 1.8-2 to 1.8-3.
- From the Image drop-down list, select a UCT-V Controller image with in the same major version.
- Specify the Number of Instances. The minimum number you can specify is 1.
- Select the Subnet from the drop-down.
- You cannot modify the rest of the fields.
- After installing the new version of UCT-V Controller, install the UCT-V with the same version.
Upgrade GigaVUE V Series Node and GigaVUE V Series Proxy
GigaVUE‑FM lets you upgrade GigaVUE V Series Proxy and GigaVUE V Series Node at a time.
There are multiple ways to upgrade the GigaVUE V Series Proxy and Node. You can:
| Launch and replace the complete set of nodes and proxys at a time. |
For example, if you have 1 GigaVUE V Series Proxy and 10 GigaVUE V Series Nodes in your VNet, you can upgrade all of them at once. First, the new version of GigaVUE V Series controller is launched. Next, the new version of GigaVUE V Series nodes are launched. Then, the old version of V Series controller and nodes are deleted from the VNet.
NOTES:
| When the new version of node and proxy is launched, the old version still exists in the VNet until they are deleted. Make sure the instance type determined during the configuration can accommodate the total number of new and old instances present in the VNet. If the instance type cannot support so many instances, you can choose to upgrade in multiple batches. |
| If there is an error while upgrading the complete set of proxys and nodes present in the VNet, the new version of the fabric is immediately deleted and the old version of the fabric is retained as before. |
| If you have deployed your nodes using Public IP address while creating the monitoring domain, then select the same number of Public IP addressess defined in your Max Instances when upgrading your nodes. Refer to Create Monitoring Domain for more detailed information. |
| Launch and replace the nodes and proxy in multiple batches. |
For example, if there are 18 GigaVUE V Series Nodes to be upgraded, you can specify how many you want to upgrade per batch.
To upgrade the GigaVUE V Series Proxy and GigaVUE V Series Node:
| 1. | Go to Inventory > VIRTUAL > Azure, and then click Monitoring Domain. The Monitoring Domain page appears. |
| 2. | On the Monitoring Domain page, select the connection name check box and click Actions |
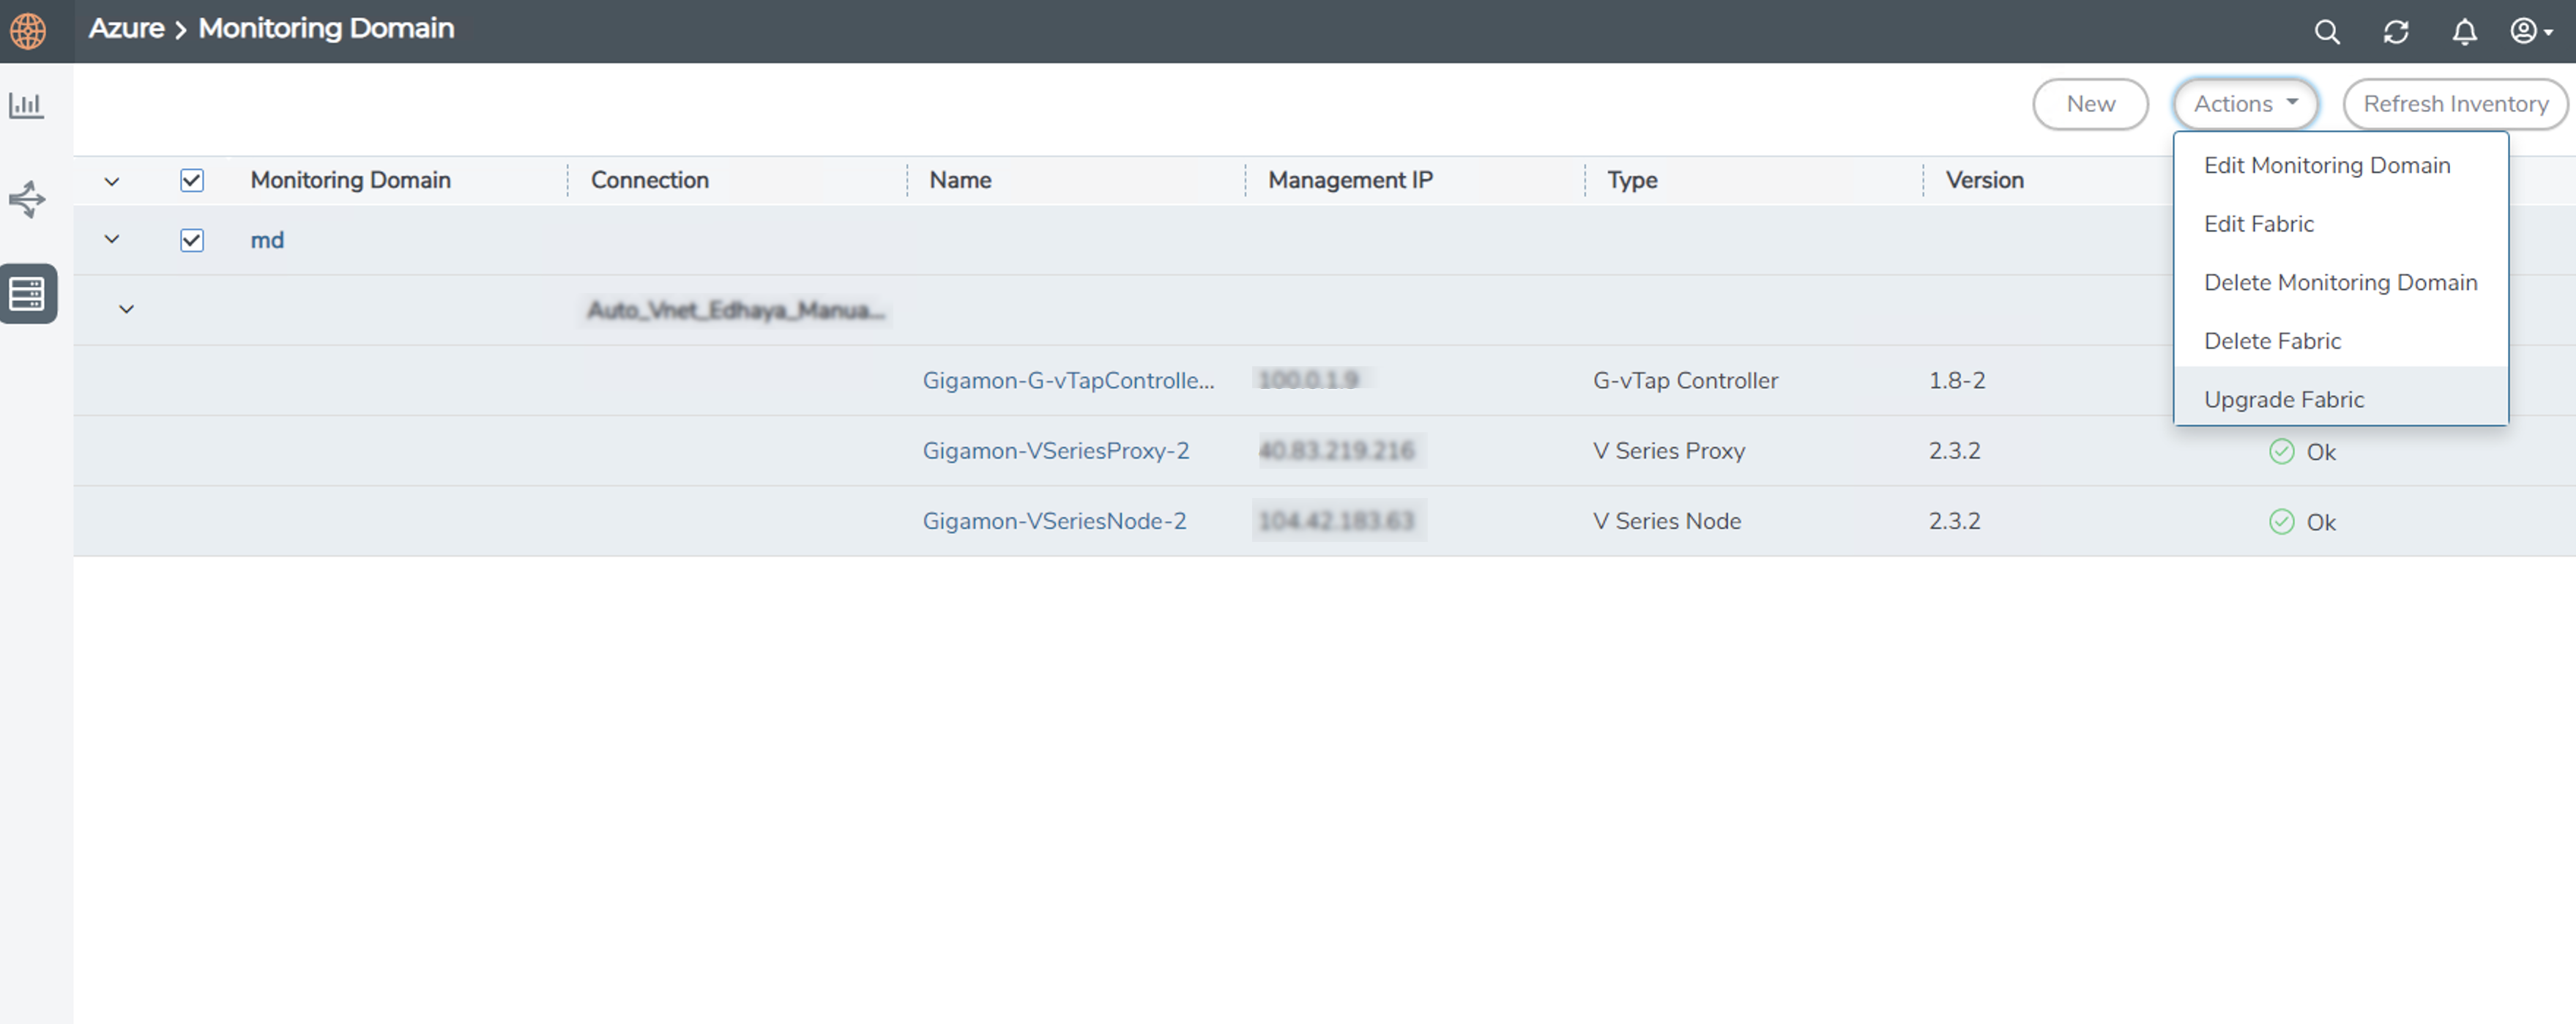
| 3. | Select Upgrade Fabric from the drop-down list. The Fabric Nodes Upgrade page is displayed. |
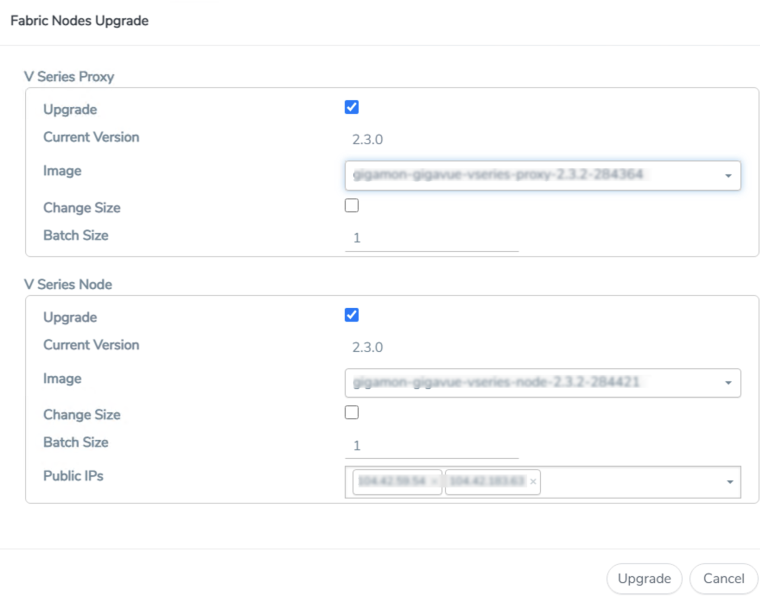
| 4. | To upgrade the GigaVUE V Series Node/Proxy, select the Upgrade checkbox. |
| 5. | From the Image drop-down list, select the latest version of the GigaVUE V SeriesProxy/Nodes. |
| 6. | Select the Change Size checkbox to change the flavor of the node/proxy, only if required. |
| 7. | To upgrade the GigaVUE V Series Node/Proxy, specify the batch size in the Batch Size box. |
For example, if there are 7 GigaVUE V Series Nodes, you can specify 7 as the batch size and upgrade all of them at once. Alternatively, you can specify 3 as the batch size, and launch and replace 3 V Series nodes in each batch. In the last batch, the remaining 1 V Series node is launched.
| 8. | From the Public IPs drop-down list, select the IP addressess equal to the Max Instances defined when creating a monitoring domain. |
Note: This is only applicable for nodes deployed using Public IP, when creating a monitoring domain.
| 9. | Click Upgrade. |
The upgrade process takes a while depending on the number of GigaVUE V Series Proxys and Nodes upgrading in your Azure environment. First, the new version of the GigaVUE V Series Proxy is launched. Next, the new version of GigaVUE V Series Nodes is launched. Then, the older version of both is deleted from the project. The monitoring session is deployed automatically.
To view the detailed upgrade status click Upgrade in progress or Upgrade successful, the V Series Node Upgrade Status dialog box appears.
- Click Clear to delete the monitoring domain upgrade status history of successfully upgraded nodes.


