Configuring GigaVUE H Series Time Options
The GigaVUE H Series node includes a variety of features for setting the time, including:
|
Method |
CLI Command |
For more information: |
|
System Clock |
clock set hh:mm:ss yyyy/mm/dd |
Setting Time Manually on page 59 |
|
One-Time NTP Synchronization |
ntpdate <ntpserver address> |
Performing One-Time NTP Server Synchronization on page 60 |
|
Persistent NTP Synchronization |
Add server using ntp server command. Enable use of ntp with ntp enable command. |
Using NTP Time Server for Clock Synchronization on page 60 |
|
PTP Synchronization |
Enable PTP with ptp enable command. |
Refer to the GigaVUE-OS CLI Reference Guide (Reserved for future use) |
Setting Time Manually
The easiest way to set the GigaVUE H Series node’s time is manually with the clock set command. For example:
(config) # clock set 05:18:38 2015/01/06
Note: Even if you are using NTP, configure time manually as well. The GigaVUE H Series node will automatically fall back to the manual time setting if it is unable to synchronize with the specified time server.
The show ntp command shows the current state of the NTP server in use; the show clock command shows the current GigaVUE H Series node’s time.
Performing One-Time NTP Server Synchronization
You can perform a one-time synchronization with an NTP server using the ntpdate command. For example:
(config) # ntpdate time.nist.gov
Note: This method does not provide updates to correct clock drift over time. It is generally preferable to use persistent NTP synchronization with the ntp commands.
Using NTP Time Server for Clock Synchronization
The GigaVUE H Series node can optionally use one or more NTP servers for its time setting. Use the following procedure to add an NTP server to the GigaVUE H Series node’s list and enable the use of NTP.
| 1. | Specify the address of the time server. For example, if the time server is on 192.168.1.10, you would use the following command: |
(config) # ntp server 192.168.1.10
Note: There are many public NTP servers available on the Internet.
| 2. | Turn on NTP with the following command: |
(config) # ntp enable
| 3. | The GigaVUE H Series node connects to the specified NTP server and synchronizes to its time. |
| 4. | NTP reports times in UTC. Because of this, it is a good idea to specify the GigaVUE H Series node’s timezone so that UTC can be converted to the local timezone. |
You specify the timezone either in terms of the offset from UTC (either plus or minus) or with a particular location’s name, depending on the argument you choose for the clock timezone command:
| Offset from UTC – Set the timezone as an offset from UTC with the UTC-offset argument. For example, the following command sets the timezone as eight hours earlier than UTC: |
(config) # clock UTC-offset UTC-8
| Location – You can specify a particular location’s timezone to use. The easiest way to do this is to build the available list of cities by adding a space and a question mark after each subsequent zone word. For example, enter (config) # clock timezone ? to see the list of available locations. Select a location and use the same question mark technique to see the next available zone words. This way, you can build out to the exact location you need. For example: |
(config) # clock timezone America North United_States Pacific(config) # clock timezone Asia Eastern Hong_Kong
Once you have finished configuring NTP options, use the show ntp command to check the status of clock synchronization (1).
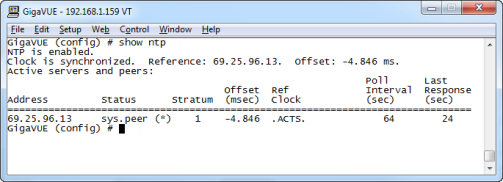
| 1 | Checking NTP Status and Configuration |


