Configure Hardware Security Model (HSM)
Refer to the following sections that provide details about HSM Group, its limitations, and instructions on how to configure HSM Group in Flexible Inline Canvas:
About HSM
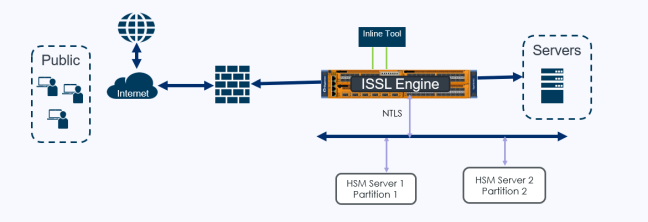
Hardware Security Modules (HSMs) are specialized systems that logically and physically safeguard cryptographic operations and cryptographic keys. HSMs protect sensitive data from being stolen by providing a highly secure operation structure. HSMs are comprehensive, self-contained solutions for cryptographic processing, key generation, and key storage. The hardware and firmware (i.e., software) required for these functions are automatically included in these appliances.
Some enterprises where security is paramount use nTrust-nCipher HSM to keep sensitive information such as private keys safe. Starting in software version 6.4, the current inline SSL is enhanced to include Thales-Luna HSM support in addition to the already supported nTrust-nCipher HSM solution.
|
1
|
ISSL with Thales Luna - Inbound support |
HSM Group - Limitations
Keep in mind the following limitations when configuring HSM Group:
|
■
|
For software version 6.4, Thales-Luna HSM support is only early access. |
|
■
|
nTrust-nCipher HSM and Thales-Luna HSM cannot be configured together in a HSM Group configuration. |
|
■
|
nTrust-nCipher HSM and Thales-Luna HSM cannot be configured together in a GigaSMART card. |
|
■
|
Thales-Luna features like cluster, standby, and non HA are not supported. |
|
■
|
IPv6 support for Thales-Luna server configuration will not be done along with IPv6 stack port support. |
|
■
|
When uploading RSA and ECDSA keys, validity check for protocol mismatch cannot be performed since the private keys are available on the HSM server. |
|
■
|
Thales-Luna HSM is not supported in GigaVUE-HC1P chassis. |
Supported Platforms
HSM Group is supported in the following platforms:
Configure HSM Group
To configure HSM Group:
|
1.
|
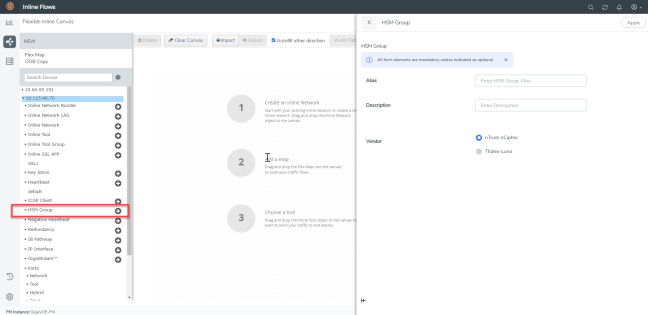
On the left navigation pane, go to Physical > Orchestrated Flows > Inline Flows, and then click Configuration Canvas to create a new Flexible Inline Canvas. |
|
2.
|
In the Flexible Inline Canvas that appears, select the required device for which you want to configure the HSM Group. |
|
3.
|
Click the ‘+’ icon next to the HSM Group option to create a new HSM. |
|
4.
|
In the HSM Group properties pane that appears on the right, enter the name and description of the HSM Group alias in the Alias and Description fields. |
|
5.
|
Select the required vendor type from the options (nTrust-nCipher or Thales-Luna) to create the respective HSM Group. |
Note: You can create a maximum of 16 HSM units per device for Thales-Luna HSM.
|
6.
|
Click Apply to save the configurations. All the individual HSM units that you create will be listed under the configured HSM Group. Refer below for detailed information on the configuration details for nTrust-nCipher and Thales-Luna.
|
Configure nTrust-nCipher HSM:
|
1.
|
Click the ‘+’ icon next to the configured nCipher HSM. |
|
2.
|
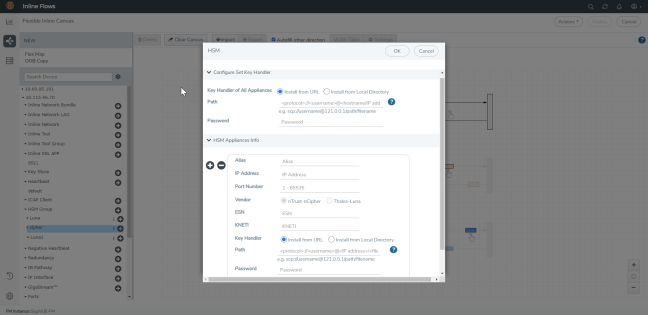
In the HSM pop-up pane, choose one of the following methods to install the key handler file: |
|
o
|
Install from URL—Enter a valid directory path including the file name and enter the password to access the server. |
Note: SCP, SFTP, HTTP, and FTP are the supported protocols from where you can select the key handler file.
|
o
|
Install from Local Directory—Browse and select the key handler file from your local directory. |
Note: Ensure that the file name is "world".
|
3.
|
In the Alias field, enter a name for the HSM appliance. |
|
4.
|
Enter a valid IP address and Port Number details. |
|
5.
|
By default, nTrust-nCipher is selected and Thales-Luna is disabled in the Vendor type when configuring nTrust-nCipher. |
|
6.
|
Enter the ESN and KNETI that you obtained from the HSM administrator. |
|
7.
|
Choose one of the following methods to select the required key handler file: |
|
o
|
Install from URL—Enter a valid directory path including the file name and enter the password to access the server. |
|
o
|
Install from Local Directory—Browse and select the key handler file from your local directory. |
|
8.
|
Click OK to save the configuration. |
Configure Thales-Luna HSM:
|
1.
|
Click the ‘+’ icon next to the configured Luna HSM. |

|
2.
|
In the HSM pop-up that appears, enter a name for the HSM appliance in the Alias field. |
|
3.
|
Enter a valid IP address and Port Number details. |
|
4.
|
By default, Thales-Luna is selected and nTrust-nCipher is disabled in the Vendor type when configuring Thales-Luna. |
|
5.
|
Enter the valid username and password in the Server Username and Server Password fields. |
|
6.
|
Enter the valid details in the Partition Label and Partition Password fields. |
Note: When adding multiple HSM appliances, make sure to keep the Partition Password same for all the partitions.
|
7.
|
Click OK to save the configuration. |
|
8.
|
Drag the Inline Network object to the canvas and click Deploy. |
Note: Make sure to wait for at least 60 seconds before you register the client on the Luna server. The total maximum wait time is 10 minutes. In case of reload, the minimum wait time is 90 seconds before you proceed with the registration.


