GigaVUE‑FM automatically collects inventory data on all target instances available in your cloud environment. You can design your monitoring session to include or exclude the instances that you want to monitor. You can also choose to monitor egress, ingress, or all traffic.
When a new target instance is added to your cloud environment, GigaVUE‑FM automatically detects and adds the instance into your monitoring session. Similarly, when an instance is removed, it updates the monitoring sessions.
For the connections without G-vTAPs there is no targets that are automatically selected. You can use
You can have multiple monitoring sessions per monitoring domain.
You can create multiple monitoring sessions within a monitoring domain.
To create a new monitoring session:
- In GigaVUE‑FM, on the left navigation pane, select Traffic > Virtual > Orchestrated Flows and select your cloud platform. The Monitoring Sessions page appears.
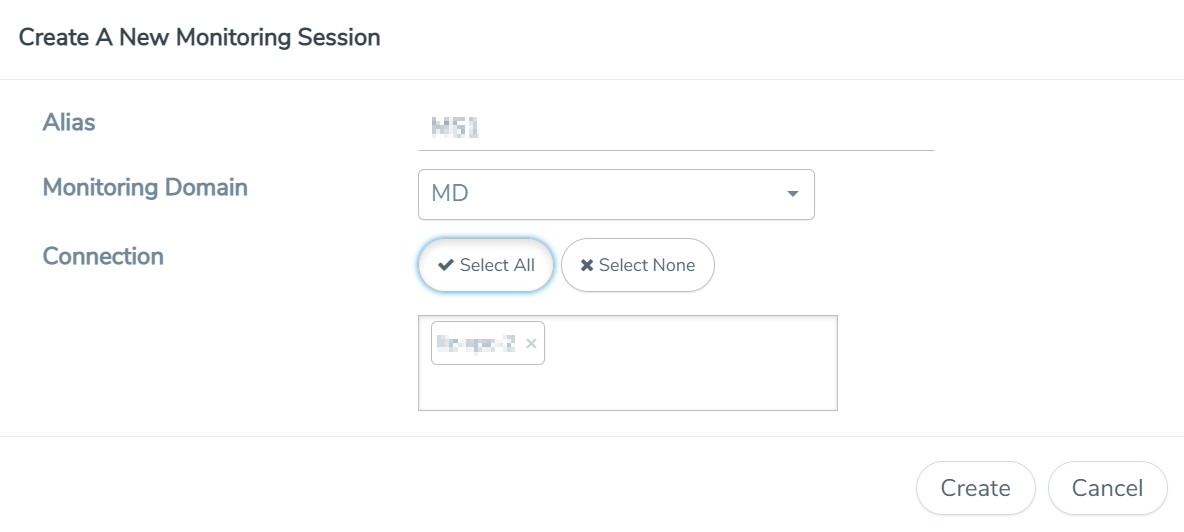
- Click New to open the Create a New Monitoring Session page.

- Enter the appropriate information for the monitoring session as described in the following table.
Field
Description
Alias
The name of the monitoring session.
Monitoring Domain
The name of the monitoring domain that you want to select.
Connection
The connection(s) that are to be included as part of the monitoring domain. You can select the required connections that need to be part of the monitoring domain.
- Click Create. The Edit Monitoring Session page appears with the new canvas.
In the Edit Monitoring Session page, you can select Prefiltering if required. To apply Prefiltering policy template refer to Applying Prefiltering policy template to Monitoring Session.
If multiple connections are selected, the Topology view displays all the instances and components of the selected connections.
Applying Prefiltering policy template to Monitoring Session
You can apply the prefiltering policy template to a monitoring session. To apply a monitoring session do the following:
- Go to Traffic > Virtual > Orchestrated Flows and select your cloud platform. The Monitoring Sessions page appears.
- Click New to open the Create a New Monitoring Session page.
- Create a new monitoring session. To create a new monitoring session, refer to Applying Prefiltering policy template to Monitoring Session.
- In the Edit Monitoring Session page, expand Prefiltering.
- Select the required Prefiltering template from the Template drop-down list. The rules and filters configured in the template appear. You can also change the values as per the requirement. By default, the changes are not saved in the template. You can save the changes as a new template by clicking Save as Template.
- Click Next. The topology view appears.
Prefiltering
Prefiltering allows you to filter the traffic at G-vTAP Agents before sending it to the GigaVUE V Series Nodes. For prefiltering the traffic, GigaVUE-FM allows you to create a prefiltering policy template and the policy template can be applied to a monitoring session.
You can define a policy template with rules and filter values. A policy template once created can be applied to multiple monitoring sessions. However a monitoring session can use only one template.
Each monitoring session can have a maximum of 16 rules.
You can also edit a specific policy template with required rules and filter values for a particular monitoring session while editing a monitoring session. However, the customized changes are not saved in the template.
Some of the points that must be remembered for prefiltering in Next Generation G-vTAP Agents are:
| Prefiltering is supported only in Next Generation G-vTAP Agents. It is not supported for classic mirroring mechanism. |
| Prefiltering is supported for both Linux and Windows G-vTAP Agents . |
| For single monitoring session only one prefiltering policy is applicable. All the agents in that monitoring sessions are configured with respective prefiltering policy . |
| For multiple monitoring session, if the same agent is selected by two or more monitoring sessions then prefiltering policy cannot be applied. It is default to PassAll. |
Creating Prefiltering policy template
GigaVUE-FM allows you to create a prefiltering policy template with a single rule or multiple rules. You can configure a rule with a single filter or multiple filters. Each monitoring session can have a maximum of 16 rules.
To create a prefiltering policy template do the following steps:
1. Go to Resources > Prefiltering, and then click G-vTAP.
2. Click New.
3. Enter the name of the template in the Template Name field.
4. Enter the name of a rule in the Rule Name field.
5. Click any one of the following options:
| Pass — Passes the traffic. |
| Drop — Drops the traffic. |
6. Click any one of the following options as per the requirement:
| Bi-Directional —- Allows the traffic in both directions of the flow. A single Bi-direction rule should consist of 1 Ingress and 1 Egress rule. |
| Ingress — Filters the traffic that flows in. |
| Egress — Filters the traffic that flows out. |
7.
8. Select the Filter Type from anyone of the following options:
| L3 |
| L4 |
9. Select the Filter Name from any one of the following options:
| ip4Src |
| ip4Dst |
| ip6Src |
| ip6Dst |
| Proto - It is common for both ipv4, ipv6. |
10. Select the Filter Relation from any one of the following options:
| Not Equal to |
| Equal to |
11. Enter the value for the given filter.
12. Click Save.
Note: Click + to add more rules or filters. Click - to remove a rule or a filter.


