Acquire Traffic using Customer Orchestrated Source
If your environment uses GigaVUE‑FM with Nutanix Prism Central pc.7.3 and FNS 4.2.0 or 4.2.1, use the GigaVUE‑FM orchestrated deployment procedure instead. For more information, refer to Deploy GigaVUE Cloud Suite for Nutanix.
Existing GigaVUE‑FM orchestrated Monitoring Domains and Monitoring Sessions are not supported after upgrade and must be deleted before proceeding.
This procedure applies only to Nutanix environments that meet the following minimum software versions. Verify that all components in your environment meet these requirements before you proceed.
|
Component |
Minimum Version |
|
Nutanix Prism Central |
pc.7.5 |
|
FNS Next Gen |
7.5.0 |
|
Network Controller |
7.0.0 |
|
AHV |
11.0 |
|
AOS |
7.5 |
|
NCC |
5.3.0 |
After the upgrade is complete, recreate the configuration using Third-Party Orchestration with Customer Orchestrated Source as the traffic acquisition method as described in this procedure.
This topic guides you through deploying Gigamon Cloud Suite for traffic visibility on Nutanix platforms running Prism Central pc.7.5, using Nutanix Flow Network Security Next Generation (FNS-NG) and Service Insertion.
Recommended Instance Type
The following table lists the recommended instance type for deploying the fabric components:
|
Compute Instances |
vCPU |
Memory |
Disk Space |
|
GigaVUE‑FM |
4 vCPU |
16GB |
2 x 40GB |
|
GigaVUE V Series Node |
4 vCPU |
8GB |
10GB |
|
GigaVUE V Series Proxy |
1 vCPU |
4GB |
10GB |
Prerequisites
Keep in mind the following when deploying the visibility solution using FNS-NG:
| VLANs must be migrated to Network Controller-Managed VLANs (NC-VLANs). The new Service Insertion applies only to NC-VLANs. |
| FNS-NG supports traffic monitoring of only underlay networks. For overlay traffic, use the existing Acquire Traffic using UCT-V . |
| GigaVUE‑FM can be deployed internally on the Nutanix environment or externally outside the Nutanix platform. As long as connectivity is available between GigaVUE‑FM and GigaVUE V Series Node (or Proxy), the solution can be deployed. |
| Deploy a medium form factor GigaVUE V Series Node based on the per-cluster traffic load. |
| Set the correct MTU for tunnels: Use 1350 for IPv4 tunnels and 1330 for IPv6. Set the correct MTU before deploying the Monitoring Session. If not, you must undeploy and redeploy the session after updating the MTU. |
Deployment Planning
This section outlines the workflow for acquiring traffic with Customer Orchestrated Source and deploying GigaVUE Fabric Components. It provides instruction on configuring traffic acquisition, processing, and forwarding to your desired destination.
| Create a VM for GigaVUE‑FM- Install and configure GigaVUE‑FM as the centralized management platform. Note the GigaVUE‑FM IP address |
| Configure Role-Based Access for Third Party Orchestration - Create users, roles and the respective user groups in GigaVUE-FM. You can use the user group to create a token for registration data, which helps deploy fabric components in your orchestrator. |
| Create a GigaVUE‑FM Token- Note the GigaVUE‑FM IP address and token, which are required later for GigaVUE V Series registration. |
| Create a Monitoring Domain- Create a Monitoring Domain with traffic acquisition set to Customer Orchestrated Source. Note the Monitoring Domain name and Connection name, as these values are required for cloud-init configuration during GigaVUE V Series Node deployment. |
| Deploy and Register GigaVUE V Series Node- Deploy a VM using the image. Configure three NICs (Management, Data, and Network Function) and provide cloud-init registration parameters, including the GigaVUE‑FM IP, token, Monitoring Domain name, and Connection name. Power on the VM to automatically register it with GigaVUE‑FM. |
| Create Network Function Entity in Prism Central- Create a Network Function entity and associate it with the GigaVUE V Series Node’s Network Function NIC. This enables Nutanix to identify the GigaVUE V Series Node as a network service and direct traffic to it. |
| (Optional) Assign Categories to Target VMs- Assign categories to target workload VMs. |
| Create an Application Security Policy- Configure inbound and outbound rules to forward traffic to the Network Function, enabling traffic redirection to the GigaVUE V Series Node. |
| Create a monitoring session in GigaVUE-FM - Create a Monitoring Session that maps the GigaVUE V Series Node’s Network Function NIC to a REP (ingress) and defines a tunnel to the monitoring tool (egress). |
| Deploy Monitoring Session - Deploy the session to activate traffic processing. |
| View Monitoring Session Statistics - Verify the flow. Nutanix Security Policy redirects traffic to the GigaVUE V Series Node through service insertion, the node processes the traffic, and the tunnel forwards it to the monitoring tool. |
Create a VM for GigaVUE‑FM
You can deploy GigaVUE‑FM as a VM within the Nutanix Prism Central environment or externally. Ensure that GigaVUE‑FM has network connectivity to the GigaVUE V Series Node management interface.
Refer to Upload Fabric Images to download the image file and upload the same to the Prism Central image library.
To launch the GigaVUE‑FM instance from the Prism Central, refer to Create a VM topic in the Nutanix Prism Central documentation.
The following table lists the specific options you must select when creating a VM for GigaVUE‑FM.
In the Configuration tab, enter the following details:
Field | Description |
| Name | Enter a name for the VM. |
| Description | Enter description for the VM. (optional) |
| Cluster | Select the cluster in which you want to deploy GigaVUE-FM. |
| Number of VMs | Enter the number of GigaVUE-FM you want to deploy. |
| VM Properties |
|
In the Resources tab, enter or select the following details:
|
Field |
Description |
| Disks |
Click Attach Disk. The Attach Disk dialog box opens. Enter or select the following details:
Click Save. Add additional disk: Click Attach Disk. Enter or select the following details:
|
| Networks |
Click Attach to Subnet. The Attach to Subnet dialog box opens. Enter or select the following details:
|
| Boot Configuration |
Select the boot configuration: UEFI Mode - To enable UEFI boot mode, select the UEFI Mode option. |
| Shield VM Security Settings | Enable the Secure Boot check box to use the secure boot mode. |
In the Management tab, enter or select the following details:
|
Field |
Description |
|
Categories |
Search for the category to be assigned to the VM. The policies associated with the category value are assigned to the VM. |
|
Timezone |
Select the time zone from the drop-down list. |
After the VM is created, it appears in the VM list with the Power State set to Off. Once powered on, the VM becomes active.
Access GigaVUE‑FM by entering the VM’s IP address in a web browser and logging in using the default credentials: username admin and password admin123A!!. You can also access the GigaVUE‑FM console from Prism Central, where you are prompted to change the password on first login.
Create a GigaVUE‑FM Token
GigaVUE‑FM allows you to generate a token only if you are an authenticated user and based on your privileges in accessing the GigaVUE‑FM. You can create multiple tokens if required.
To create a token in GigaVUE‑FM, follow these steps:
| 1. | Go to  , select Authentication > GigaVUE‑FM User Management. The User Management page appears. , select Authentication > GigaVUE‑FM User Management. The User Management page appears. |
| 2. | In the User Management page, select Tokens. |
Note: If you are a user with write access, then you can view a drop- down list under Tokens. Select Current User Tokens to create a token.
| 3. | Select New Token. |
| 4. | Enter a name for the new token in the Name field. |
| 5. | Enter the days until the token is valid in the Expiry field. |
| 6. | Select the user group for which you are privileged to access GigaVUE‑FM from the User Group drop-down list. |
| 7. | Select OK to generate a new token. The generated token appears on the Tokens page. |
| 8. | Select the token to copy and use it to authenticate the GigaVUE‑FM REST APIs. |
| a. | Go to Actions > Copy Token. |
| b. | Paste the copied token in the required fields to complete authentication. |
Note: You cannot view the generated token. You can only copy and paste the generated token.
Create a Monitoring Domain
If a default Monitoring Domain was automatically created during a previous Third Party Orchestration registration, edit the existing Monitoring Domain to set the Traffic Acquisition Method to Customer Orchestrated Source before creating a Monitoring Session. Else, proceed with the following procedure to create a Monitoring Domain with Traffic Acquisition Method set to Customer Orchestrated Source:
To create a monitoring domain in Third Party Orchestration:
- Go to Inventory > VIRTUAL > Third Party Orchestration, and then click Monitoring Domain. The Monitoring Domain page appears.
- In the Monitoring Domain page, select New. The Monitoring Domain Configuration page appears.
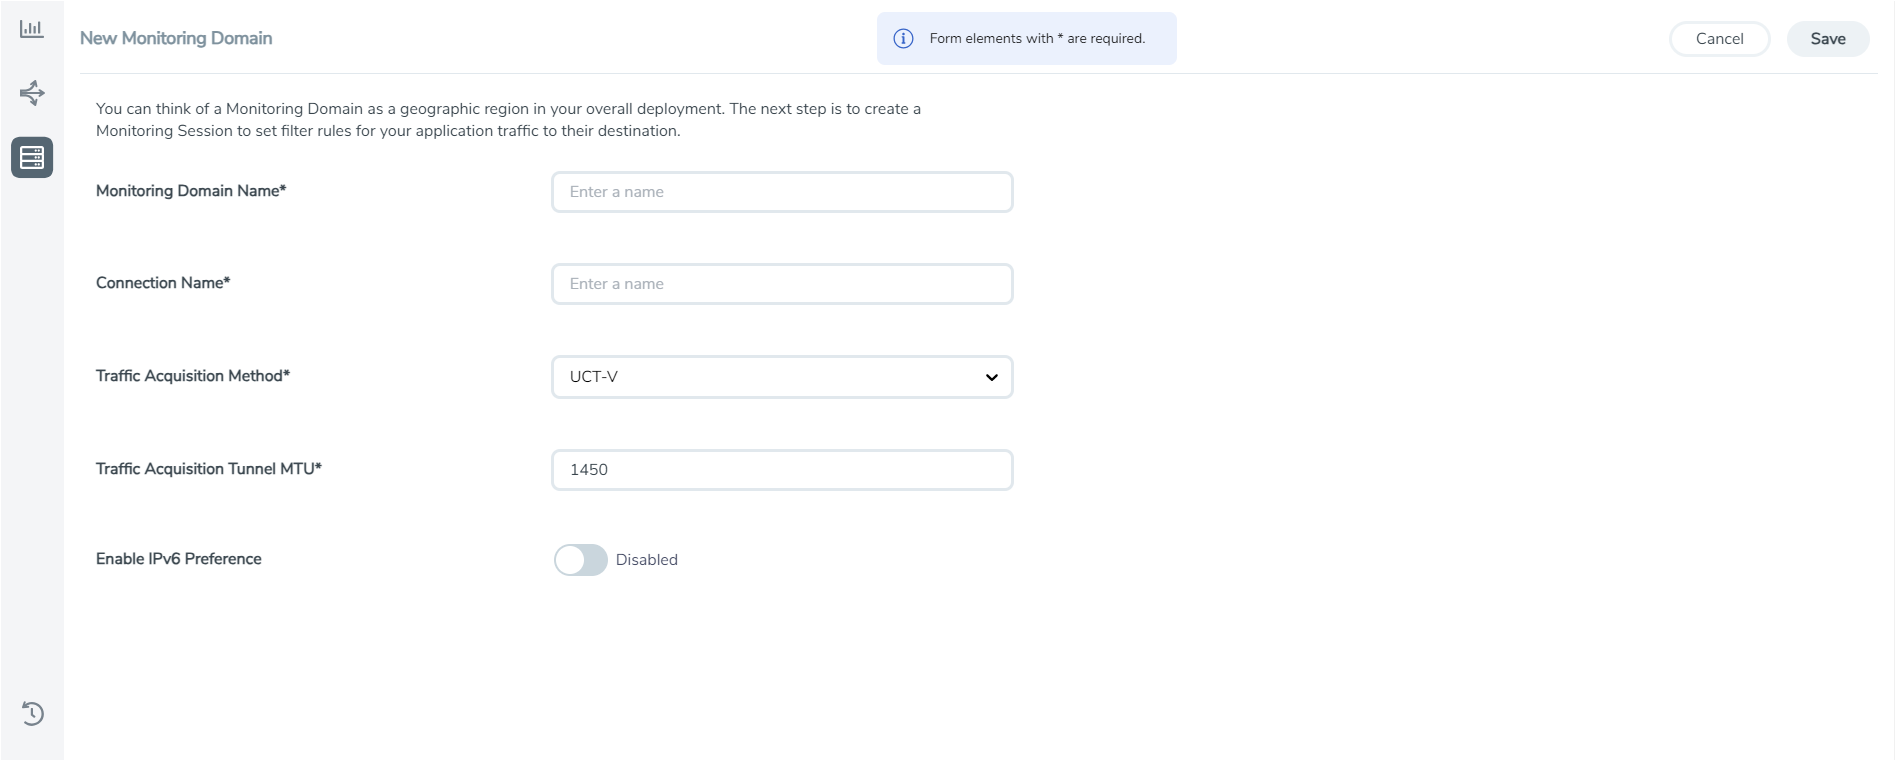
- Select or enter appropriate information as described in the following table:
Field
Description
Monitoring Domain
An alias used to identify the monitoring domain. A monitoring domain consists of set of connections.
Connection Alias
An alias used to identify the connection.
Traffic Acquisition Method
Select a tapping method.
Customer Orchestrated Source: If you select the Customer Orchestrated Source option, the mirrored, tunneled or the raw traffic from your workloads is directed directly to the GigaVUE V Series Nodes, and you need not configure the UCT-Vs and UCT-V Controllers. Uniform Traffic Policy
(When Traffic Acquisition Method is Customer Orchestrated Source)Enable this option if you wish to use the same monitoring session configuration for the GigaVUE V Series Node deployed under this monitoring domain.
Note: Once the monitoring session is deployed for the monitoring domain you cannot enable or disable this option.
- Click Save.
| Ensure that all V Series Nodes within a single Monitoring Domain are running the same version. Mixing different versions in the same Monitoring Domain may lead to inconsistencies when configuring Monitoring Session traffic elements. |
| Similarly, when upgrading a V Series Node, ensure that the GigaVUE‑FM version is the same or higher than the V Series Node version. |
Deploy and Register GigaVUE V Series Node
GigaVUE‑FM does not support fabric upgrades for GigaVUE V Series nodes. To upgrade a GigaVUE V Series node:
| Power off and delete the existing GigaVUE V Series node from Prism Central. |
| Upload and deploy the new GigaVUE V Series node image to Prism Central. |
Before deploying the GigaVUE V Series Node, you must decide how it will register with GigaVUE‑FM. This choice determines the remotePort and remoteIP values in the cloud-init configuration and cannot be changed after the VM is created.
|
Register |
remotePort |
remoteIP |
|---|---|---|
| GigaVUE V Series Node | 443 |
IP address of GigaVUE‑FM |
| GigaVUE V Series Proxy |
8891 |
IP address of GigaVUE V Series node |
Refer Upload Fabric Images to download the GigaVUE V Series Node or GigaVUE V Series Proxy image.
Upload the GigaVUE V Series to Prism Central
You are required to make the GigaVUE V Series Node image available in the Prism Central image library for use during VM deployment.
You can upload images to Nutanix Prism Central using one of the following methods:
| Upload an image file directly from your local system. |
| Upload from a remote server. Provide the URL of the image hosted on a remote server to import it into Prism Central. |
Use the method that best fits your environment and image source.
Deploy and Configure the GigaVUE V Series node VM
You are required to deploy the GigaVUE V Series Node as a VM in Prism Central, configured with the appropriate NICs and cloud-init registration parameters to enable automatic registration with GigaVUE‑FM on first boot.
GigaVUE V Series requires three NICs:
| Management NIC — provides connectivity between the GigaVUE V Series Node and GigaVUE‑FM. |
| Data NIC — used to forward processed traffic to your monitoring tools. |
| Network Function NIC — receives redirected traffic from Nutanix Service Insertion. This NIC is essential for the FNS-NG integration. |
Refer to Create a VM topic in Nutanix Prism Central documentation.
The following table lists the specific options you must select when creating a VM for GigaVUE V Series.
On the Configuration page, enter the basic VM settings:
|
Field |
Description |
|||||||||
| Name | Enter a descriptive name (for example, VSN-Cluster1-Node1) | |||||||||
| Description |
Enter description for the VM. (optional) |
|||||||||
| Cluster |
Select the cluster in which you want to deploy GigaVUE V Series. |
|||||||||
| Number of VMs |
Enter the number of GigaVUE V Series node you want to deploy. |
|||||||||
| VM Properties |
Refer to Recommended Instance Type. |
On the Resources page and select the following.
|
Field |
Description |
|||||||||
| Disks |
Select Clone from Image and select the GigaVUE V Series node image you had uploaded in Deploy and Register GigaVUE V Series Node. |
|||||||||
| Network |
Attach the following NICs:
Note: You must set Network Function NIC. Nutanix Service Insertion uses this NIC to redirect workload VM traffic to the GigaVUE V Series Node. If Network Function NIC is configured as a normal NIC, traffic redirection does not occur and the security policy has no effect. |
On the Management configuration page, configure cloud-init to enable automatic registration with GigaVUE‑FM.
| 1. | In the Guest Customization field, select Cloud-init (Linux) and Configuration Method as Custom Script. |
| 2. | Enter the Registration details replacing the placeholder. The GigaVUE V Series Node uses this user data to generate the config file (/etc/gigamon-cloud.conf) used to register with GigaVUE‑FM. |
#cloud-config
write_files:
  - path: /etc/gigamon-cloud.conf
    owner: root:root
    permissions: '0644'
    content: |
      Registration:
          groupName: <Monitoring Domain Name in GigaVUE-FM>
          subGroupName: <Connection Name within the Monitoring Domain>
          token: <Token generated in GigaVUE-FM>
          remoteIP: <IP address of the GigaVUE-FM>
remotePort: 443Important: If you have not added the NICs during the VM creation, you can attach the required NICs by editing the VM configuration before powering on the VM.
Review the configuration on the Review page and create the VM. After the VM is created, power on the GigaVUE V Series node VM. The GigaVUE V Series node automatically registers with GigaVUE‑FM using the cloud-init configuration.
You can verify that the deployed node appears in GigaVUE‑FM under Third Party Orchestration > Monitoring Domain > GigaVUE V Series Nodes (IP) with the status Healthy.
[Active-Standby] Deploy and Register a Second GigaVUE V Series Node
Note: For high availability, we recommend deploying two GigaVUE V Series nodes and registering them to the same Monitoring Domain in GigaVUE‑FM.
Active-Standby mode improves availability by using two GigaVUE V Series nodes. One node is active and processes traffic, while the other is standby and takes over if the active node becomes unavailable. During failover, the standby node automatically becomes active, ensuring continuous traffic monitoring.
Requirements
| Two GigaVUE V Series nodes |
| Both nodes powered on at all times |
| Both nodes registered with GigaVUE‑FM |
| A single Network Function (NF) entity that includes both nodes |
Deploy a second GigaVUE V Series node by referring to Deploy and Register GigaVUE V Series NodeRegister both nodes with GigaVUE‑FM.
After deploying and registering the GigaVUE V Series node, create the Network Function (NF) entity and Security Policy in Nutanix Prism Central to define how traffic is redirected to the node.
Create Network Function Entity in Prism Central
You must create a Network Function (NF) entity in Prism Central. A Security Policy redirects traffic only to a Network Function entity, not directly to a VM or NIC. Without this entity, the GigaVUE V Series node does not receive traffic, even if it is deployed and registered with GigaVUE‑FM.
Refer to Create Network Function Entity topic in the Nutanix Prism Central.
The following table lists the specific options you must select while creating a Network Function Entity:
|
Field |
Description |
| Name |
Enter a name for the network function (for example, Gigamon-Monitoring). |
| Traffic Forwarding Mode |
Select vTAP (Virtual TAP). vTAP copies traffic from the target VM and sends it to the GigaVUE V Series node without interrupting the original traffic flow. |
| Assign VM NICs |
Select your GigaVUE V Series Node VM. In the drop-down, confirm that the MAC address of the Network Function NIC is listed. If no MAC address appears, verify that the Network Function NIC was correctly added during VM creation in Deploy and Register GigaVUE V Series Node. |
The network function entity is now created and linked to the GigaVUE V Series node.
Note: Each NF entity supports a maximum of two GigaVUE V Series nodes as an Active-Standby pair. If your deployment includes additional GigaVUE V Series nodes, create separate NF entities and corresponding Security Policies for each node pair, and map the appropriate target VM categories to distribute traffic across nodes.
(Optional) Assign Categories to Target VMs
Security policies in Prism Central are applied to categories, which are logical groupings of VMs. Assign categories (tags) to identify the workloads whose traffic you want to monitor.
Refer to the following topics in the Nutanix Prism Central documentation:
| 1. | Create a Category |
| 2. | Assign Category to an Entity |
Assign the required category key‑value pair to the VM so it can be identified and used in Create an Application Security Policy.
You can also assign the required category during VM creation by selecting the appropriate key‑value pair in the Categories field on the Management configuration page. Search for the key‑value pair you created, select it, and then complete the remaining VM configuration to ensure the VM is correctly classified from the start.
Create an Application Security Policy
Nutanix Prism Central offers a visualization-based approach to configuring security policies and monitoring the traffic to which a given policy applies. A Security Policy can redirect traffic to only one NF entity, which maps to the Network Function NIC of a specific GigaVUE V Series node.
Note: If you have deployed more than one GigaVUE V Series node, create a separate NF entity and a dedicated Security Policy for each node in Nutanix Prism Central.
To distribute traffic across multiple nodes, define distinct target VM categories and create a corresponding Security Policy for each node, ensuring that each policy maps its assigned VMs to the appropriateGigaVUE V Series node.
Refer to Creating an Application Policy with Service Insertion.
The following table lists the specific options you must select when you are creating a security policy.
On the Define Policy page, enter the following details:
|
Field |
Description |
| Name |
Enter a name for the policy (for example, security-policy-vsn). |
| Policy Type |
Select Application: Secure Entities. For service insertion, where traffic is forwarded to a network function such as a GigaVUE V Series node, select Application:Secure Entities. |
On the Secure Application page, enter the following details:
|
Field/Pane |
Description |
| Scope | Set the scope to VLANs only. Service Insertion is supported only on NC-VLANs. |
| Inbound | Add traffic sources by choosing whether to capture all traffic or limit it to a specific source. If you choose to limit it to a specific source, in the Entity Type field, select VM or Subnet. These are the only entity types supported for service insertion. |
| Outbound | Add traffic sources by choosing whether to capture all traffic or limit it to a specific destination. If you choose to limit it to a specific destination, in the Entity Type field, select VM or Subnet. These are the only entity types supported for service insertion. |
| Secured Entities | Identifies the entities whose traffic is monitored. Select VM as the entity type and choose the category key‑value pair assigned to the target VMs to define the traffic scope. When creating the rules or security policy, the selected secured entity and configured condition are applied together. |
After defining the traffic sources and secured entity:
| 1. | Create separate inbound and outbound rules, where the configured traffic condition and the selected secured entity are applied together. |
| 2. | During rule creation, open the inbound rule configuration using the (+) symbol which appears once you click on the Inbound/Outbound pane. Click Enable forwarding to a Network Function, then select the network function entity created in Create Network Function Entity in Prism Central so that the traffic is redirected for inspection. |
| 3. | Configure outbound rules in the same way to ensure both traffic directions are monitored. |
| 4. | Finally, Apply and Enforce the policy to activate traffic redirection. The policy must be in the Enforced state for traffic redirection to take effect. A policy that is saved but not enforced does not redirect traffic. |
What to do next:
Create a Monitoring Session (Third Party Orchestration) in GigaVUE‑FM to define the traffic processing pipeline from the GigaVUE V Series's Network Function NIC to the monitoring tool.


