SSL Decrypt
License: For information on licensing, refer to the Volume Based License (VBL) section of respective GigaVUE Cloud Suite Deployment Guide.
SSL Decrypt application delivers decrypted traffic to out-of-band tools that can then detect threats entering the network. Secure Socket Layer (SSL) is a cryptographic protocol that adds security to TCP/IP communications such as Web browsing and email. The protocol allows the transmission of secure data between a server and client who both have the keys to decode the transmission and the certificates to verify trust between them.
SSL encryption secures traffic between a client and a server, such as a Web server. SSL decryption uses keys to decode the traffic between the client and server.
SSL and Transport Layer Security (TLS) protocols consist of a set of messages exchanged between a client and server to set up and tear down the SSL connection between them. To set up the connection, the client and server use the Public Key Infrastructure (PKI) to exchange the bulk encryption keys needed for data transfer.
IMPORTANT: To use SSL Decrypt application in GigaVUE-FM 6.3.00, install new GigaVUE-FM 6.3.00 image. Refer to GigaVUE-FM Installation and Upgrade Guide for step-by-step instructions on how to install GigaVUE-FM. SSL Decrypt application does not work if you upgrade from any previous GigaVUE-FM version to GigaVUE-FM 6.3.00.
Keep in mind the following when using SSL Decrypt application:
- On updating the keys, service, or key maps which are already used in a monitoring session, the monitoring session is dynamically updated, and you need not re-deploy the monitoring session. You can also see if the updated keys, services, or key maps were successfully updated to the monitoring session and the respective GigaVUE V Series Nodes on the All Events page. Refer to Overview of Events section in the GigaVUE Administration Guide for detailed information on Events.
- When deleting a key that is part of a Key Map and that Key Map is used in a monitoring session which is already deployed, then the key will be removed from the Key Map. If that key is the only available entry in the Key Map, then it will not be removed.
- When deleting a key that is part of a Key Map and that Key Map is used in a monitoring session that is not deployed, then the key will be removed from the Key Map and if that key is the only available entry in the Key Map, the whole key map will be removed from the monitoring session.
- When deleting a service that is part of a Key Map and that Key Map is used in a monitoring session which is already deployed, then the service will be removed from the Key Map. If that service is the only available entry in the Key Map, then it will not be removed.
- When deleting a service that is part of a Key Map and that Key Map is used in a monitoring session which is not deployed, then the service will be removed from the Key Map and if that service is the only available entry in the Key Map, the whole key map will be removed from the monitoring session.
- In VMware NSX-T platform, the throughput of SSL Decrypt application is improved to 480 Mbps.
Refer to the following topics for more detailed information:
Supported Protocols, Algorithms, and Ciphers for SSL Decrypt
The supported protocols are as follows:
| SSL 3.0 |
| TLS 1.0 |
| TLS 1.1 |
| TLS 1.2 |
The supported authentication (Au) is as follows:
| RSA |
The supported key exchange (Kx) is as follows:
| RSA |
The supported encryption algorithms (Enc) are as follows:
| NULL |
| RC4 |
| DES |
| 3DES |
| AES (including GCM mode) |
| CAMELLIA |
| SEED |
| IDEA |
The supported compression algorithm is as follows:
| NULL |
The supported digest algorithms are as follows:
| MD5 |
| SHA1 |
| SHA2 |
The supported key sizes are 128, 256, 512, 1024, 2048, and 4096.
The supported TLS extensions are as follows:
| Extended Master Secret, RFC 7627 |
| Encrypt-then-MAC, RFC 7366 |
The following table lists the supported ciphers:
|
Cipher Name |
Kx |
Au |
Enc |
Bits |
Mac |
|
TLS_RSA_WITH_NULL_MD5 |
RSA |
RSA |
NULL |
0 |
MD5 |
|
TLS_RSA_WITH_NULL_SHA |
RSA |
RSA |
NULL |
0 |
SHA |
|
TLS_RSA_EXPORT_WITH_RC4_40_MD5 |
RSA_EXPORT |
RSA_EXPORT |
RC4_40 |
40 |
MD5 |
|
TLS_RSA_WITH_RC4_128_MD5 |
RSA |
RSA |
RC4_128 |
128 |
MD5 |
|
TLS_RSA_WITH_RC4_128_SHA |
RSA |
RSA |
RC4_128 |
128 |
SHA |
|
TLS_RSA_EXPORT_WITH_RC2_CBC_40_MD5 |
RSA_EXPORT |
RSA_EXPORT |
RC2_CBC_40 |
40 |
MD5 |
|
TLS_RSA_WITH_IDEA_CBC_SHA |
RSA |
RSA |
IDEA_CBC |
128 |
SHA |
|
TLS_RSA_EXPORT_WITH_DES40_CBC_SHA |
RSA_EXPORT |
RSA_EXPORT |
DES40_CBC |
40 |
SHA |
|
TLS_RSA_WITH_DES_CBC_SHA |
RSA |
RSA |
DES_CBC |
56 |
SHA |
|
TLS_RSA_WITH_3DES_EDE_CBC_SHA |
RSA |
RSA |
3DES_EDE_CBC |
168 |
SHA |
|
TLS_RSA_WITH_AES_128_CBC_SHA |
RSA |
RSA |
AES_128_CBC |
128 |
SHA |
|
TLS_RSA_WITH_AES_256_CBC_SHA |
RSA |
RSA |
AES_256_CBC |
256 |
SHA |
|
TLS_RSA_WITH_CAMELLIA_128_CBC_SHA |
RSA |
RSA |
CAMELLIA_128_CBC |
128 |
SHA |
|
TLS_RSA_WITH_CAMELLIA_256_CBC_SHA |
RSA |
RSA |
CAMELLIA_256_CBC |
256 |
SHA |
|
TLS_RSA_WITH_SEED_CBC_SHA |
RSA |
RSA |
SEED_CBC |
128 |
SHA |
|
TLS_RSA_WITH_NULL_SHA256 |
RSA |
RSA |
NULL |
0 |
SHA256 |
|
TLS_RSA_WITH_AES_128_CBC_SHA256 |
RSA |
RSA |
AES_128_CBC |
128 |
SHA256 |
|
TLS_RSA_WITH_AES_256_CBC_SHA256 |
RSA |
RSA |
AES_256_CBC |
256 |
SHA256 |
|
TLS_RSA_WITH_AES_128_GCM_SHA256 |
RSA |
RSA |
AES_128_GCM |
128 |
SHA256 |
|
TLS_RSA_WITH_AES_256_GCM_SHA384 |
RSA |
RSA |
AES_256_GCM |
256 |
SHA384 |
All algorithms used for SSL Decrypt application are FIPS 140-3 compliant.
All key URLs must point to an RSA private key stored in the PEM or PKCS12 format, as follows:
| http://keyserver.domain.com/path/keyfile.pem |
| https://keyserver.domain.com/path/keyfile.pem |
| ftp://keyserver.domain.com/path/keyfile.pem |
| tftp://keyserver.domain.com/path/keyfile.pem |
| scp://username[:password]@keyserver.domain.com/path/keyfile.pem |
The supported applications are as follows:
| HTTPS |
| FTPS |
| SMTP, IMAP, and POP3 with StartTLS |
Configure SSL Decrypt
To configure SSL Decrypt Application using GigaVUE-FM follow the steps given below:
- Upload SSL Key Pairs
- Create SSL Service
- Key Mapping
- SSL Key Pair Store
- Add SSL Decrypt to Monitoring Session
Upload SSL Key Pairs
To upload an SSL private key, do the following:
- Go to Inventory > Resources > Security > SSL Keys.
- Click Add. The Create SSL Key Pair page appears.
- Enter the following details:
Field
Description
Key Alias
Enter a name for the key.
Comment
Enter a description
Key Type
Select the either of the key type:
PEM
PassPhrase (optional)
SSH passphrases allows you to protect your private key from being used with out the passphrase. Enter the passphrase created with the private key.
SSL Key Store
Enter the SSL Key Pair Store in which the Key is stored.
Private key
Enter the Private Key using any of the following options:
- Copy and Paste
- Install from URL
- Install from Local Directory
Certificate
Enter the Certificate using any of the following options:
- Copy and Paste
- Install from URL
- Install from Local Directory
PKCS12
PassPhrase
SSH passphrases allows you to protect your private key from being used with out the passphrase. Enter the passphrase created with the private key.
SSL Key Store
Enter the SSL Key Pair Store in which the Key is stored.
- Click Save.
Note: SSL Decrypt application does not support HSM.
The following actions can also be performed from the SSL Key Pairs Page:
|
Field |
Description |
|
Edit |
To edit a SSL Key pair, select the key from the list in the SSL Key Pairs page and click the Edit button. |
|
Delete |
To delete a SSL Key pair, select the key from the list in the SSL Key pairs page and click the Delete button. |
|
Delete all |
Use this button to delete all the SSL Key pairs in the SSL Key pairs page. |
|
View certificate |
To view the certificate associated with the particular SSL Key Pair, select the key from the list in the SSL Key Pairs page and click the View Certificate button. |
Create SSL Service
After uploading a private key, you can add a service. A service maps to a physical server, such as an HTTP server. One server can run multiple services. A service is a combination of an IP address and a server port number.
Prerequisite
Before creating a service, upload a private key as described in Upload SSL Key Pairs
To create a SSL service, do the following:
- Go to Inventory > Resources > Security > SSL Service. The SSL Services page appears.
- Click Add. The Create SSL Service page appears.
- On the Create SSL Service page, enter the following details:
Field
Description
Alias
Enter a name for the SSL Service.
Default Service
Enable this to use default service.
Server IP Address
Enter the IP address of the server in which the service runs.
Server Port
Enter the port number of the server.
- Click Save.
The following actions can also be performed from the SSL Service Page:
|
Field |
Description |
|
Edit |
To edit a SSL Service, select the service from the list in the SSL Service page and click the Edit button. |
|
Delete |
To delete a SSL Service, select the service from the list in the SSL Service page and click the Delete button. |
|
Delete all |
Use this button to delete all the SSL Service in the SSL Service page. |
Key Mapping
After adding the SSL Service, now you map the private key with the service using Key Mapping.
To map a key with the service, follow the steps given below,
- Go to Inventory > Resources > Security > SSL Key Mapping. The SSL Key Pair Mapping page appears.
- Click Add.
- Enter the Key Mapping Alias.
- Select the SSL Service and Key Alias from the drop-down.
- Click Save.
The following actions can also be performed from the SSL Key Pairs Page:
|
Field |
Description |
|
Edit |
To edit a SSL Service, select the service from the list in the SSL Service page and click the Edit button. |
|
Delete |
To delete a SSL Service, select the service from the list in the SSL Service page and click the Delete button. |
|
Delete all |
Use this button to delete all the SSL Service in the SSL Service page. |
SSL Key Pair Store
SSL Key Pair Store is a repository, that allows you to save all the key under a single location. You can create multiple key stores and in each key store you can store multiple keys.
- Go to Inventory > Resources > Security > SSL Key Store. The SSL Key Pair Store page appears.
- Click Add.
- Enter the Key Store Alias and Comment.
- Click Save.
The following actions can also be performed from the SSL Key Pair Store Page:
|
Field |
Description |
|
Edit |
To edit a SSL Key pair Store, select the Key Store from the list in the SSL Key Pair Store page and click the Edit button. |
|
Delete |
To delete a SSL SSL Key Pair Store, select the SSL Key Pair Store from the list in the SSL Key Pair Store page and click the Delete button. |
|
Delete all |
Use this button to delete all the SSL Key Pair Store in the SSL Key Pair Store page. |
Add SSL Decrypt to Monitoring Session
After mapping your keys with service, to add GigaSMART applications to GigaVUE V Series Node, follow the steps given below,
- Drag and drop SSL Decrypt from APPLICATIONS to the graphical workspace.
- Click the SSL Decrypt application and select Details.
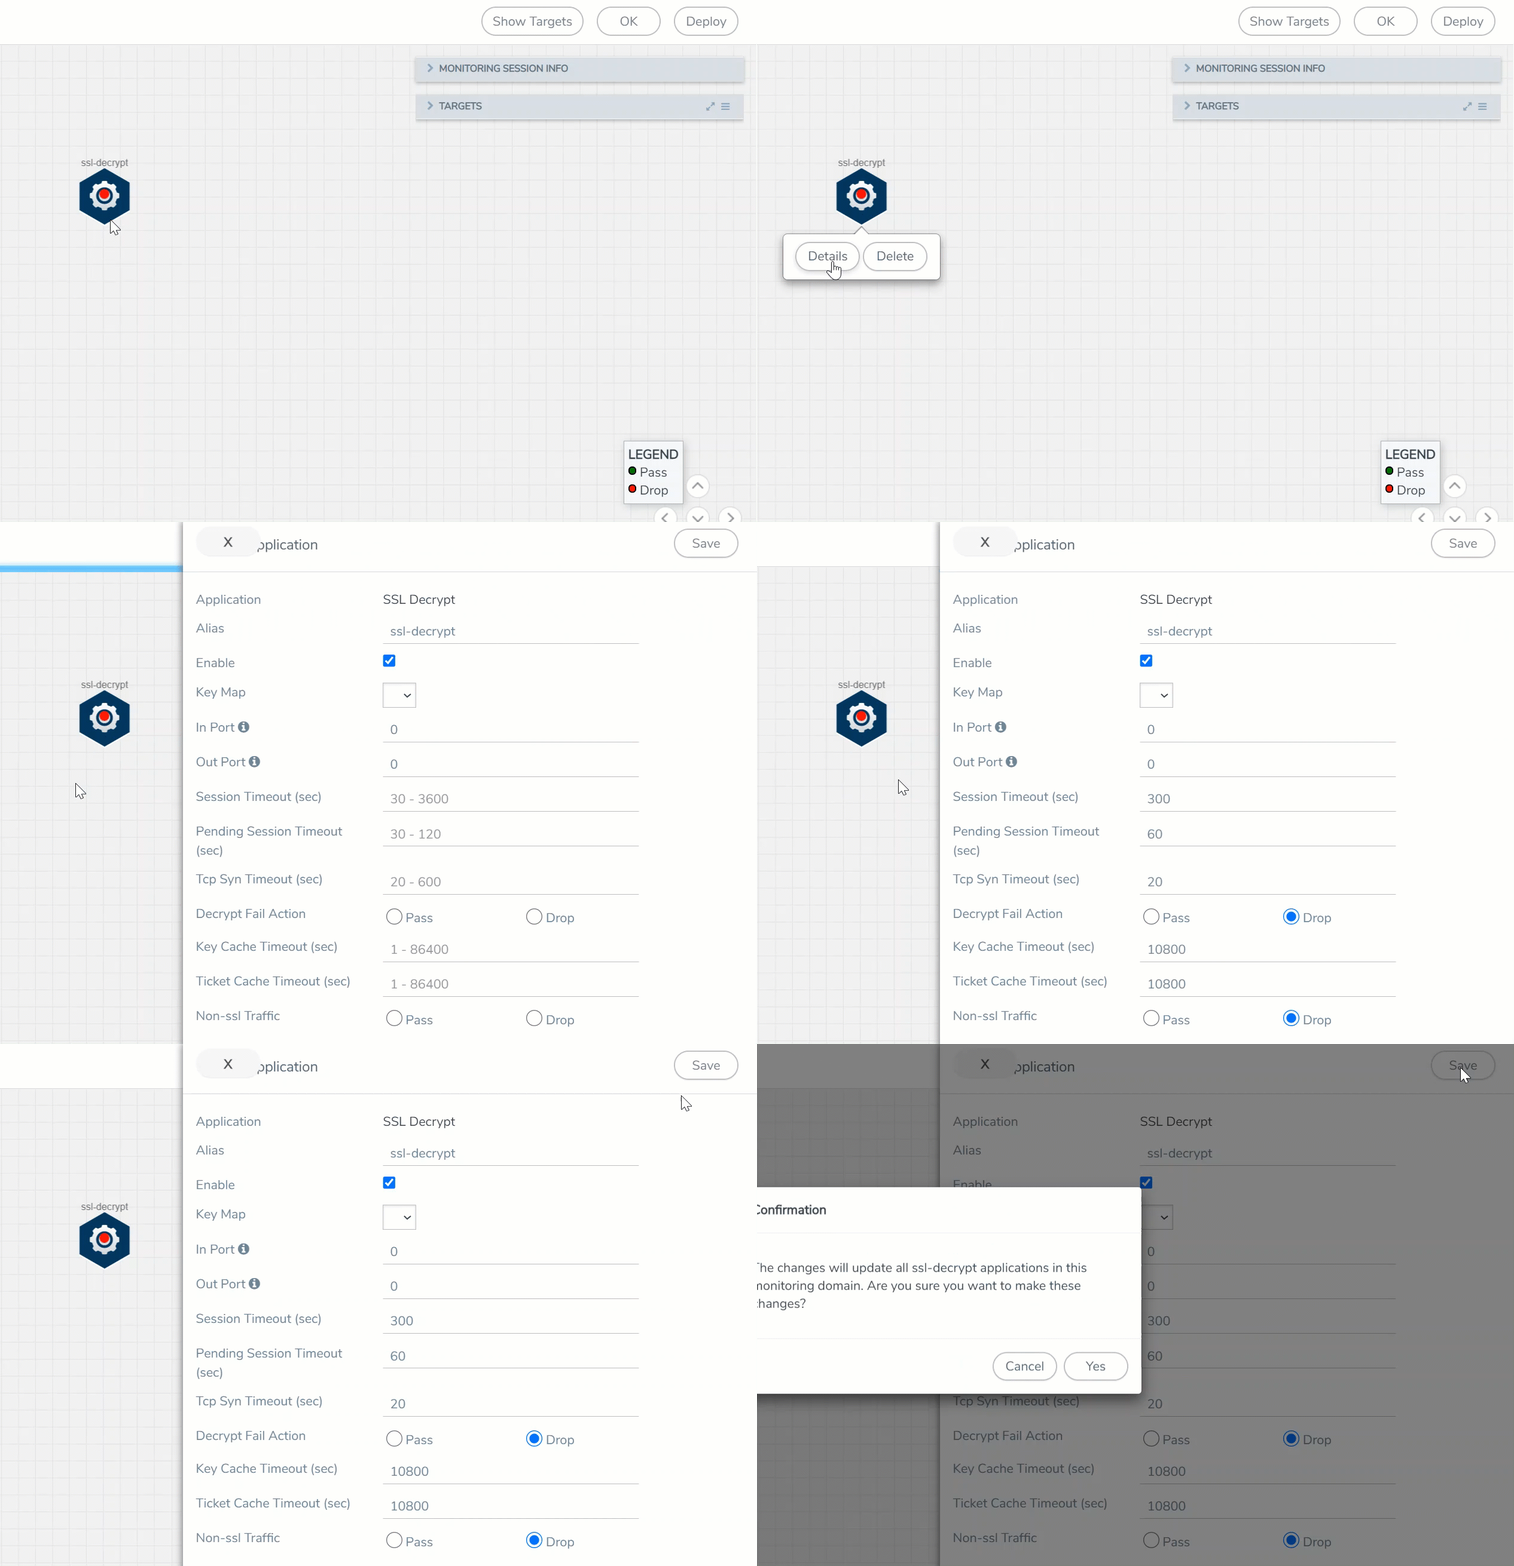
- Enter the following details in the Application quick view:
Fields
Description
Alias
Enter the alias name for the application.
Enable
Enable the box to enable SSL Decryption.
Key Map
Select the Key Map from the list of available Key Maps. Refer to Key Mapping for more details on how to map the key to SSL Service.
In Port
Enter the source port number from which the traffic should be fetched.
Out Port
Enter the destination port number to which the decrypted traffic should be delivered.
Session Timeout
Enter the value in seconds after which the session should be timeout. The default value is 300 seconds.
Pending Session Timeout
Enter the value in seconds after which the session must timeout if the session is in pending state
Tcp Syn Timeout
Enter the value in seconds after which the session must timeout when the session does not synchronize TCP.
Decrypt Fail Action
Select Pass to allow the traffic to pass through the application when the decryption fails and select Drop to drop the traffic before passing through the application when the decryption fails.
Key Cache Timeout (sec)
Enter the value in seconds until which the key cache information can be reused for resumption.
Ticket Cache Timeout (sec)
Enter the value in seconds until which the ticket cache information can be reused for resumption.
Non-ssl Traffic
Select Pass to allow the non-SSL traffic to pass through the application and select Drop to drop the non- SSL traffic before passing through the application.
- Click Save.
- Click Deploy. The Select nodes to deploy the monitoring session page appears.
- Select the GigaVUE V Series Nodes you want to deploy and select an interface for each GigaVUE V Series Node. Then, click Deploy.


