Connecting Power to the GigaVUE‑HC3
The GigaVUE‑HC3 supports AC and DC power in a 1+1 or 2+2 redundant configuration.
Only a single power supply module (PSM) is required to operate the node. However, connecting PSMs in a 1+1 or 2+2 configuration provides redundant power.
Note: It is recommended not to insert different product codes PSU in the same chassis. Doing so will give an SNMP mismatch trap. For example, PSU AC-132-00DU and PSU AC-132-00H6 must not coexist in the PSU slots.
Behavior for the PSU AC-132-00H6
When you remove the power cord from the PSU AC-132-00H6:
-
PSU slots LEDs will be OFF instead of amber.
-
PSU appears absent in the status output.
The procedure for connecting power to the GigaVUE‑HC3 is similar to the other GigaVUE HC Series nodes:
|
GigaVUE HC Series Chassis Type |
Number of PSMs |
|
GigaVUE‑HC3 |
2 (1+1) |
|
4 (2+2) |
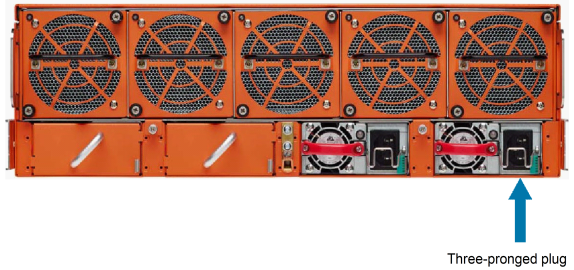
| 1. | Plug an approved C13 power cable into each PSMs at the rear of the GigaVUE‑HC3 chassis. |
Note: For information on the optional DC power supply modules, refer to 1 DC Power Supply Module.
| 1 | Connecting AC Power |
| 2. | Plug the other end of the power cables into a power source that can supply adequate power. For optimal power protection, plug the PSMs into separate circuits. When connecting to the external AC power source, ensure that a Surge Protective Device (SPD) is installed at the AC power inlet. |
For information on GigaVUE‑HC3 power requirements, refer to AC- and DC-Powered GigaVUE‑HC3.
Note: To avoid disk corruption, please ensure the "reload halt" command is executed before an ungraceful power shutdown or power supply module removal.
| 3. | Power is turned on when the node is plugged in and turned off when the node is unplugged. To remove a PSM, refer to Removing a Power Supply Module. |
Note: Once the power supply is powered OFF, wait for 1 minute (60 seconds) before powering the supply ON for GigaVUE‑HC3.
Note: The ETA-USA power adapter has a switch; ensure it is turned ON. Refer to the Unpacking the GigaVUE‑HC3 Shipment for more information.


