Inline Bypass Solution Examples
The following sections provide examples of inline bypass solutions. The solutions are presented in an order from simple to complex. Refer to the following:
Example 1: Unprotected Inline Bypass with an Inline Tool Group
Example 1 is a simple, unprotected inline bypass solution. In the example, aliases are used for inline network ports (iN1 and iN2), inline tool ports (iT1 and iT2), inline network (inNet), inline tool (inTool), and inline map (inMap).
On GigaVUE‑HC3, an unprotected inline bypass solution can be configured on the bypass combo module with the inline networks and inline tools on ports 1/1/x1..x16 or on ports c1..c4, or on any other module on the GigaVUE‑HC3 node.
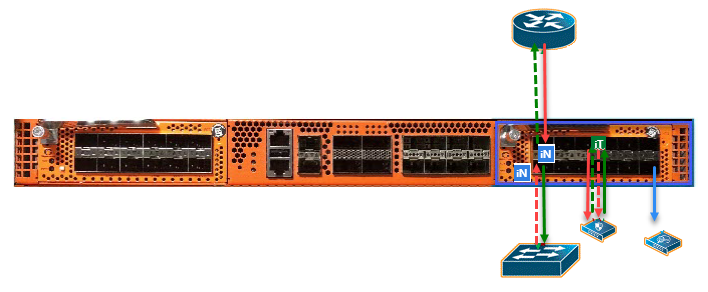
On GigaVUE‑HC1-Plus, an unprotected inline bypass solution can be configured with the inline networks and inline tools on ports 1/1/x1..x16 or on ports x17..x24, or on any other module on the GigaVUE‑HC1-Plus node. Refer to 1 Logical Bypass Without Bypass Combo Module which shows a GigaVUE‑HC1-Plus.
|
1
|
Logical Bypass Without Bypass Combo Module |
On GigaVUE‑HC1-Plus, an unprotected inline bypass solution can be configured on the base module, with the inline networks and inline tools on ports 1/1/x1..x12 and 1/1/g1..g4, or on the bypass combo module on ports x1..x4.
|
Task
|
Description
|
UI Steps
|
|
|
Configure inline network aliases, port type (inline-network), and administratively enable inline network ports.
|
|
1.
|
Go to System > Ports > Ports > All Ports. |
|
2.
|
Click Quick Port Editor. |
|
3.
|
Use Quick search to find the ports to configure. In this example, the ports are 3/1/x1 and 3/1/x2 |
|
4.
|
Set port 3/1/x1 to Type Inline-Network and select Enable. Enter iN1 for the port alias. |
|
5.
|
Set port 3/1/x2 to Type Inline-Network and select Enable. Enter iN2 for the port alias. |
|
6.
|
Make sure Enable is selected for Admin on the ports. |
|
|
|
Configure inline network.
|
|
1.
|
Select Inline Bypass > Inline Networks. |
|
3.
|
In the Alias field, type InNet. |
|
4.
|
For Port A, select iN1. |
|
5.
|
For Port B, select iN2. |
|
|
|
Configure inline tool ports, port type (inline-tool), and administratively enable inline tool ports.
|
|
1.
|
Go to System > Ports > Ports > All Ports. |
|
2.
|
Click Quick Port Editor. |
|
3.
|
Use Quick search to find the ports to configure. In this example, the ports are 3/1/x3 and 3/1/x4 |
|
4.
|
Set port 3/1/x4 to Type Inline-Tool and select Enable. Enter iT1 for the port alias. |
|
5.
|
Set port 3/1/x4 to Type Inline-Tool and select Enable. Enter iT2 for the port alias. |
|
6.
|
Make sure Enable is selected for Admin on the ports. |
|
|
|
Configure inline tool, and enable it. Also enable the default heartbeat profile.
|
|
1.
|
Select Inline Bypass > Inline Tools. |
|
3.
|
In the Alias field, type InTool. |
|
4.
|
For Port A, select iT1. |
|
5.
|
For Port B, select Ii2. |
a. Select Enabled
b. Select Enabled Heartbeat and set Profile to default.
|
|
|
Configure map passall, from inline network to inline tool.
|
|
3.
|
In the Alias field, type InMap. |
|
4.
|
Select Inline for Type and Pass All for Subtype. |
|
5.
|
For Source, select InNet |
|
6.
|
For Destination, select InTool. |
|
|
|
Configure the path of the traffic to inline tool.
|
|
1.
|
Select Inline ByPass > Inline Networks. |
|
2.
|
Select the Inline Network InNet and click Edit |
|
3.
|
Under Configuration, set the Traffic Path field to To Inline Tool. |
|
Example 2: Unprotected Inline Bypass with Default Heartbeat
Example 2 adds the default heartbeat profile to the unprotected inline bypass solution in Example 1.
|
Task
|
Description
|
UI Steps
|
|
|
Configure inline network aliases, port type (inline-network), and administratively enable inline network ports.
|
|
5.
|
Go to System > Ports > Ports > All Ports. |
|
6.
|
Click Quick Port Editor. |
|
7.
|
Use Quick search to find the ports to configure. In this example, the ports are 3/1/x1 and 3/1/x2 |
|
8.
|
Set port 3/1/x1 to Type Inline-Network and select Enable. Enter iN1 for the port alias. |
|
9.
|
Set port 3/1/x2 to Type Inline-Network and select Enable. Enter iN2 for the port alias. |
|
10.
|
Make sure Enable is selected for Admin on the ports. |
|
|
|
Configure inline network.
|
|
1.
|
Select Inline Bypass > Inline Networks. |
|
13.
|
In the Alias field, type InNet. |
|
14.
|
For Port A, select iN1. |
|
15.
|
For Port B, select iN2. |
|
|
|
Configure inline tool ports, port type (inline-tool), and administratively enable inline tool ports.
|
|
1.
|
Go to System > Ports > Ports > All Ports. |
|
17.
|
Click Quick Port Editor. |
|
18.
|
Use Quick search to find the ports to configure. In this example, the ports are 3/1/x3 and 3/1/x4 |
|
19.
|
Set port 3/1/x4 to Type Inline-Tool and select Enable. Enter iT1 for the port alias. |
|
20.
|
Set port 3/1/x4 to Type Inline-Tool and select Enable. Enter iT2 for the port alias. |
|
21.
|
Make sure Enable is selected for Admin on the ports. |
|
|
|
Configure default heartbeat profile.
|
In GigaVUE-HVUE, the default heartbeat profile is already configured. To view the profile, select Inline Bypass > Heartbeats.
|
|
|
Configure inline tools, and enable it. Also enable the default heartbeat profile.
|
|
1.
|
Select Inline Bypass > Inline Tools. |
|
24.
|
In the Alias field, type InTool1. |
|
25.
|
For Port A, select iT1. |
|
26.
|
For Port B, select iT2. |
a. Select Enabled
b. Select Enabled Heartbeat and set Profile to default.
|
|
|
Configure map passall, from inline network to inline tool.
|
|
30.
|
In the Alias field, type InMap. |
|
31.
|
Select Inline for Type and Pass All for Subtype. |
|
32.
|
For Source, select InNet |
|
33.
|
For Destination, select InTool. |
|
|
|
Configure the path of the traffic to inline tool.
|
|
1.
|
Select Inline ByPass > Inline Networks. |
|
35.
|
Select the Inline Network InNet and click Edit |
|
36.
|
Under Configuration, set the Traffic Path field to To Inline Tool. |
|
Example 3: Protected Inline Bypass Using Combo Modules
Example 3 is a protected inline bypass solution using bypass combo modules on GigaVUE‑HC3. It also configures heartbeat and negative heartbeat profiles.
Protected inline networks are based on the pairs of ports associated with the physical protection switches located on the bypass combo modules. Unlike the unprotected examples, you do not need to configure inline network ports because they are created automatically. On GigaVUE‑HC3, the port pairs are numbered for example: 2/2/x17 and 2/2/x18, 2/2/x19and 2/2/x20, 2/2/x21 and 2/2/x22, 2/2/x23 and 2/2/x24.
You do not need to configure inline networks because they are also created automatically on bypass combo modules. The aliases of the default inline networks are: default_inline_net_2_2_1, default_inline_net_2_2_2, default_inline_net_2_2_3, default_inline_net_2_2_4.
On GigaVUE‑HC3, protected inline bypass can be configured on the bypass combo module on ports c1..c4.
On GigaVUE‑HC1, protected inline bypass can be configured on the bypass combo module. It can also be configured on the TAP-HC1-G10040 module placed in either bay 2 or bay 3, so the ports will be 1/2/g1..g8 or 1/3/g1..g8.
Note: The default value of the physical-bypass attribute of protected inline networks is set to enable, which means that the fibers attached to ports net-a and net-b of the inline network are optically coupled and the traffic is exchanged between end nodes without coming to the switching fabric. of the GigaVUE node. As shown in Example 4, after configuring the inline tool and the map passall, the physical-bypass attribute is set to disable in order to activate the Inline Bypass solution.
|
Task
|
Description
|
UI Steps
|
|
|
Configure inline too aliases, port type (inline-tool), and administratively enable inline network ports.
|
|
1.
|
Go to System > Ports > Ports > All Ports. |
|
38.
|
Click Quick Port Editor. |
|
39.
|
Use Quick search to find the ports to configure. In this example, the ports are 2/2/x11 and 2/2/x12 |
|
40.
|
Set port 2/2/x11 to Type Inline Tool and select Enable. Enter iT1 for the port alias. |
|
41.
|
Set port 2/2/x12 to Type Inline Tool and select Enable. Enter iT2 for the port alias. |
|
|
|
Configure a heartbeat profile.
|
|
1.
|
Select Inline Bypass > Heartbeats. |
|
44.
|
In the Alias field, type hb2. |
|
45.
|
For Type, select Regular. |
|
|
|
Configure negative heartbeat profile alias and PCAP file
|
|
1.
|
Select Inline Bypass > Heartbeats. |
|
48.
|
In the Alias field, type nhb1. |
|
49.
|
For Type, select Negative. |
|
50.
|
Click the Browse button for Custom Format and upload the pcap file; for example, hnb.pcap. |
|
|
|
Configure inline tools, and enable them. Also specify the heartbeat profile.
|
|
1.
|
Select Inline Bypass > Inline Tools. |
|
53.
|
In the Alias field, type InTool1. |
|
54.
|
For Port A, select iT1. |
|
55.
|
For Port B, select iT2. |
a. Select Enabled
b. Select Enabled Regular Heartbeat and set Profile to hb2.
c. Select Enabled Negative Heartbeat and set Negative Heartbeat Profile to nhb1.
Configure the second inline tool.
|
1.
|
Select Inline Bypass > Inline Tools. |
|
59.
|
In the Alias field, type InTool2. |
|
60.
|
For Port A, select iT3. |
|
61.
|
For Port B, select iT4. |
a. Select Enabled
b. Select Enabled Heartbeat and set Profile to hb_custom.
|
|
|
Configure the inline tool group and enable it.
|
|
1.
|
Select Inline Bypass > Inline Tool Group |
|
65.
|
In the Alias field, type inToolGroup. |
|
66.
|
For Inline Tools, select InTool1 and InTool2. |
|
67.
|
Under Configuration, select Enabled. |
|
|
|
Configure map passall, from inline network to inline tool.
|
|
70.
|
In the Alias field, type InMap. |
|
71.
|
Select Inline for Type and Pass All for Subtype. |
|
72.
|
For Source, select default_inline_net_2_2_1 |
|
73.
|
For Destination, select InTool1 |
|
|
|
Configure the path of the traffic to inline tool and disable the physical bypass
|
|
1.
|
Select Inline ByPass > Inline Networks. |
|
75.
|
Select the Inline Network default_inline_net_2_2_1 and click Edit |
|
76.
|
Under Configuration, set the Traffic Path field to To Inline Tool. |
|
77.
|
Make sure Physical Bypass is not selected. |
|


