Create NetFlow Session for Physical Environment
Note: This configuration is applicable only when using NetFlow License.
| 1. | On the left navigation pane, select Traffic > Solutions > Application Intelligence. |
| 2. | Click Create New. The Create Application Intelligence Session page appears. |
Note: If the Create button is disabled, check whether a valid license for Application Metadata Intelligence or Application Filtering Intelligence is available.
| 3. | In the Basic Info section complete the following: |
| Enter the name and description (optional). |
| Select Physical in the Environment field. |
| Select the node from the list of nodes. |
| 4. | In the Configurations section, view the following: |
| a. | Select a GigaSMART Group. You can also choose to create a new GigaSMART Group. |
| • | Provide a name in the Alias field. |
| • | Select a port or multiple ports from the Port List. |
| • | Click Save. |
| 5. | If you are unable to view the required port in the Port field, perform these steps: |
| Click Port Editor. Select the Type as Tool from the drop-down list for the required Port Id. Select OK. |
The selected Port appears in the list.
| Select the Type as: |
| IPv4 - to allow the traffic in IPv4 interface. |
| IPv6 - to allow the traffic in IPv6 interface. |
| Provide the IP Address, IP Mask, Gateway, and MTU. Provide the IP address corresponding to the IP interface selected. |
| Click Save. |
| 6. | In the Source Traffic section, select a source port that require application monitoring in the Source ports field. Source port can be a single port, multiple ports, and port groups. |
Note: Ports already used as source ports in the intent-based orchestrated solution will not be listed in the drop-down.
| 7. | Configure the rules for filtering the required traffic in the L2-L4 Rules fields. To configure a rule: |
| a. | Click Select Conditions. Select the required parameters from the drop-down list. |
| b. | Select the value for the parameters from the drop-down. |
| c. | Select the required options: |
| • | Pass or Drop - Based on the parameter selected in the Conditions fields, the traffic that matches the conditions will either be passed or dropped. |
| • | Bidirectional - Allows the traffic in both directions of the flow. |
Note: Click “+” to create multiple rules for filtering the required traffic, and click “+ New Source Traffic” to create multiple sources with filtering options.
| 8. | Click on the Application Metadata tab. |
| 9. | In the Destination Traffic section, click + Add New to create an exporter to receive application-specific traffic. You can only create a maximum of 5 exporters. Enter the following details:
|
| 10. | In the Advanced Settings > Collects section, the following details are already configured. Note: When the template is NetFlow v5 or when the format is NetFlow and the version as V5 you cannot modify the Collects. Note: The GTP -U collects are disabled if the template is the Netflow v9 .
|
| 11. | Click Save. |
| 1 | TCP Flags Bitmap Example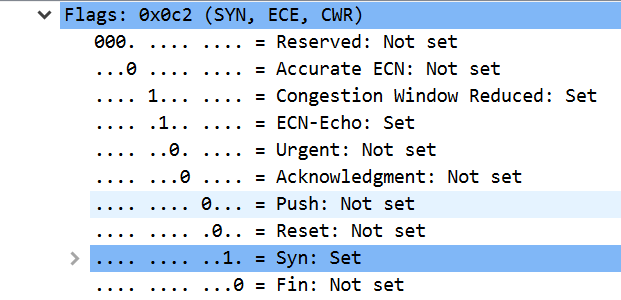 |
NetFlow Dashboard
In Appviz, only the traffic statistics are displayed as applications cannot be configured and used in the NetFlow configuration.
.png)
NetFlow/IPFIX Feature Compatibility
The table below shows feature compatibility between NetFlow/IPFIX features and devices.
|
Netflow/IPFIX Features |
Gen 2 GigaSMART |
Gen 3 GigaSMART |
|---|---|---|
|
IPv4/IPv6 Traffic |
Supported |
Supported |
|
Tunnel Traffic(Supported tunnels are L2GRE, VXLAN, ERSPAN, GTP and MPLS) |
Not Supported |
Supported |
|
Application Attributes |
Supports exporting attributes for the following protocols: HTTP, SSL/TLS and DNS. |
Not Supported. It is recommended to use AMI license for exporting application attributes. |
|
Packet Fragmentation Support |
Supported |
Supported |
|
Packets Sampling |
Supported |
Not Supported |
|
Export Input and Output Interface Index |
Supported |
Supported |
|
Export Remote Management IP and Input Interface Name |
Supported |
Not Supported |
|
SNMP Support for exporter |
Supported |
Supported |
|
No. of Exporters |
6 |
5 |
|
Exporter Filter |
Supported |
Not Supported |
|
Exporter Formats |
NetFlow v5/v9, IPFIX and CEF |
NetFlow v5/v9, IPFIX and CEF |
|
Exporter Protocol |
UDP and TCP |
UDP |
|
Cache Size |
HC3-Gen2 (C05): 12M HC1-Gen2: 4M All Platforms: 1M (SSL only) |
HC3-Gen3 (C08): 10M HC1P Gen3 (HC1A-R): 10M HC1P Gen3 (HC1-S): 10M HC1 Gen3 (HC1-S): 2M |
|
Transit Map |
Not Supported |
Supported |
|
Enhanced TCP Insights* |
Not Supported |
Not Supported |
Note: *Enhanced TCP Insights include MSS, Aggregate Window Size and Zero Window.


