Configure GigaVUE Fabric Components using VMware vCenter
This topic provides instructions on how to deploy the fabric components using VMware vCenter.
GigaVUE Cloud Suite for VMware ESXi uses port mirroring for traffic acquisition method. However you can also use UCT-V for traffic acquisition from the workload virtual machines. The traffic acquired from the workload VMs is sent to the GigaVUE V Series Nodes for processing.
Note: When GigaVUE‑FM version is 6.10.00 or above and the Fabric Components are on (n-1) or (n-2) versions, you must create a Username and Password instead of using tokens in the registration data. For more details, refer to the Configure Role-Based Access for Third-Party Orchestration section in the 6.9 Documentation.
Recommended Instance Type
The following table lists the recommended instance type for deploying the fabric components:
|
Compute Instances |
vCPU |
Memory |
|
GigaVUE V Series Node |
4vCPU |
8GB |
|
UCT-V Controller |
2vCPU |
4GB |
Refer to the following topics for more details on how to register the fabric components with GigaVUE‑FM after deploying the fabric components using VMware vCenter on the host server.
Fabric Component Registration for Deployments
The following table displays the fabric components registration required for various deployments.
| Application |
Deployment |
GigaVUE V Series Registration |
UCT-V Registration |
UCT-V Controller Registration |
|---|---|---|---|---|
| Linux | AMX, 5G Cloud, GV-HTTP2, 5G-SBI, Sbipoe | Required | NA | NA |
| GigaSMART | AMI, AFI, Slicing, App Viz, Dedup, Header Stripping, Load Balancing, Masking | Required | Required | Required |
GigaVUE V SeriesNode Deployment and Registration
The following architecture diagram explains the deployment of GigaVUE V Series Node in VMware vCenter and registration of the V Series Node with GigaVUE‑FM.
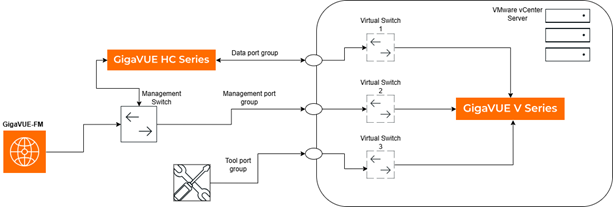
The architecture includes a HC Series device that is connected to the VMware vCenter server through a data port. The VMware vCenter server has virtual switches and V Series node that communicate with the HC Series device, GigaVUE-FM and tools through the Management, Data, and Tool port groups. Each port group is mapped to a unique virtual switch to ensure smooth transmission of data, management, and tool traffic. The V Series node is deployed with the AMX application. The Data port group carries monitored traffic from the H Series to the V Series, and the Tool port group connects the V Series to the external tools.
Prerequisites
The following prerequisites are required for deployment of the GigaVUE V Series Node in VMware vCenter.
| Configuring port groups: Create a Management Port Group for connectivity with GigaVUE‑FM, a Data Port Group to receive metadata from the V Series node, and a Tool Port Group for connectivity with the tools. Refer to VMware Documentation for more information. |
| Configuring virtual switch: Create unique virtual switches for each port group. Refer to VMware Documentation for more information. |
| Configuring monitoring domain: Create a monitoring domain in the GigaVUE‑FM UI. Refer to Create Monitoring Domain topic for more information. |
| Configuring token: Create a token for registration of V Series Node with GigaVUE‑FM. Refer to Configure Tokens topic for more information. |
| Download the OVF Package Files from the Gigamon Community portal. |
Deploy and Register GigaVUE V Series Node
Do the following steps:
| 1. | Log into the VMware vCenter web interface. |
| 2. | Right-click the ESXi Host, Cluster, or data center on which you want to deploy the GigaVUE V Series Node and then select Deploy OVF Template. The Deploy OVF Template wizard appears. |
| 3. | In the Select an OVF template page, choose one of the following options: |
| a. | URL – Enter the URL of the OVF package that includes .ovf and .vmdk files. |
| b. | Local file – Click the Upload Files button and navigate to .ovf and .vmdk files that are available on your local machine, and then select the files. |
| c. | Refer to the OVF Package Files table for the OVF package files. |
| 4. | Click Next. The Select a name and folder page appears. |
| 5. | Enter a unique name for the virtual machine in the Virtual machine name field, and then select a location and host to which you want to deploy the GigaVUE FM instance. |
| 6. | Click Next. The Select a compute resource page appears. |
| 7. | Select a destination compute host for the OVF deployment. |
| 8. | Click Next. The Review details page appears. |
| 9. | Verify the OVF template details, and then select Next. The Configuration page appears. |
| 10. | Select a deployment configuration from the following: |
| a. | Do Not Use DHCP – Select this option if you want to use static IP addresses for the management, data, and tool ports |
| b. | Management, Data and Tool Port DHCP – Select this option if you want to use dynamic IP addresses for the management, data, and tool ports |
| c. | Management Port DHCP – Select this option if you want to use dynamic IP address only for the management port |
| d. | Tool Port DHCP - Select this option if you want to use dynamic IP address only for the tool port |
| e. | Data Port DHCP – Select this option if you want to use dynamic IP address only for the data port |
| 11. | Click Next and the Select storage page appears. |
| 12. | From the Select virtual disk format list, select Thick Provisioning as the format for the virtual disks and provisioning. |
| 13. | Select a datastore where the virtual machine’s files will be stored. |
Note: Note: It is recommended to use data store that has Solid-State Drive (SSD) drive type for better performance.
| 14. | Click Next. The Select networks page appears. |
| 15. | Select the port groups configured for Management Port, Tool Port and Data Port. |
| 16. | Click Next. The Customize template page appears. The Customize template page has three sections namely: System, Network Connectivity, Optional Parameters. |
| 17. | Do the following configuration in the Customize template page. |
| a. | In the System section, enter the hostname of the V Series node instance in the Hostname field and create a new admin password for the V Series node instance in the Administrative Login Password field. |
| b. | In the Network Connectivity section, enter the required fields based on the selected network configuration. |
Note: Ensure to unselect the Management Port DHCP checkbox if you want to use static IP address for the management port. If you select the Management Port DHCP checkbox, dynamic IP address will be configured for the management port even if you have selected Do Not Use DHCP option in the Configuration page.
Note: If you do not enter value for the Management Port MTU size in bytes, the default value of 1500B is considered.
| c. | Enter the domain name in the Nameserver field to resolve the domain name of the tool. |
| d. | In the Optional Parameters section, enter the monitoring domain name in the GroupName field and connection name in the SubGroupName field. |
Note: The monitoring domain and connection name corresponds to the domain name and connection referenced in the prerequisites section.
| e. | Enter the token created in GigaVUE FM UI in the JWT Token used for registration field. |
| f. | Enter the GigaVUE FM IP address and remote port in the RemoteIP and RemotePort fields respectively. |
| g. | In the Custom node properties field enter one of the following: |
| • | app_mode=linux_apps for all AMI, AMX and AFI deployments |
| • | app_mode=gs_apps for other GigaSMART configurations |
| 18. | Click Next and the Ready to complete page appears. |
| 19. | Review all the entered information and then click Finish. When the operation completes, you have successfully deployed a GigaVUE V Series node. |
Verification and Troubleshooting
During the initial bringup, the V Series reboots multiple times. After a wait time of 5 minutes, you can check the status of the deployment. If the status is failed, you can check the logs to perform troubleshooting.
OVF Package Files
|
Form Factor |
Supported Ports |
File Name |
Comments |
|---|---|---|---|
|
Small (2vCPU, 4GB Memory, and 8GB Disk space) |
Mgmt Port, Tool Port, and 8 Network Ports |
vseries-node-file1.ovf |
Use these files when deploying GigaVUE V Series Node via VMware vCenter. |
|
Medium (4vCPU, 8GB Memory, and 8GB Disk space) |
Mgmt Port , Data Port, and Tool Port |
vseries-node-file2.ovf |
|
|
Large (8vCPU, 16GB Memory, and 8GB Disk space) |
Mgmt Port, Tool Port, and 8 Network Ports |
vseries-node-file3.ovf |
|
|
Small (2vCPU, 4GB Memory, and 8GB Disk space) |
Mgmt Port , Data Port, and Tool Port |
vseries-node-file4.ovf |
Use these when deploying GigaVUE V Series Node via VMware NSX-T Manager. |
|
Medium (4vCPU, 8GB Memory, and 8GB Disk space) |
Mgmt Port , Data Port, and Tool Port |
vseries-node-file5.ovf |
|
|
Large (8vCPU, 16GB Memory, and 8GB Disk space) |
Mgmt Port, Tool Port, and 2 Network Ports |
vseries-node-file6.ovf |
|
|
Small (2vCPU, 4GB Memory, and 8GB Disk space) |
Supported Ports |
vseries-node-file7.ovf |
Use these files when deploying GigaVUE V Series Node via VMware ESXi without vCenter. |
|
Medium (4vCPU, 8GB Memory, and 8GB Disk space) |
Mgmt Port, Tool Port, and 8 Network Ports |
vseries-node-file8.ovf |
|
|
Large (8vCPU, 16GB Memory, and 8GB Disk space) |
Mgmt Port , Data Port, and Tool Port |
vseries-node-file9.ovf |
|
|
Larger (8vCPU, 16GB Memory, and 80GB Disk space) |
Mgmt Port, Tool Port, and 8 Network Ports |
vseries-node-file12.ovf |
Use these files when deploying GigaVUE V Series Node via VMware vCenter and if you wish to configure AMX application. |
|
Larger (8vCPU, 16GB Memory, and 80GB Disk space) |
Mgmt Port , Data Port, and Tool Port |
vseries-node-file15.ovf |
Use these files when deploying GigaVUE V Series Node via VMware ESXi without vCenter and if you wish to configure AMX application. Note: This file supports form factor with higher range of CPU, memory and disk space. |
|
|
Mgmt Port , Data Port, and Tool Port |
vseries-node-file16.ovf |
minipc - Virtual Small Form Factor |
Assign Static IP address for GigaVUE V Series
By default, the GigaVUE V Series gets assigned an IP address using DHCP.
To assign a static IP address, perform the following steps:
| 1. | Navigate to /etc/netplan/ directory. |
| 2. | Create a new .yaml file. |
Note: Do not use the default 50-cloud-init.yaml file.
| 3. | Update the file as shown in the following sample: |
network:
  version: 2
  renderer: NetworkManager
  ethernets:
    <interface>:                # Replace with your actual interface name (e.g., eth0)
      dhcp4: no
      dhcp6: no
      addresses:
        - <IPV4/24>             # e.g., 192.168.1.10/24
        - <IPV6/64>             # e.g., 2001:db8:abcd:0012::1/64
      nameservers:
        addresses:
          - <DNS_IPV4>          # e.g., 8.8.8.8
          - <DNS_IPV6>          # e.g., 2001:4860:4860::8888
      routes:
        - to: 0.0.0.0/0
          via: <IPV4_GW>        # e.g., 192.168.1.1
        - to: ::/0
          via: <IPV6_GW>        # e.g., 2001:db8:abcd:0012::fffe

Example netplan config:

network:
  version: 2
  renderer: NetworkManager
  ethernets:
    ens3:
      addresses:
        - 10.114.53.24/21
      dhcp4: no
      dhcp6: no
      accept-ra: false
      routes:
        - to: 10.114.48.1/32
          scope: link
        - to: default
via: 10.114.48.1| 4. | Save the file. |
| 5. | Apply the configuration. |
$ sudo netplan apply
6. Restart the GigaVUE V Series service.
$ sudo service vseries-node restart
The deployed GigaVUE V Series registers with the GigaVUE‑FM. After successful registration the GigaVUE V Series sends heartbeat messages to GigaVUE‑FM every 30 seconds. If one heartbeat is missing, the fabric component status appears as Unhealthy. If more than five heartbeats fail to reach GigaVUE‑FM, GigaVUE‑FM tries to reach the GigaVUE V Series. If that fails as well then GigaVUE‑FM unregisters the GigaVUE V Series and removes from GigaVUE‑FM.
Register UCT-V Controller
IMPORTANT: You must enable the basic authentication to launch the GigaVUE fabric components for version 6.9 and lower. For more instructions on the steps to enable the basic authentication, refer to Authentication Type.
Deploy UCT-V Controller through VMware vCenter on the host server.
To register UCT-V Controller after launching a Virtual Machine using a configuration file, perform the following steps:
- Log in to the UCT-V Controller.
- Create a local configuration file (/etc/gigamon-cloud.conf) and enter the following user data.
- When using Static IP configuration or multiple interfaces with Static IP configuration, create a new .yaml file in /etc/netplan/ directory.
- Update the file and save it.
- Restart the UCT-V Controller service.
$ sudo service uctv-cntlr restart
Registration:
    groupName: <Monitoring Domain Name>
    subGroupName: <Connection Name>
    token: <Token>
    remoteAddress: <IP address of the GigaVUE-FM>
    sourceIP: <IP address of UCT-V Controller> (Optional Field)
    remotePort: 443
Assign Static IP address for UCT-V Controller
By default, the UCT-V Controller gets assigned an IP address using DHCP.
To assign a static IP address, perform the following steps:
| 1. | Navigate to /etc/netplan/ directory. |
| 2. | Create a new .yaml file. |
Note: Do not use the default 50-cloud-init.yaml file.
| 3. | Update the file as shown in the following sample: |
network:
  version: 2
  renderer: NetworkManager
  ethernets:
    <interface>:                # Replace with your actual interface name (e.g., eth0)
      dhcp4: no
      dhcp6: no
      addresses:
        - <IPV4/24>             # e.g., 192.168.1.10/24
        - <IPV6/64>             # e.g., 2001:db8:abcd:0012::1/64
      nameservers:
        addresses:
          - <DNS_IPV4>          # e.g., 8.8.8.8
          - <DNS_IPV6>          # e.g., 2001:4860:4860::8888
      routes:
        - to: 0.0.0.0/0
          via: <IPV4_GW>        # e.g., 192.168.1.1
        - to: ::/0
          via: <IPV6_GW>        # e.g., 2001:db8:abcd:0012::fffe

Example netplan config:

network:
  version: 2
  renderer: NetworkManager
  ethernets:
    ens3:
      addresses:
        - 10.114.53.24/21
      dhcp4: no
      dhcp6: no
      accept-ra: false
      routes:
        - to: 10.114.48.1/32
          scope: link
        - to: default
via: 10.114.48.1| 4. | Save the file. |
| 5. | Apply the configuration. |
$ sudo netplan apply
6. Restart the UCT-V Controller service.
$ sudo service uctv-cntlr restart
The deployed UCT-V Controller registers with the GigaVUE‑FM. After successful registration the UCT-V Controller sends heartbeat messages to GigaVUE‑FM every 30 seconds. If one heartbeat is missing, the fabric component status appears as Unhealthy. If more than five heartbeats fail to reach GigaVUE‑FM, GigaVUE‑FM tries to reach the UCT-V Controller. If that fails as well then GigaVUE‑FM unregisters the UCT-V Controller and removes from GigaVUE‑FM
Register UCT-V
To register UCT-V after launching a Virtual Machine using a configuration file,perform the following steps:
-
Install the UCT-V in the Linux or Windows platform. For detailed instructions, refer to Linux UCT-V Installation and Windows UCT-V Installation.
- Log in to the UCT-V.
- Create a local configuration file and enter the following user data.
- /etc/gigamon-cloud.conf is the local configuration file in Linux platform.
- C:\ProgramData\uctv\gigamon-cloud.conf is the local configuration file in Windows platform.
- When creating C:\ProgramData\uctv\gigamon-cloud.conf file, ensure that the file name extension is .conf. To view the file name extension in Windows, perform the following steps:
- Go to File Explorer and open the File Location.
- On the top navigation bar, select View.
- In the View tab, enable the File name extensions check box.
CopyRegistration:
groupName: <Monitoring Domain Name>
subGroupName: <Connection Name>
token: <Token>
remoteIP: <IP address of the UCT-V Controller 1>, <IP address of the UCT-V Controller 2> - Restart the UCT-V service.
Note: Before restarting the UCT-V service, update the /etc/uctv/uctv.conf file with network interface information to tap traffic and outgoing interface of tapped traffic.
- Linux platform:
$ sudo service uctv restart
- Windows platform: Restart from the Task Manager.
- Linux platform:
Verification and Troubleshooting
After applying the configuration, the should register with GigaVUE-FM.
After successful registration the sends heartbeat messages to every 30 seconds.
If one heartbeat is missing- Status: Unhealthy.
If five consecutive heartbeats fail- attempts to reach
If that fails unregisters the and removes from .


