Configure GigaVUE Fabric Components in Nutanix
This section provides step-by-step information on how to register GigaVUE fabric components using a configuration file.
Keep in mind the following when deploying the fabric components using generic mode:
- Ensure that the Traffic Acquisition Tunnel MTU is set to the default value of 1300. To edit the Traffic Acquisition Tunnel MTU, select the monitoring domain and click on the Edit Monitoring Domain option. Enter the Traffic Acquisition Tunnel MTU value and click Save.
- Before deploying the monitoring session ensure that the appropriate Traffic Acquisition Tunnel MTU value is set. Otherwise, the monitoring session must be un-deployed and deployed again.
- User and Password provided in the registration data must be configured in the User Management page. Refer to Configure Role-Based Access for Third Party Orchestration for more detailed information. Enter the UserName and Password created in the Add Users Section.
- You can also create a monitoring domain under Third Party Orchestration and provide the monitoring domain name and the connection name as groupName and subGroupName in the registration data. Refer to Create Monitoring Domain for more detailed information on how to create monitoring domain under third party orchestration.
- When you deploy the fabric components using third party orchestration, you cannot delete the monitoring domain without unregistering the registered fabric components.
In Nutanix Prism Central, you can configure the following GigaVUE fabric components:
- Configure G-vTAP Controller in Nutanix
- Configure G-vTAP Agent in Nutanix
- Configure GigaVUE V Series Nodes and V Series Proxy in Nutanix
Configure G-vTAP Controller in Nutanix
You can configure more than one G-vTAP Controller in a monitoring domain.
To register the G-vTAP Controller in Nutanix, you can use any one of the following methods:
Register G-vTAP Controller during Instance Launch
In the Nutanix Prism Central, to launch the G-vTAP Controller instance and register the G-vTAP Controller using user data, perform the following steps:
- On the Prism Central, go to the List tab and click Create VM. The Create VM dialogue box appears. For more information, refer to Creating a VM through Prism Central (AHV) topic in the Nutanix Documentation.
- On the Step 3:Management tab, in the Guest Customization field, select Cloud-init (Linux). Enter the registration data in the text box and deploy the instance. The G-vTAP Controller uses the user data to generate the config file (/etc/gigamon-cloud.conf) that is used to register with GigaVUE-FM.Copy
#cloud-config
 write_files:
 - path: /etc/gigamon-cloud.conf
   owner: root:root
   permissions: '0644'
   content: |
     Registration:
        groupName: <Monitoring Domain Name>
        subGroupName: <Connection Name>
        user: <Username>
        password: <Password>
        remoteIP: <IP address of the GigaVUE-FM>
        remotePort: 443
The G-vTAP Controller deployed in Nutanix appears on the Monitoring Domain page of GigaVUE-FM.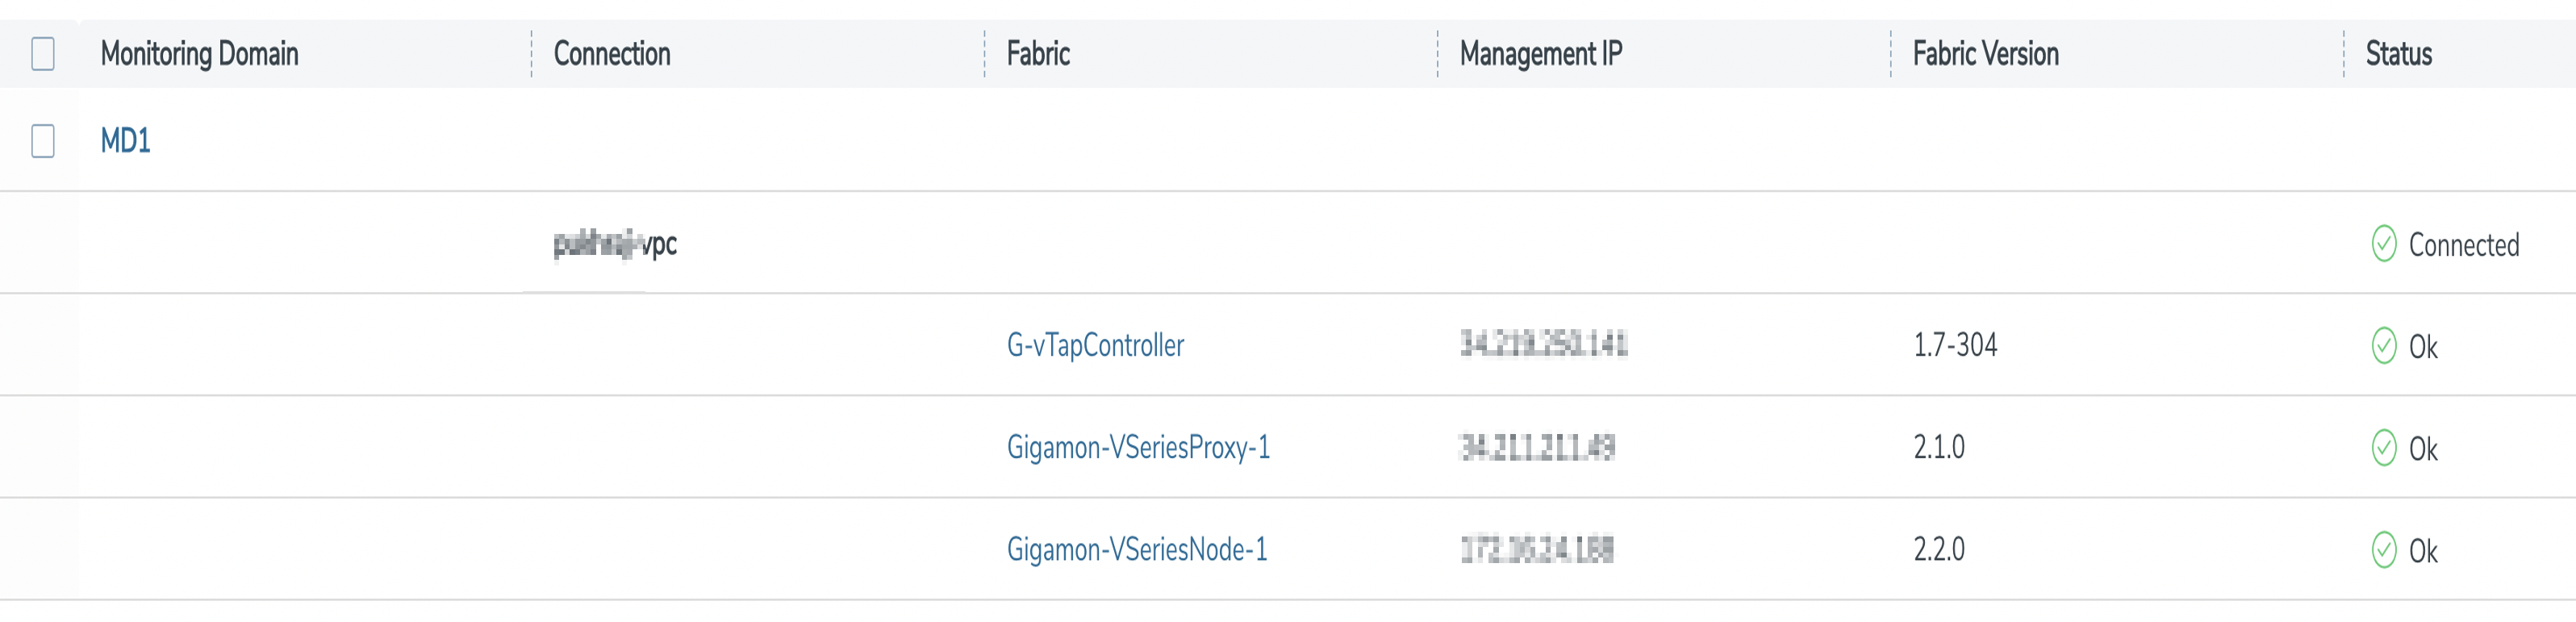
Register G-vTAP Controller after Instance Launch
To register G-vTAP Controller after launching a Virtual Machine using a configuration file, perform the following steps:
- Log in to the G-vTAP Controller.
- Create a local configuration file (/etc/gigamon-cloud.conf) and enter the following user data.Copy
Registration:
    groupName: <Monitoring Domain Name>
    subGroupName: <Connection Name>
    user: <Username>
    password: <Password>
    remoteIP: <IP address of the GigaVUE-FM>
remotePort: 443 - Restart the G-vTAP Controller service.
$ sudo service gvtap-cntlr restart
The deployed G-vTAP Controller registers with the GigaVUE-FM. After successful registration the G-vTAP Controller sends heartbeat messages to GigaVUE-FM every 30 seconds. If one heartbeat is missing ,the fabric node status appears as 'Unhealthy'. If more than five heartbeats fail to reach GigaVUE-FM, GigaVUE‑FM tries to reach the G-vTAP Controller and if that fails as well then GigaVUE‑FM unregisters the G-vTAP Controller and it will be removed from GigaVUE‑FM.
Note: When you deploy GigaVUE V Series Nodes or G-vTAP Controllers using 3rd party orchestration, you cannot delete the monitoring domain without unregistering the GigaVUE V Series Nodes or G-vTAP Controllers.
Configure G-vTAP Agent in Nutanix
Note: Deployment of GigaVUE fabric components through a third-party orchestrator is supported on Linux and Windows platforms. Refer to Linux G-vTAP Agent Installation and Windows G-vTAP Agent Installation for detailed information.
G-vTAP Agent should be registered using the registered G-vTAP Controller. It uses PORT 8891.
To register G-vTAP Agent in Nutanix, you can use any one of the following methods.
Register G-vTAP Agent during Instance Launch
Note: Registering G-vTAP Agent during Virtual Machine Launch is not applicable for Windows Agents. You can register the Windows Agent after launching the Virtual machine using a configuration file. The configuration file is located in C:\ProgramData\gvtap-agent\gigamon-cloud.conf
In Nutanix Prism Central, to launch the G-vTAP Agent instance and register the G-vTAP Agent using user data, perform the following steps:
- On the Prism Central, go to the List tab and click Create VM. The Create VM dialogue box appears. For detailed information, refer to Creating a VM through Prism Central (AHV) topic in Nutanix Documentation.
- On the Step 3:Management tab, in the Guest Customization field, select Cloud-init (Linux). Enter the registration data in the text box and deploy the instance. The G-vTAP Agent uses this user data to generate config file (/etc/gigamon-cloud.conf) used to register with GigaVUE-FM.Copy
#cloud-config
 write_files:
 - path: /etc/gigamon-cloud.conf
   owner: root:root
   permissions: '0644'
   content: |
     Registration:
         groupName: <Monitoring Domain Name>
         subGroupName: <Connection Name>
         user: <Username>
         password: <Password>
         remoteIP: <IP address of the G-vTAP Controller 1>, <IP address of the G-vTAP Controller 2>
         remotePort: 8891
Register G-vTAP Agent after Instance Launch
Note: You can configure more than one G-vTAP Controller for a G-vTAP Agent, so that if one G-vTAP Controller goes down, the G-vTAP Agent registration will happen through another Controller that is active.
To register G-vTAP Agent after launching a Virtual Machine using a configuration file, perform the following steps:
-
Install the G-vTAP Agent in the Linux or Windows platform. For detailed instructions, refer to Linux G-vTAP Agent Installation and Windows G-vTAP Agent Installation.
- Log in to the G-vTAP Agent.
- Create a local configuration file and enter the following user data.
- /etc/gigamon-cloud.conf is the local configuration file in Linux platform.
- C:\ProgramData\gvtap-agent\gigamon-cloud.conf is the local configuration file in Windows platform.
CopyRegistration:
groupName: <Monitoring Domain Name>
subGroupName: <Connection Name>
user: <Username>
password: <Password>
remoteIP: <IP address of the G-vTAP Controller 1>,<IP address of the G-vTAP Controller 2>
remotePort: 8891 - Restart the G-vTAP Agent service.
- Linux platform:
$ sudo service gvtap-agent restart
- Windows platform: Restart from the Task Manager.
- Linux platform:
The deployed G-vTAP Agent registers with the GigaVUE-FM through the G-vTAP Controller. After successful registration the G-vTAP Agent sends heartbeat messages to GigaVUE-FM every 30 seconds. If one heartbeat is missing, G-vTAP Agent status appears as 'Unhealthy'. If more than five heartbeats fail to reach GigaVUE-FM, GigaVUE‑FM tries to reach the G-vTAP Agent and if that fails as well then GigaVUE‑FM unregisters the G-vTAP Agent and it will be removed from GigaVUE‑FM.
Configure GigaVUE V Series Nodes and V Series Proxy in Nutanix
Note: It is not mandatory to register GigaVUE V Series Nodes using the V Series proxy. However, if there are large number of nodes connected to GigaVUE-FM or if you want to hide the IP addresses of the nodes, then you can register the nodes using GigaVUE V Series Proxy. In this case, GigaVUE-FM communicates with GigaVUE V Series Proxy to manage the GigaVUE V Series Nodes.
Note: Before deploying V Series Node, enable the Multi Queue. For more information on enabling the multi-queue, refer to the Nutanix KB article How to change number of vNIC queues and enable RSS virtio-net Multi-Queue for AHV VMs. You can enable the Multi Queue using the Nutanix REST APIs. For more infomation on Nutanix APIs, refer to Nutanix support site.
To register GigaVUE V Series Node and GigaVUE V Series Proxy in Nutanix, you can use any one of the following methods.
- Register GigaVUE V Series Node and GigaVUE V Series Proxy during Instance Launch
- Register GigaVUE V Series Node and GigaVUE V SeriesProxy after Instance Launch
Register GigaVUE V Series Node and GigaVUE V Series Proxy during Instance Launch
- On the Prism Central, go to the List tab and click Create VM. The Create VM dialogue box appears. For detailed information, refer to Creating a VM through Prism Central (AHV) topic in Nutanix Documentation.
- On the Step 3:Management tab, in the Guest Customization field, select Cloud-init (Linux). enter the registration data in the text box and deploy the instance. The GigaVUE V Series Nodes or V Series proxy uses this user data to generate config file (/etc/gigamon-cloud.conf) used to register with GigaVUE-FM.Copy
#cloud-config
 write_files:
 - path: /etc/gigamon-cloud.conf
   owner: root:root
   permissions: '0644'
   content: |
     Registration:
        groupName: <Monitoring Domain Name>
        subGroupName: <Connection Name>
        user: <Username>
        password: <Password>
        remoteIP: <IP address of the GigaVUE-FM> or <IP address of the proxy>
remotePort: 443- You can register your GigaVUE V Series Nodes directly with GigaVUE‑FM or you can use GigaVUE V Series Proxy to register your GigaVUE V Series Nodes with GigaVUE‑FM. If you wish to register GigaVUE V Series Nodes directly, enter the
remotePortvalue as 443 and theremoteIPas <IP address of the GigaVUE‑FM> or if you wish to deploy GigaVUE V Series Nodes using V Series proxy then, enter theremotePortvalue as 8891 andremoteIPas <IP address of the Proxy>.
- You can register your GigaVUE V Series Nodes directly with GigaVUE‑FM or you can use GigaVUE V Series Proxy to register your GigaVUE V Series Nodes with GigaVUE‑FM. If you wish to register GigaVUE V Series Nodes directly, enter the
Register GigaVUE V Series Node and GigaVUE V SeriesProxy after Instance Launch
To register GigaVUE V Series Node and GigaVUE V Series Proxy after launching the virtual machine using a configuration file, perform the following steps:
- Log in to the GigaVUE V Series Node or Proxy.
- Edit the local configuration file (/etc/gigamon-cloud.conf) and enter the following user data.Copy
Registration:
    groupName: <Monitoring Domain Name>
    subGroupName: <Connection Name>
    user: <Username>
    password: <Password>
    remoteIP: <IP address of the GigaVUE-FM> or <IP address of the Proxy>
remotePort: 443- You can register your GigaVUE V Series Nodes directly with GigaVUE‑FM or you can use V Series proxy to register your GigaVUE V Series Nodes with GigaVUE‑FM. If you wish to register GigaVUE V Series Nodes directly, enter the
remotePortvalue as 443 and theremoteIPas <IP address of the GigaVUE‑FM> or if you wish to deploy GigaVUE V Series Nodes using V Series proxy then, enter theremotePortvalue as 8891 andremoteIPas <IP address of the Proxy>.
- You can register your GigaVUE V Series Nodes directly with GigaVUE‑FM or you can use V Series proxy to register your GigaVUE V Series Nodes with GigaVUE‑FM. If you wish to register GigaVUE V Series Nodes directly, enter the
- Restart the GigaVUE V Series node or proxy service.
- V Series node:
$ sudo service vseries-node restart
- V Series proxy:
$ sudo service vps restart
- V Series node:
The deployed GigaVUE V Series proxy registers with the GigaVUE-FM. After successful registration theGigaVUE V Series proxy sends heartbeat messages to GigaVUE-FM every 30 seconds. If one heartbeat is missing, the fabric node status appears as 'Unhealthy'. If more than five heartbeats fail to reach GigaVUE-FM, GigaVUE‑FM tries to reach the GigaVUE V Series proxy and if that fails as well then GigaVUE‑FM unregisters theGigaVUE V Series proxy and it will be removed from GigaVUE‑FM.
Keep in mind the following when upgrading the GigaVUE-FM to 6.1.00 (when using third party orchestration to deploy fabric components):
When upgrading GigaVUE-FM to any version higher than 6.0.00 and if the GigaVUE V Series Nodes version deployed in that GigaVUE-FM are lower than or equal to 6.0.00, then for the seamless flow of traffic, GigaVUE-FM automatically creates Users and Roles in GigaVUE-FM with the required permission. The username would be orchestration and the password would be orchestration123A! for the user created in GigaVUE-FM. Ensure that there is no existing user in GigaVUE-FM, with the username orchestration.
It is recommended to change the password in the Users page, once the upgrade is complete. Refer to Configure Role-Based Access for Third Party Orchestration for detailed steps on how to change password in the user page.
Limitations
IPv6 is not supported by Nutanix for the current release of GigaVUE Cloud Suite.


