Configure a Gateway Load Balancer on GigaVUE Cloud Suite in AWS
The gateway load balancer (GWLB) uses the gateway load balancer end points to distribute the traffic across the end points. It is a VPC endpoint that provides connectivity in between virtual machines. With GWLB Endpoint as a target, mirrored traffic can be forwarded from any subnet. You can monitor network traffic across multiple VPCs and accounts, with centralized traffic inspection in a single VPC across their entire organization.
Refer to the following topics for detailed information.
- Architecture
- Prerequisites
- Configure a Gateway Load Balancer on GigaVUE Cloud Suite in AWS
- Deploy GigaVUE V Series Solution with Gateway Load Balancer
Architecture
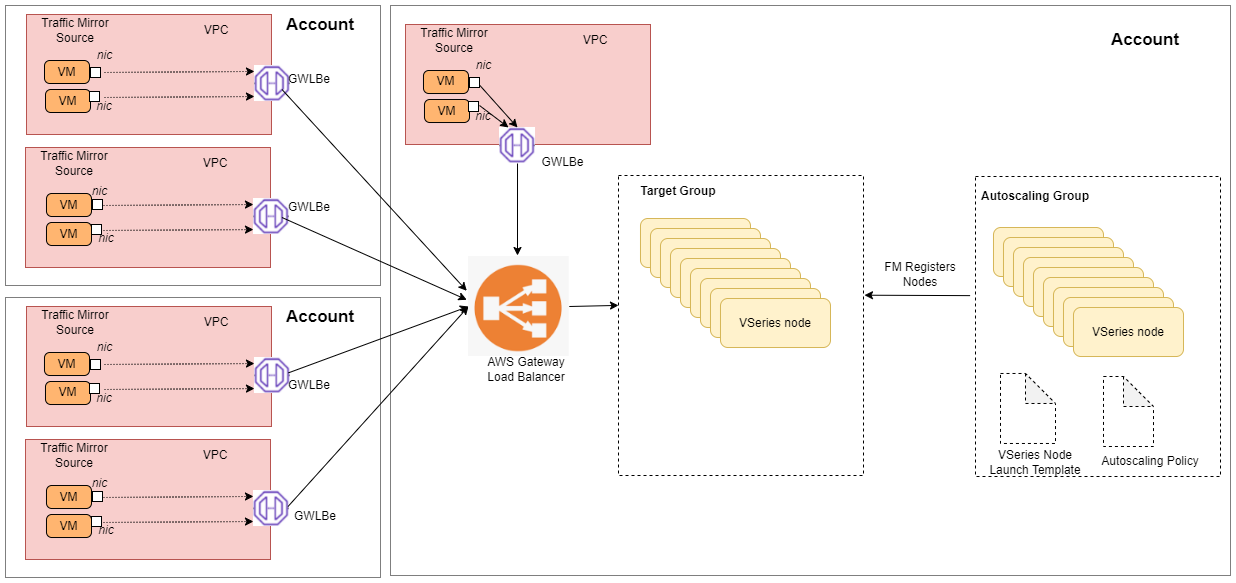
In the architecture, you can see the deployment of GigaVUE Cloud Suite for AWS environments that have GWLB implementation for the security appliances, such as firewalls. In such deployments, the applications and your appliances are in different VPCs. The workload VPC is configured with the Gateway load balancer endpoint while the service VPC is configured with the Gateway load balancer. Gigamon deployed VPC has the solution components, such as GigaVUE-FM, GigaVUE V Series Nodes, and the OOB tools which consume the mirrored and decapsulated data.
Prerequisites
- Create or update Security Group policies of GigaVUE Cloud Suite components. Refer to Security Group topic for detailed information.
- Create or update routes in various VPCs across participating mirrored AWS accounts so that all mirrored account VPCs can connect to the target account VPC where the AWS Gateway Load Balancer is deployed. Refer to Amazon VPC for more information.
- Create or update existing IAM role for GigaVUE-FM in the centralized VPC. Additionally trust relationship needs to be created between the mirrored and the target account for GigaVUE-FM to execute the above permissions at the IAM role level. Refer to AMI and Permissions section for detailed information.
-
For more information on AWS recommended design for Gateway Load Balancer implementation with inline services, such as firewall. see Getting started with Gateway Load Balancers - Elastic Load Balancing (amazon.com)
-
You must create a VPC endpoint and endpoint service. For more information, see Create endpoint service
-
Create a routing table. For more information, see Amazon documentation.
Configure a Gateway Load Balancer in AWS
To configure an external load balancer in AWS:
- In the Target Groups page, click Create target group and the Create target group wizard appears. Enter or select the following values and create the target group.
- Select IP addresses as the target type.
- Enter a name for the target group..
- Select the VPC of your target group where the targets are registered.
- Select TCP as the Health check protocol in port number 8889 with 10 seconds health check interval.
Note: You must select GENEVE protocol and port 6081 while creating the targets groups. For detailed instructions, refer to Target groups for your Gateway Load Balancers.
- Navigate to the Load Balancer page and click Create Load Balancer the Create elastic load balancer wizard appears. Enter or select the following values and create the load balancer.
- Select Gateway Load Balancer as the load balancer type and click Create.
- Enter a name for the Gateway Load Balancer.
- Select the VPC for your targets (GigaVUE V Series Nodes).
- Select the regions/zones and the corresponding subnets.
- Associate the load balancer to the target group.
- By default, GENEVE as the Listener Protocol with Port number 6081 is selected.
Note: For detailed instructions, refer to Create a Gateway Load Balancer topic in the AWS Elastic Load Balancing document
- Navigate to the Launch Templates page and click Create launch template the Create launch template wizard appears. Enter or select the following values and create the launch template.
- Enter a name for the launch template.
- Select the AMI of the GigaVUE V Series node.
- Select c5n.xlarge as the instance type.
- Select a Key pair for the instance.
- Select VPC as the Networking platform and don't specify the security group.
- Add 2 Network Interfaces for the GigaVUE V Series node with device index as 0 and 1 (mgmt and data interface respectively) and for the interfaces, select the appropriate security group.
Note: For detailed instructions, refer to Creating a launch template for an Auto Scaling group topic in the AWS EC2 Auto Scaling document.
- Navigate to the Auto Scaling groups page, and click Create an Auto Scaling group the Create Auto Scaling group wizard appears. Enter or select the following values and create the Auto Scaling group.
- Enter a name for the Auto Scaling group.
- Select an existing launch template.
- Select the VPC and subnet.
- In the Group size section, enter the value for minimum and maximum capacity.
- In the Scaling policies section, select Target tracking scaling policy and choose Average network in (bytes) for the Metric type with 1000000000 (bytes) as target value and 300 seconds warm up value.
- (optional) Add Tags to the instances.
Note: For detailed instructions, refer to Creating an Auto Scaling group using a launch template topic in the AWS EC2 Auto Scaling document.
In the Instances page, you can view the GigaVUE V Series 2 node instance launched by the auto scaling group.
Deploy GigaVUE V Series Solution with Gateway Load Balancer
To deploy GigaVUE V Series solution across the AWS accounts with Gateway Load Balancing in GigaVUE-FM:
- In the Monitoring Domain Configuration page, select VPC Traffic Mirroring as the Traffic Acquisition method. Refer to Create a Monitoring Domain for detailed information.
- For the Use Load Balancer field, select Yes.
- Click Save and the AWS Fabric Launch Configuration page appears.
- In the AWS Fabric Launch Configuration page, select the following for the load balancer.
- Select the Load Balancer configured in AWS
- Select the Auto Scaling Group configured in AWS
For the remaining field description, refer to Configure and Deploy GigaVUE Fabric Components in GigaVUE-FM.
- Click Save to save the configuration.
To monitor the traffic, you must create a monitoring session. For more information on creating a monitoring session, see Configure Monitoring Session.
For more information on the best practices and architectures, see the following links:


