Upgrade the Software
This section provides the steps for upgrading the software version on a standalone GigaVUE node.
In a cluster configuration, if you try to update the software through GigaVUE-FM, the following message is displayed across the Images tab:
This is just a WARNING. It is recommended that you use the CLI to upgrade software on the GigaVUE HC Series nodes when in a cluster.
Important: The default password on the admin account is admin123A!. If the node is upgraded through the configuration-jumpstart command, the password for the admin user is required to be set to a non-default value. This will be the password when the admin user logs into GigaVUE-FM after the upgrade.
Save the Configuration
Before upgrading the software, save your current running configuration by doing the following:
|
1.
|
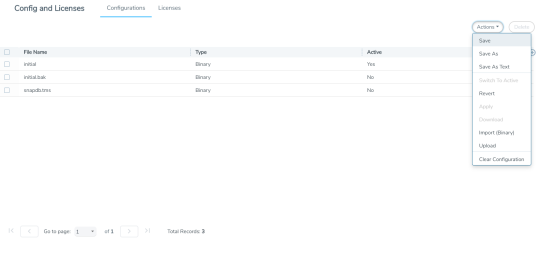
Select Setting > Config and Licenses > Configurations > Actions. |
|
2.
|
Select Action > Save menu as shown in the following figure. |

Note: You can also save the current configuration by selecting Admin > Save Configuration a shown in the following figure.
|
3.
|
If you used the Action menu, confirm that you want to save the configuration by Clicking Save on the dialog screen that displays, as follows: |
Upgrade the Software
Use the following steps to upgrade the software:
|
1.
|
Access the GigaVUE node using a Web browser and log in with administrator user credentials. |
|
2.
|
Select Settings > Reboot and Upgrade > Images. |
The Images page shows the currently installed images and indicates the which image will boot next. 1 shows an example where three images are currently installed. To change the image that will boot next select, Action > Switch Boot Partition.

|
1
|
Active Images Page Showing Both Partitions |
|
3.
|
Remove all the currently uploaded images. |

|
2
|
All Image Files Selected |
|
4.
|
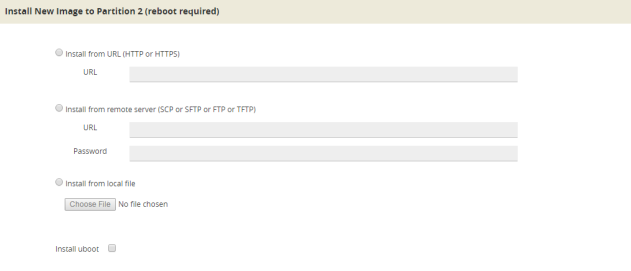
On the Images page, click New to access a new application image. The Install New Image page displays as shown in 3. |

|
3
|
Install a New Image Page |
|
5.
|
Select the method for installing the new image, which is one of the following: |
|
o
|
Install from URL — Enter the URL from which to fetch the image. |
|
o
|
Install from scp or sftp — Enter the URL and password of the SCP or SFTP server from which to fetch the image. |
|
o
|
Install from local file — Use this option to upload the image file from your local environment. Click Choose File to select the file. |
Note: The image must match the type of control card system (for example, HCCv2, GigaVUE-TA1, or GigaVUE‑HC2).
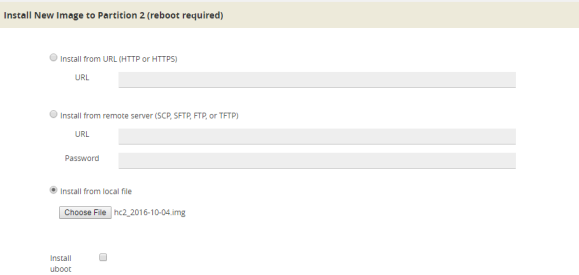
In 4, a local file is selected for the install.

|
4
|
Local File Selected for Install |
|
6.
|
Click OK after the software path is selected. A progress bar appears below the title bar. |
The new software is uploaded and installed. It is then active upon the next reboot.
|
7.
|
To make the image effective, reboot the system. |
Refer to Reboot the Nodes for the steps to reboot the system.
Upgrade Uboot and PLD
Use the following steps to upgrade Uboot and Programmable Logic Device (PLD):
|
1.
|
Access the GigaVUE node using a Web browser and log in with administrator user credentials. |
|
2.
|
Select Settings > Reboot and Upgrade > PLD and Uboot. |
|
3.
|
For Uboot upgrade, check Uboot to upgrade to a new Uboot version, then click Upgrade. |
|
4.
|
For PLD upgrade, check PLD to upgrade Programmable Logic Devices (PLDs) such as Field Programmable Gate Arrays (FPGAs) on GigaVUE‑HC3 nodes. |
|
5.
|
Select the slot, then click Upgrade. |


