NCipher HSM for SSL Decryption for Out-of-Band Tools
Required License: Included with SSL Decryption for Out-of-Band Tools
Starting in software version 5.3, NCipher (formerly Thales) Hardware Security Module (HSM) is integrated with out-of-band SSL decryption. Hardware Security Modules offer secure storage, management, and operation of cryptographic material, such as private keys and passphrases. The HSM stores and manages the keys in a safe and secure environment. Since the keys reside on the HSM in the network, they are offloaded from an application on a network device.
The application could be a web server or a database server, but, in the case of SSL decryption for out-of-band tools, the application is GigaSMART. The application interfaces with HSM to use the keys that are stored. There must be network connectivity between the HSM and the application.
Keys are added to the HSM by an administrator. When an application’s key is on the HSM, the HSM creates an application key token. The key token is sent to the application. When the application wants to use a key, the application sends the token to HSM, which establishes a session with the HSM to use the key. In this way, the use of keys by the application is secure because only key tokens are exchanged.
NCipher HSM is supported on GigaVUE-HC1, GigaVUE-HC2, and GigaVUE-HC3.
Refer to the following limitations:
|
•
|
GigaSMART uses keys that are already stored on the HSM. There is no key generation. |
|
•
|
The key token that is uploaded to GigaSMART can only be in PKCS11 format. |
|
•
|
Only RSA keys (private keys) are supported. |
|
•
|
Keys are module-protected. With module-protection, the application is a registered client that does not need to log in to the HSM. |
|
•
|
The network connectivity between the HSM and GigaSMART must use a static IP address. Do not use DHCP because the IP address needs to remain the same. |
|
•
|
Only IPv4 addresses are supported. |
|
•
|
Each GigaSMART card that interfaces with the NCipher HSM will use one NCipher license. |
|
•
|
Clustering is not supported. |
Refer to the following sections for details:
Configuring HSM
This section provides information about the steps to configure HSM. The following topics are covered:
Create HSM Appliance
Configure at least one HSM by specifying an alias, a static IP address, and port number. Obtain the ESN and KNETI from your HSM administrator.
To access GigaSMART within GigaVUE-FM, access a device that has been added to GigaVUE-FM from the GigaVUE-FM interface. GigaSMART appears in the navigation pane of the device view on supported devices. Refer to the Access GigaSMART from GigaVUE-FM for details.
To configure an HSM appliance, do the following:
|
1.
|
From the device view, select GigaSMART> Passive SSL > HSM. |
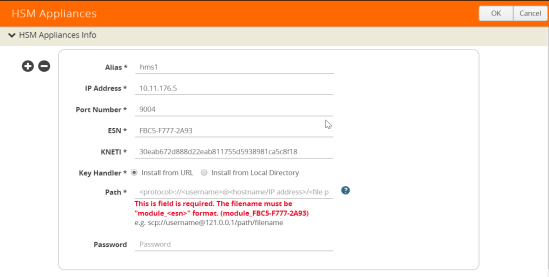
Figure 882: Creating New HSM
|
4.
|
Type hsm1 in the Alias field. |
|
5.
|
Enter valid IP address. |
|
9.
|
Select Key Handler >Install from URL. |
|
10.
|
Type the Path of the Key handler file. |
Configure Set Key Handler
|
1.
|
From the device view, select GigaSMART> Passive SSL > HSM. |
|
2.
|
Select the HSM appliance you just created. |
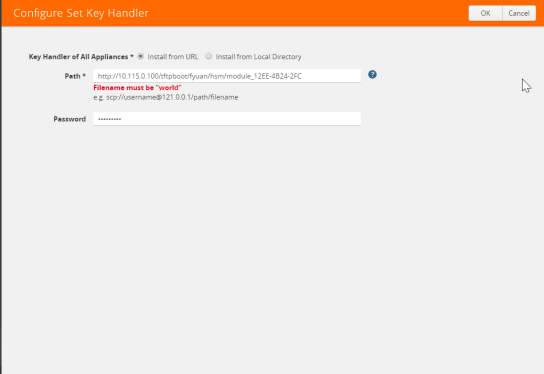
Figure 883: HSM-Configure Key Handler
|
4.
|
Type the Path. Path filename must include world. |
Configure Passive SSL Network Access
In this step you need to configure Passive SSL Network Access along with an valid IP address for GigaSMART.
|
1.
|
From the device view, select GigaSMART> Passive SSL > Network Access. |
|
2.
|
Select the GigaSMART appliance. |
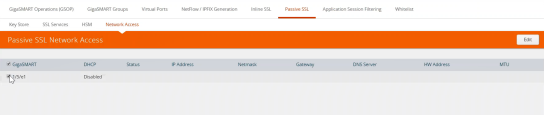
Figure 884: Passive SSL Network - Edit
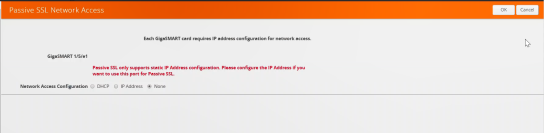
Figure 885: Passive SSL Network Access
Uploading SSL Private Keys
To access GigaSMART within GigaVUE-FM, access a device that has been added to GigaVUE-FM from the GigaVUE-FM interface. GigaSMART appears in the navigation pane of the device view on supported devices. Refer to the Access GigaSMART from GigaVUE-FM for details.
Each GigaSMART card requires IP address configuration for network access. To configure IP address details, do the following:
|
1.
|
Enter IP Address, Network, Gateway, DNS, MTU and VLAN parameters. |
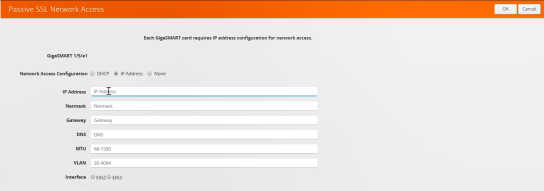
Figure 886: Passive SSL Network Access - IP Configuration
Configure a GigaSMART Group
|
1.
|
From the device view, select GigaSMART> Passive SSL > HSM. |
|
3.
|
Type GS in Alias field. |
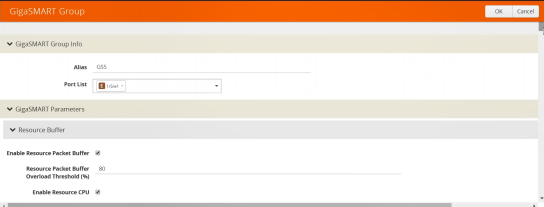
Figure 887: GigaSMART Group Setup Page
|
4.
|
Select the Port you want to associate with this group. |
|
5.
|
Scroll down the page and click Enable HSM. |
Create a GigaSMART Operations (GSOP)
To create a GigaSMART operation with an SSL Decryption component, do the following:
|
1.
|
From the device view, select GigaSMART > GigaSMART Operations (GSOP) > GigaSMART Operation. |
|
3.
|
In the Alias field, enter hsm for the GigaSMART Operation. |
|
4.
|
From the GigaSMART Groups list, select a GigaSMART group. |
|
5.
|
From the GigaSMART Operations (GSOP) list, select SSL Decryption. |
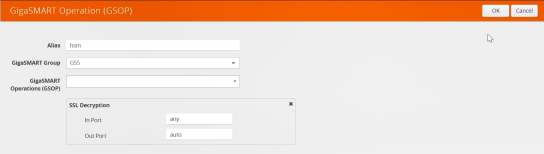
Figure 888: GigaSMART Operations - Setup Page
Configure the Keys Residing on HSM
Before uploading keys or configuring SSL, you must create an SSL keychain password. The password is used to encrypt the private keys that you upload to the node.
Note: When uploading SSL keys, make sure that you are not creating a duplicate key. Adding a duplicate key can cause errors.
To create an SSL keychain password, use the following steps:
|
1.
|
From the device view, select GigaSMART > Passive SSL > Key Store. |
|
2.
|
Click Keychain Password. |
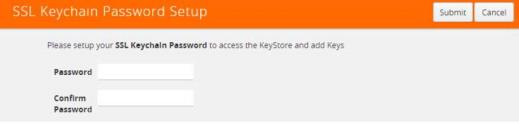
Figure 889: SSL Keychain Password Setup Page
|
3.
|
Enter a password in the Password and Confirm Password fields. You can only configure a strong password. A strong password has at least ten (10) characters and at least three (3) of the following: |
Uploading SSL Private Keys
To upload an SSL private key, do the following:
|
1.
|
From the device view, select GigaSMART >Passive SSL > Key Store to open the Key Store page. |
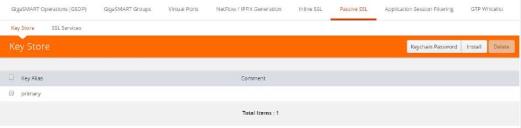
Figure 890: SSL Key Store Page
|
3.
|
The SSL Key page displays. |
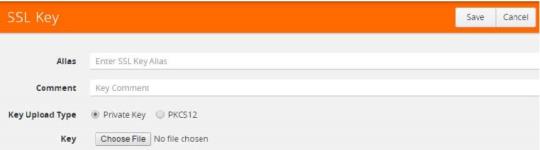
Figure 891: SSL Key Page
|
4.
|
Enter an Alias for the SSL key in the Alias field. |
|
5.
|
Select the upload type. Keys residing on the HSM, the type selected must be PKCS #11. |
|
6.
|
Choose the file. The URL can be downloaded using HTTP, HTTPS, FTP, TFTP, SCP, and SFTP. Using a secure protocol, such as HTTPS is recommended. |
Configure the GigaSMART Operation for Out-of-Band SSL Decryption
After you have uploaded a private key, you can add a service. A service maps to a
physical server, such as an HTTP server. One server can run multiple services. A service is a combination of an IP address and a server port number. Also, the key and the service must be tied together.
To create a service, do the following:
|
1.
|
From the device view, select GigaSMART > Passive SSL > SSL Services. |
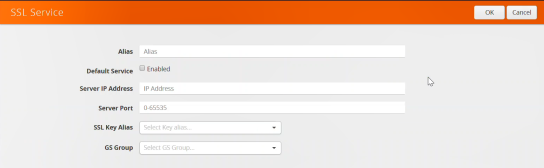
Figure 892: SSL Service
3. On the SSL Service configuration page, do the following:
|
•
|
Enter the information for the service: IP Address, Server Port. |
|
•
|
Select the alias of SSL Key previously uploaded. |
|
•
|
Select the GigaSMART Group with SSL decryption enabled to associate with this SSL service. |
4. Click OK.
Configure Maps

Figure 893: Create New Map
|
•
|
Type map11 inthe Alias field. |
|
•
|
Select Regular for Type. |
|
•
|
Select By Rule for Subtype. |
|
•
|
Select the network port for the Source. |
|
•
|
Select Tool port/Hybrid port for Destination. |
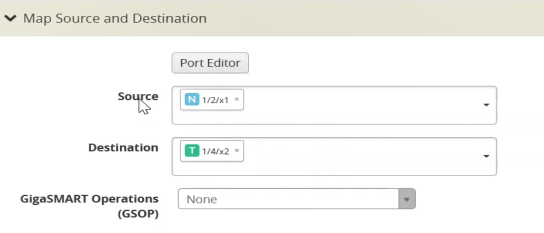
Figure 894: Configure Map Details
4. Add a Rule.
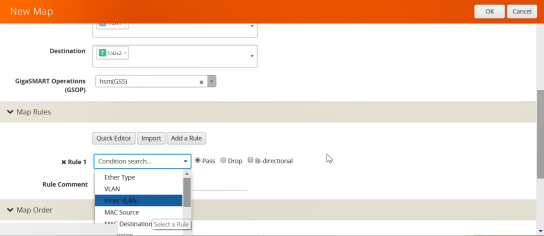
Figure 895: Figure 20-123: Map Details - Create Rule
|
c.
|
Select IPv4 Version and set Version to v4. |


