Perform Initial Configuration
Before powering on GigaVUE-FM, you can optionally perform the following:
| • | Add Additional vNIC |
| • | Increase the Memory |
| • | Add vCPUs |
Add Additional vNIC
Gigamon allows you to configure GigaVUE-FM with two network interfaces—eth0 and eth1. The network interface eth0 can be configured to connect to a network used to manage Gigamon devices. The other network interface eth1 can be configured to connect to a network hosting different servers like SMTP server, Archive server, and so on.
To add an additional vNIC:
| 1. | Right-click the GigaVUE-FM instance and select Edit Settings... Refer to Figure 162: vSphere Client: Edit Settings. |

Figure 162: vSphere Client: Edit Settings
| 2. | In the Hardware tab, click Add. |
| 3. | In the Add Hardware dialog box, select Ethernet Adapter and then click Next. Refer to Figure 163: vSphere Client: Selecting Ethernet Adapter. |
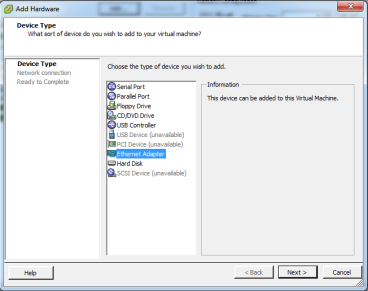
Figure 163: vSphere Client: Selecting Ethernet Adapter
| 4. | In the Adapter Type drop-down list, select an appropriate adapter type. Refer to Figure 164: vSphere Client: Selecting Device Type. |

Figure 164: vSphere Client: Selecting Device Type
| 5. | In the Named network with specified label drop-down list, select an appropriate network and click Next. |
The Network adapter 2 is added to GigaVUE-FM.
Increase the Memory
Based on the requirement, you can increase the memory of the GigaVUE-FM instance.
To increase the memory:
| 1. | Right-click the GigaVUE-FM instance and select Edit Settings... Refer to Figure 165: vSphere Client: Edit Settings. |
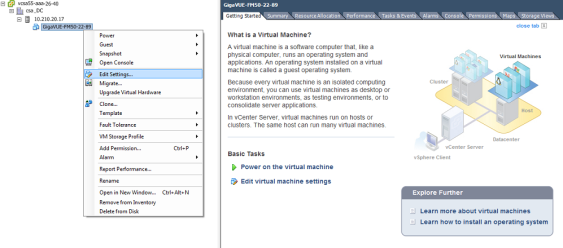
Figure 165: vSphere Client: Edit Settings
| 2. | In the Hardware tab, select Memory. |
| 3. | In Memory Configuration, increase the size of the memory as per your requirement. Refer to the recommended size for your guest OS in the dialog box. Refer to Figure 166: vSphere Client: Increasing Memory. |

Figure 166: vSphere Client: Increasing Memory
| 4. | Click OK. |
Add vCPUs
Based on the requirement, you can add additional vCPUs to the GigaVUE-FM instance.
| 1. | Right-click the GigaVUE-FM instance and select Edit Settings... |
| 2. | In the Hardware tab, select CPUs. Refer to Figure 167: vSphere Client: Adding vCPUs. |
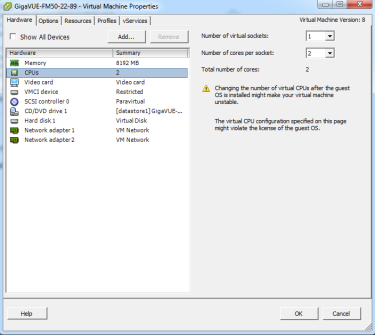
Figure 167: vSphere Client: Adding vCPUs
| 3. | In the Number of virtual sockets field, enter the appropriate number of sockets. |
| 4. | In the Number of cores per socket field, enter the appropriate number of cores per socket. |
| 5. | Click OK. |
Following are the steps to perform the initial configuration of GigaVUE-FM after installing on VMware ESXi:
| 1. | Log in to vCenter in the vSphere Client. |
| 2. | Ensure that the UTC time for GigaVUE-FM is configured correctly. Refer to the vSphere documentation for instructions on how to set the time. |
| 3. | If you checked the Power on after deployment box at the end of the GigaVUE-FM deployment in the previous procedure, then the GigaVUE-FM instance starts automatically in vSphere Client. |
If you did not check the box, you can power GigaVUE-FM on now by right-clicking the GigaVUE-FM instance (refer to Figure 168: GigaVUE-FM in vSphere Client) in the vSphere Client by selecting Power, and then Power On.
A GigaVUE-FM console displays a login prompt.
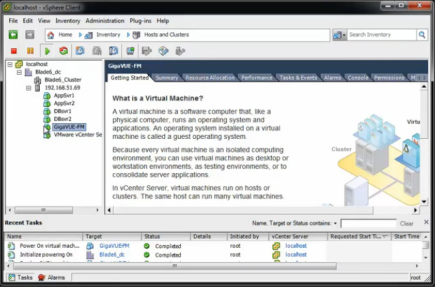
Figure 168: GigaVUE-FM in vSphere Client
1Log in as admin with password admin123A!
For a new installation of GigaVUE-FM, a password is required.
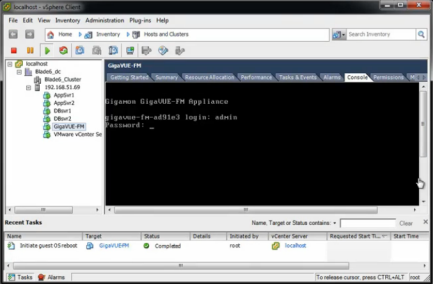
Figure 169: Jump Start Configuration Starts Automatically
2The jump start configuration for GigaVUE-FM starts automatically.
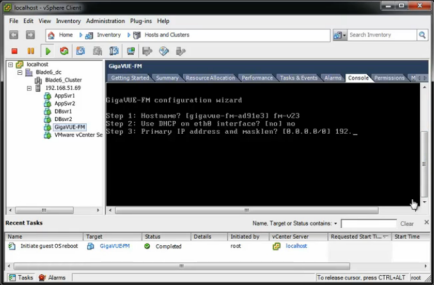
Figure 170: Jumpstart Wizard for GigaVUE-FM
| 4. | Provide a unique hostname for GigaVUE-FM. Note that the hostname may contain letters, numbers, periods (.), and hyphens (-), but may not begin with a hyphen. No other special characters are permitted. The hostname will display as part of the command line prompt after configuration jump-start completes. |
| 5. | To enable DHCP on eth0 interface, type yes and press enter. |
| 6. | Enter the primary IP address and the mask length, and then press enter. |
| 7. | Enter the default gateway and press enter. |
| 8. | Enter the primary DNS server address and press enter. Refer to Figure 171: Jump-Start Wizard for Network Interface Configuration. |
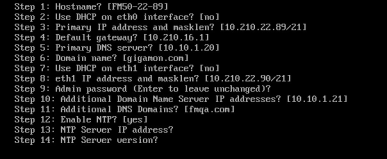
Figure 171: Jump-Start Wizard for Network Interface Configuration
| 9. | (optional) To enable DHCP on eth1 interface, type yes and press enter. Follow steps 7 to 10 to enable DHCP on eth1 interface. |
| 10. | Provide an appropriate password for your environment. (Type a password and press Enter, or just press Enter to leave the password unchanged.) |
Note: GigaVUE-FM requires a password.
| 11. | For configuration options: |
| a. | Additional Domain Name Server IP Addresses? - the address of any additional name servers required. These must be provided as a set of IP addresses with spaces as shown in the Figure 172: Jumpstart Wizard for Additional Domain Name Server IP Addresses. |
| b. | Additional DNS Domains? - Multiple DNS domains can be defined in the jump start configuration with spaces in between as shown in Figure 172: Jumpstart Wizard for Additional Domain Name Server IP Addresses. |
| c. | Enable NTP? [no] - the default is set to “yes”, the following options are available: |
NTP Server IP Address? - enter the NTP server address
NTP Server Version? - enter the NTP version number of the NTP server
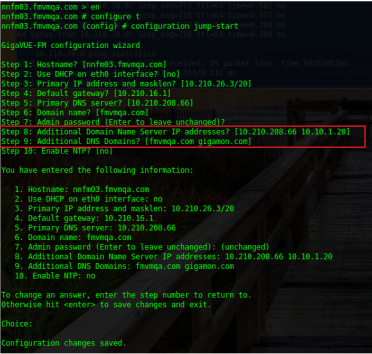
Figure 172: Jumpstart Wizard for Additional Domain Name Server IP Addresses
3The console displays the summary of the chosen selections with instructions on how to make changes, as needed.
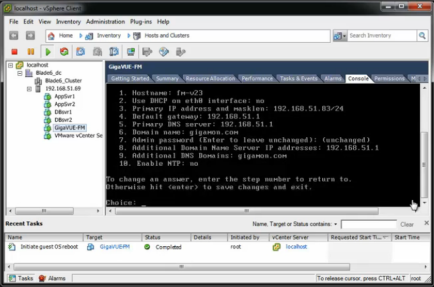
Figure 173: Summary of the Selections from Jumpstart Menu
4Press Enter to save your choices and exit the wizard.
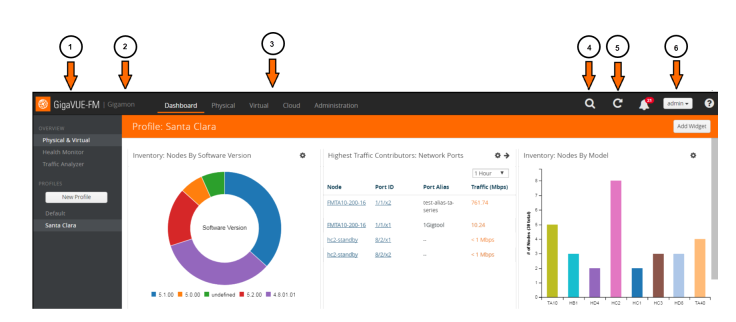
The initial configuration is saved and GigaVUE-FM is up and running. GigaVUE-FM is now accessible using a web browser, using IP address specified in the jumpstart steps. Also the first time GigaVUE-FM starts, a EULA is presented. Accept the EULA to continue and see a dashboard similar to the one shown in Figure 174: Instance of GigaVUE-FM from Web Client.