Configure AAA
Use the aaa command in Configure mode for authentication, authorization, and accounting settings for the GigaVUE H Series node – there are separate arguments for each. In general, configuring authentication consists of specifying the login methods accepted, the order in which they are tried, the local user account to map to external logins, whether to accept roles specified by the AAA server, and the configuration of the external authentication server itself.
Refer to the GigaVUE Fabric Management Guide for detailed information.
Configure AAA Authorization
For details on the aaa authorization command, refer to aaa authorization.
Example
The following commands demonstrate how to set up authentication using RADIUS with a fallback to local if no RADIUS server is available.
|
Command |
Description |
|
(config) # aaa authentication login default radius local |
Use RADIUS authentication first, followed by local authentication. |
|
(config) # aaa authorization map order remote-first |
If the external user also exists in the local database, use the specified local account. Otherwise, use the account specified by the map default-user argument. |
|
(config) # aaa authorization map default-user admin |
If the external user does not exist in the local database, use the admin account instead. This is only done if the map order is set to remote-first or local. |
|
(config) # radius-server host 192.168.0.62 key gigamon |
Adds a RADIUS server at IPv4 address 192.168.0.62 to the GigaVUE H Series node’s list. |
|
(config) # radius extra-user-params roles enable |
Allows the RADIUS server to include additional roles for a remotely authenticated user in the response. Refer to Granting Roles with External Authentication Servers on page 935. |
Add a RADIUS Server
Admin users use the radius-server command to specify the RADIUS servers to be used for authentication. You can specify multiple RADIUS servers. Servers are used as fallbacks in the same order in which they are specified. If the first server is unreachable, the second is tried, and so on, until all named servers have been used. If a server is reachable and authentication fails, the authentication process terminates.
For details on the radius-server command, refer to radius-server.
Examples
The following radius-server commands demonstrate different ways to specify a RADIUS server:
|
Command |
Comments |
||||||||||||||||||
|
(config) # radius-server host 192.168.0.75 key gvhd8 (config) # radius-server timeout 20 (config) # radius extra-user-params roles enable |
Specifies that:
|
||||||||||||||||||
|
(config) # radius-server host 192.168.1.212 auth-port 5150 key lowkey retransmit 5 timeout 30 |
Specifies that:
Note: If this command was used after the command in the previous row, this server would be the backup RADIUS server for the previously-specified server. |
||||||||||||||||||
|
(config) # radius-server host www.MyCo.com |
Specifies a RADIUS server host by hostname. Note: Starting in software version 5.6, GigaVUE‑OS supports dynamic Fully Qualified Domain Name (FQDN) or hostname. |
Delete a RADIUS Server
As with all GigaVUE‑OS elements, you can delete a RADIUS server by prefacing the radius-server command with the no command. For example, the following command deletes the second RADIUS server:
(config) # no radius-server host 192.168.1.212
The following command resets the global timeout value to its default setting of three:
(config) # no radius-server timeout
The show radius output looks as follows after making these changes:
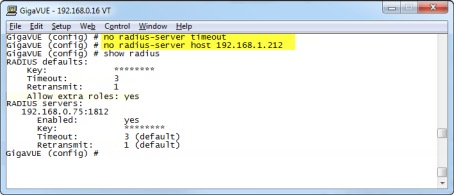
| 1 | show radius Output after Removing Server |
Add a TACACS+ Server
Admin users use the tacacs-server command to specify the TACACS+ servers to be used for authentication. You can specify multiple TACACS+ servers. Servers are used as fallbacks in the same order in which they are specified. If the first server is unreachable, the second is tried, and so on, until all named servers have been used. If a server is reachable and authentication fails, the authentication process terminates.
For details on the parameters and the syntax of the tacacs-server command, refer to tacacs-server in the reference section.
Examples
The following tacacs-server commands demonstrate different ways to specify a TACACS+ server:
|
Command |
Comments |
|||||||||||||||||||||
|
(config) # tacacs-server host 192.168.0.93 key mytac123 (config) # tacacs-server retransmit 5 (config) # tacacs-server extra-user-params roles enable service gigamon |
Specifies that:
|
|||||||||||||||||||||
|
(config) # tacacs-server host 2001:db8:a0b:12f0::11:49 auth-port 4949 key tackey retransmit 3 timeout 45 |
Specifies that:
Note: If this command was used after the command in the previous row, this server would be the backup TACACS+ server for the previously-specified server. |
|||||||||||||||||||||
|
(config) # tacacs-server host www.MyCo.com |
Specifies a TACACS+ server host by hostname. Note: Starting in software version 5.6, GigaVUE‑OS supports dynamic Fully Qualified Domain Name (FQDN) or hostname. |
2 shows the results of a show tacacs command for the servers set up in the first two examples:
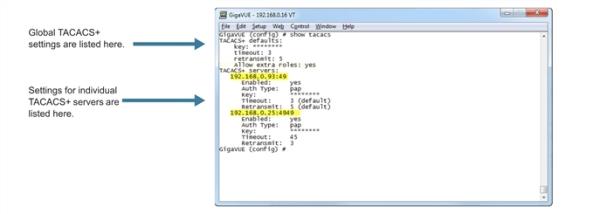
| 2 | Results of show tacacs Command |
Delete a TACACS+ Server
As with all GigaVUE‑OS elements, you can delete a TACACS+ server by prefacing the tacacs-server command with the no command. For example, the following command deletes the second TACACS+ server:
(config) # no tacacs-server host 192.168.0.25
The following command resets the global retransmit value to its default setting of one:
(config) # no tacacs-server retransmit
The show tacacs output looks as follows after making these changes:
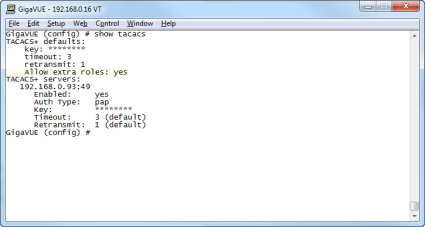
| 3 | show tacacs Output after Removing Server |
Configure an IPv6 Address
Use the following CLI command to configure an IPv6 address for a TACACS+ server:
(config) # tacacs-server host 2001:db8:a0b:12f0::17/120 key gigamon enable
To enable IPv6 on the GigaVUE node, there are more configuration steps. Refer to IPv6 Configuration Example.
Add an LDAP Server
Admin users use the ldap command to specify the LDAP servers to be used for authentication. You can specify multiple LDAP servers. Servers are used as fallbacks in the same order in which they are specified. If the first server is unreachable, the second is tried, and so on, until all named servers have been used. If a server is reachable and authentication fails, the authentication process terminates.
For Common Criteria, specify SHA password hashing when configuring the remote LDAP server. For details on Common Criteria, refer to Common Criteria on page 962.
For details on the ldap command, refer to ldap on page 239.
Examples
The following highlights the steps to configure LDAP, AAA, and certificates.
General configuration:
username operator password <enter password>DNS IP is configured <DNS/LDAP server IP>
LDAP configuration:
ldap bind-dn <accountname@domainname>ldap bind-password <account password>ldap login-attribute <AD: sAMAccountName or openldap: uid>ldap base-dn cn=Users,dc=example,dc=com (directory tree search path)ldap port 636 (ssl: 636, none-ssl: 389)ldap host <dns name of server> (ip address will not work)In environments where the device is isolated from DNS, use the following:
ip host <host>.<domain>.<com> x.x.x.x
AAA configuration:
aaa authentication login default ldap local
aaa authorization map order remote-first
Certificate creation:
On Linux or Linux app (such as Cygwin):
$ openssl.exe req \> -x509 -nodes -days 365 \> -newkey rsa:1024 -keyout mycert.pem -out mycert.pemGenerating a 1024 bit RSA private key.........................................++++++.......++++++writing new private key to 'mycert.pem'-----You are about to be asked to enter information that will be incorporated into your certificate request.What you are about to enter is what is called a Distinguished Name or a DN.There are quite a few fields but you can leave some blankFor some fields there will be a default value,If you enter '.', the field will be left blank.-----Country Name (2 letter code) [AU]:USState or Province Name (full name) [Some-State]:CaliforniaLocality Name (eg, city) []:OurtownOrganization Name (eg, company) [Internet Widgits Pty Ltd]:OurcompanyOrganizational Unit Name (eg, section) []:OurGroupCommon Name (e.g. server FQDN or YOUR name) []:MynameEmail Address []:My.name@Ourcompany.com
$ ls
mycert.pem
Certificate installation:
| crypto certificate name <name> public-cert pem “<certificate string including BEGIN CERTIFICATE and END CERTIFICATE lines>”. Enclose the contents of the PEM file in quotation marks. Refer to the example. |
Note: Install all the certificates in the certificate chain.
| crypto certificate name <name> public-cert pem fetch <url> |
Note: Fetch the remote certificate using SCP, HTTP, HTTPS, TFTP, and SFTP.
| crypto certificate ca-list default-ca-list name <installed certificate> |
Note: Execute this for all the installed certificates.
| sh crypto certificate ca-list default-ca-list <this command shows all the installed certificate> |
Example:
(config) # crypto certificate name mycert public-cert pem
"-----BEGIN CERTIFICATE-----
MIIC8jCCAlugAwIBAgIJAJtFtchQpGk6MA0GCSqGSIb3DQEBBQUAMIGRMQswCQYDVQQGEwJVUzETMBEGA1UECAwKQ2FsaWZvcm5pYTERMA8GA1UEBwwITWlscGl0YXMxEDAOBgNVBAoMB0dpZ2Ftb24xCzAJBgNVBAsMAlFBMRAwDgYDVQQDDAdiZXJuYXJkMSkwJwYJKoZIhvcNAQkBFhpiZXJuYXJkLmFydG9sYUBnaWdhbW9uLmNvbTAeFw0x
MzEwMTcxOTQzNDJaFw0xNDEwMTcxOTQzNDJaMIGRMQswCQYDVQQGEwJVUzETMBEGA1UECAwKQ2FsaWZvcm5pYTERMA8GA1UEBwwITWlscGl0YXMxEDAOBgNVBAoMB0dpZ2Ftb24xCzAJBgNVBAsMAlFBMRAwDgYDVQQDDAdiZXJuYXJkMSkwJwYJKoZIhvcNAQkBFhpiZXJuYXJkLmFydG9sYUBnaWdhbW9uLmNvbTCBnzANBgkqhkiG9w0BAQEFAAOBjQAwgYkCgYEAwSM5dHUaZUcI8vTdd+l/I+2dXxamSFI2xLLS54WunKaLfI9Fm6FS6NYzoPY7SAS+Y5qtsFR5di+duPhpylcDTCDUBa0CMzdtzt0qGR3uuxClNWt6cBKFaLGMwqgxe+XAtqt5S5FzEXZGZp9bmuwpLhpXm7Dhhkfa+YjkzHhbeoECAwEAAaNQME4wHQYDVR0OBBYEFGB4M/57N9yDBT3ODiUV4r/Evk6BMB8GA1UdIwQYMBaAFGB4M/57N9yDBT3ODiUV4r/Evk6BMAwGA1UdEwQFMAMBAf8wDQYJKoZIhvcNAQEFBQADgYEAYlasOq3/oB8Yu7Y44NZnbrhrWUZZleYNLa3c8+8KnSvVZYsUZJBUXNthOs3nvlRW+Z8H9J1D9PkC/a5ym2Na3AU0zXpTt7HQA0cfemKJqJ7XIF/7AUOJSjIxxLMQL+2tGkc5on8No27wn5UgLFzbn9ZzU/QDkD3eKOvKtQW50Ok=
-----END CERTIFICATE-----"
Successfully installed certificate with name 'mycert'
Examples
The following ldap commands demonstrate different ways to add an LDAP server to the GigaVUE H Series node’s list:
|
Command |
Comments |
|||||||||||||||
|
(config) # ldap host 192.168.0.62 (config) # ldap login-attribute uid (config) # ldap base-dn "ou=People,dc=ncgold,dc=com" (config) # ldap extra-user-params roles enable |
Specifies that:
|
|||||||||||||||
|
(config) # ldap host 2001:10:115:104::110:f (config) # ldap port 5858 (config) # ldap base-dn "ou=Employees,dc=ncgold,dc=com" (config) # ldap timeout 35 (config) # ldap version 2 |
Specifies that:
Note: If this command was used after the command in the previous row, this server would be the backup LDAP server for the previously-specified server. You can always change the order of LDAP servers by using the ldap host <host> order command. |
|||||||||||||||
|
(config) # ldap host 192.168.1.84 order 1 |
This command moves the LDAP server at IPv4 address 192.168.1.84 up to the first position in the list of the servers, meaning that it will be used for authentication first. |
|||||||||||||||
|
(config) # ldap host www.MyCo.com |
Specifies an LDAP server host by hostname. Note: Starting in software version 5.6, GigaVUE‑OS supports dynamic Fully Qualified Domain Name (FQDN) or hostname. |
2 shows the results of a show ldap command for the servers set up in the first two examples. Note that most LDAP settings are global settings – changes made for the second server appear as new settings for the defaults.
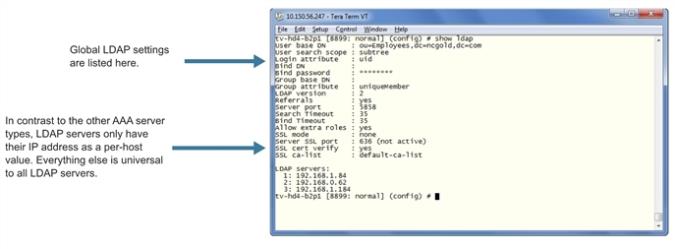
| 4 | Results of show ldap Command |
Delete an LDAP Server
As with all GigaVUE‑OS elements, you can delete an LDAP server by prefacing the ldap host command with the no command. For example, the following command deletes the second ldap server:
(config) # no ldap host 192.168.1.84
The following commands reset the LDAP port, timeout, and version back to their default settings:
(config) # no ldap port
(config) # no ldap timeout
(config) # no ldap version
The show ldap output looks as follows after making these changes:
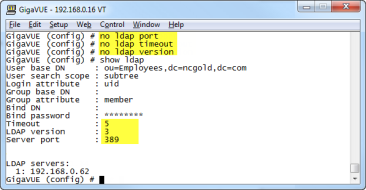
| 5 | show ldap Output after Resetting Values to Defaults |
Configuring an IPv6 Address
Use the following CLI command to configure an IPv6 address for an LDAP server:
(config) # ldap host 2001:db8:a0b:12f0::66
To enable IPv6 on the GigaVUE node, there are more configuration steps. Refer to IPv6 Configuration Example.


