Create Map
Each map can have up to 32 rules associated with it. The following table lists the various conditions that you can select for creating a map, inclusion map, and exclusion map.
| Conditions | Description | ||||||||||||||||||||||||||||||||||||||||||
|
L2, L3, and L4 Filters |
|||||||||||||||||||||||||||||||||||||||||||
|
EtherType |
The packets are filtered based on the selected ethertype. The following conditions are displayed:
L3 Filters If you choose IPv4 or IPv6, the following L3 filter conditions are displayed:
L4 Filters If you select TCP or UDP protocol, the following L4 filter conditions are displayed:
|
||||||||||||||||||||||||||||||||||||||||||
|
MAC Source |
The egress traffic from the instances or ENIs matching the specified source leader in a bidirectional clock relationship (formerly master) MAC address is selected. |
||||||||||||||||||||||||||||||||||||||||||
|
MAC Destination |
The ingress traffic from the instances or ENIs matching the specified destination MAC address is selected. |
||||||||||||||||||||||||||||||||||||||||||
|
VLAN |
All the traffic matching the specified IEEE 802.1q Virtual LAN tag is filtered. Specify a number from 0 to 4094. |
||||||||||||||||||||||||||||||||||||||||||
|
VLAN Priority Code Point (PCP) |
All the traffic matching the specified IEEE 802.1q Priority Code Point (PCP) is filtered. Specify a value between 0 to 7. |
||||||||||||||||||||||||||||||||||||||||||
|
VLAN Tag Control Information (TCI) |
All the traffic matching the specified VLAN TCI value is filtered. Specify the exact TCI value. |
||||||||||||||||||||||||||||||||||||||||||
|
Pass All |
All the packets coming from the monitored instances are passed through the filter. When Pass All is selected, the L3 and L4 filters are disabled. |
||||||||||||||||||||||||||||||||||||||||||
When you select a condition without source or destination specified, then both egress and ingress traffic is selected for monitoring the traffic. For example, if you select IPv4 as the EtherType, TCP as the protocol, and do not specify IP source or destination, then both egress and ingress traffic is selected for monitoring purpose.
When you select a condition with either source or destination specified, it determines the direction based on the selection. For example, if only IP source is selected as shown in the following figure, the egress traffic from the instances in the subnet 10.0.1.0/24 is selected for monitoring the traffic.
Note: You can create Inclusion and Exclusion Maps using all default conditions except EtherType and Pass All.
To create a new map:
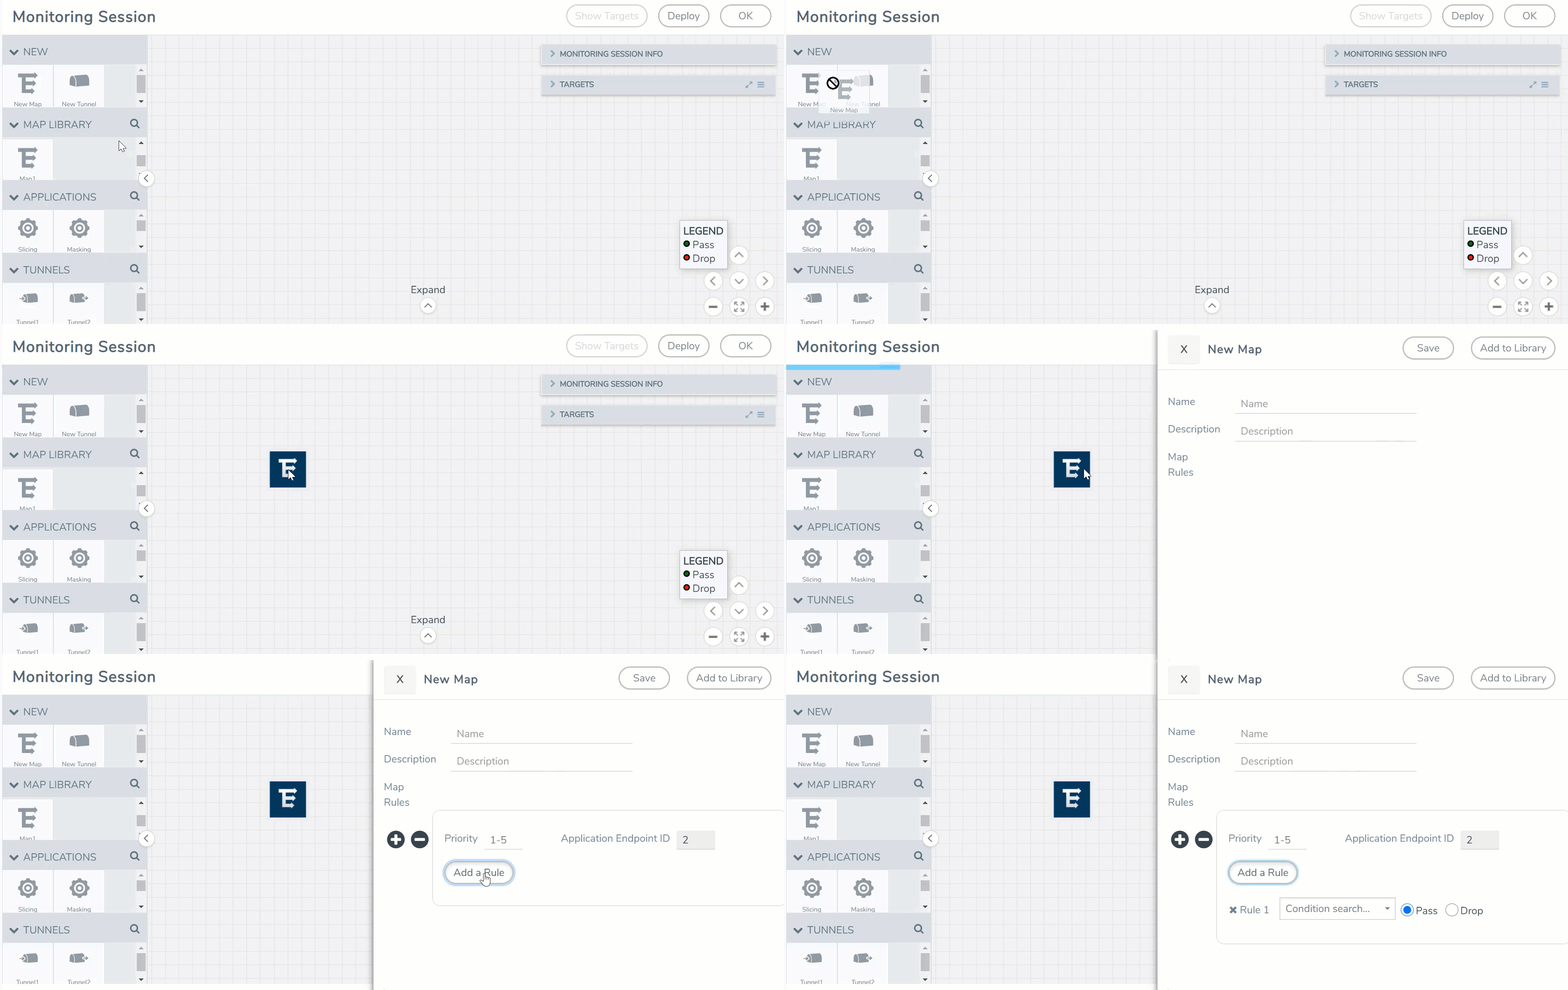
- After creating a new monitoring session, or click Edit on an existing monitoring session, the GigaVUE-FM canvas appears.
- In the canvas, select New > New Map, drag and drop a new map template to the workspace. The New Map quick view appears.

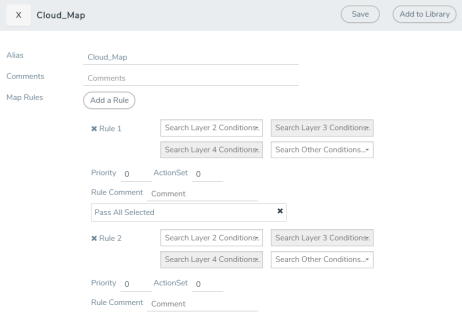
- Enter the appropriate information for creating a new map as shown in the following table.
Parameter
Description
Alias
The name of the new map.
Note: The name can contain alphanumeric characters with no spaces.
Description
The description of the map.
Map Rules
The rules for filtering the traffic in the map.
To add a map rule:
a. Click Add a Rule. b. Select a condition from the Search L2 Conditions drop-down list and specify a value. Based on this selection, the Search L3 Conditions drop-down list is automatically updated. c. Select a condition from the Search L3 Conditions drop-down list and specify a value. d. (Optional) If you have selected TCP or UDP as the protocol in the L3 conditions, then select Port Source or Port Destination from the Search L4 Conditions drop-down list and specify a value. If you have selected conditions other than TCP or UDP, then the Search L4 Conditions drop-down list is disabled. e. (Optional) In the Priority and Action Set box, assign a priority and action set. f. (Optional) In the Rule Comment box, enter a comment for the rule. - Repeat steps b through f to add more conditions.
- Repeat steps a through f to add nested rules
Note: Do not create duplicate map rules with the same priority.
- To reuse the map, click Add to Library. Save the map using one of the following ways:
- Select an existing group from the Select Group list and click Save.
- Enter a name for the new group in the New Group field and click Save.
Note: The maps saved in the Map Library can be reused in any monitoring session present in the VPC.
- Click OK.
To edit a map, click the map and select Details, or click Delete to delete the map.


