Add AAA Servers to the Node’s List
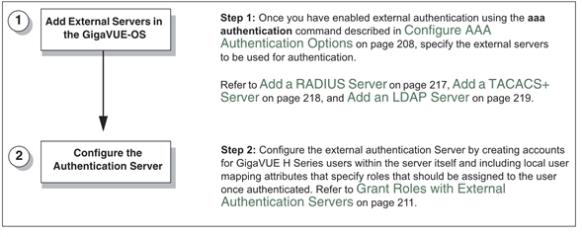
If you enable an external authentication option (RADIUS, TACACS+, or LDAP) with the AAA, you must also perform some additional configuration tasks, both within the GigaVUE node and the external server itself:

| Figure 11 | Steps to Use the Node with an External Authentication Server |
Add a RADIUS Server
Admin users use the RADIUS page to specify the RADIUS servers to be used for authentication. You can specify multiple RADIUS servers. Servers are used as fallbacks in the same order they are specified—if the first server is unreachable, the second is tried, and so on, until all named servers have been used. If a server is reachable and authentication fails, the authentication process terminates.
To Add a RADIUS server, do the following:
| 1. | Select Settings > Authentication > RADIUS. |
| 2. | Click Add. |
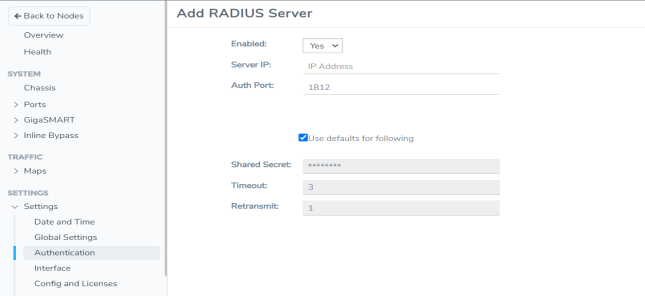
| 3. | Enter the RADIUS information on the ADD Radius page. For an example, refer to Figure 2. |
You can enter either an IPv4 or IPv6 address for the Server IP. The same IP address can be used for more than one RADIUS server if the Auth Port values are different.
| 4. | Click Save. |

| Figure 12 | Adding a Radius Server |
Delete a RADIUS Server
To delete a RADIUS server, do the following:
| 1. | Select Settings > Authentication > RADIUS. |
| 2. | Select the RADIUS server to delete. |
| 3. | Click Delete. |
Add a TACACS+ Server
Admin users use the TACACS+ page to specify the TACACS+ servers to be used for authentication. You can specify multiple TACACS+ servers. Servers are used as fallbacks in the same order they are specified – if the first server is unreachable, the second is tried, and so on, until all named servers have been used. If a server is reachable and authentication fails, the authentication process terminates.
To Add a RADIUS server, do the following:
| 1. | Select Settings > Authentication > TACACS+. |
| 2. | Click Add. |
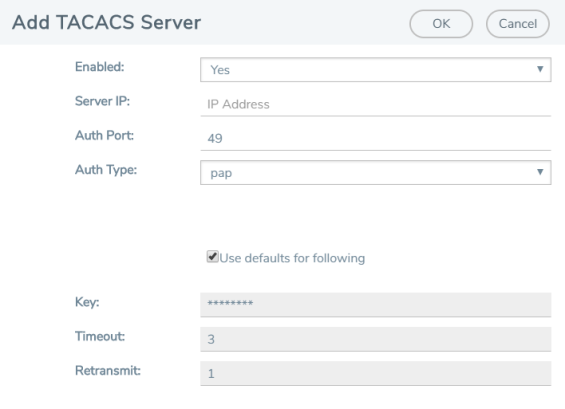
| 3. | Enter the RADIUS information on the ADD TACACS Server page. For an example, refer to Figure 3 |
| 4. | Click Save. |

| Figure 13 | Adding a TACACS Server |
Delete a TACACS+ Server
To delete a RADIUS server, do the following:
| 1. | Select Settings > Authentication > TACACS+. |
| 2. | Select the TACACS+ server to delete. |
| 3. | Click Delete. |
Configure an IPv6 Address
To configure an IPv6 address for a TACACS+ server, enter the IPv6 address in the Server IP filed on the Add TACACS Server page (select Settings > Authentication > TACACS > Add.)
Note: To use IPv6 addresses, you must use the CLI to enable IPv6 through the configuration jump-start wizard. For more information, refer to the GigaVUE-OS CLI Reference Guide.
Add an LDAP Server
Admin users use the LDAP page to specify the LDAP servers to be used for authentication. You can specify multiple LDAP servers. Servers are used as fallbacks in the same order they are specified—if the first server is unreachable, the second is tried, and so on, until all named servers have been used. If a server is reachable and authentication fails, the authentication process terminates.
To add an LDAP Server, do the following:
| 1. | Select Settings > Authentication > LDAP. |
| 2. | Click Add. |
| 3. | Enter the IP address of the LDAP server in the Server IP field. |
| 4. | Click Save. |
For Common Criteria, specify SHA password hashing when configuring the remote LDAP server. For details on Common Criteria, refer to Common Criteria.
Set the LDAP Server Default Settings
After adding an LDAP Server, do the following to specify the default settings:
| 1. | Select Settings > Authentication > LDAP. |
| 2. | Select the LDAP Server, and then click Default Settings. |
| 3. | Enter or select the settings for the LDAP server on the Edit LDAP Server Default Settings page, and then click Save. The settings are described in Table 1: LDAP Default Settings |
|
Default Setting |
Description |
|||||||||
|
User Base DN |
Identifies the base distinguished name (location) of the user information in the LDAP server's schema. Specify this by identifying the organizational unit (ou) in the base DN. Provide the value as a string with no spaces. For example: ou=People,dc=mycompany,dc=com This is a global setting. It cannot be configured on a per-host basis. |
|||||||||
|
User Search Scope |
Specifies the search scope for the user under the base distinguished name (dn):
This is a global setting. It cannot be configured on a per-host basis. |
|||||||||
|
Login UID |
Specifies the name of the LDAP attribute containing the login name. You can select
This is a global setting. It cannot be configured on a per-host basis. |
|||||||||
|
Bind Password |
Provides the credentials to be used for binding with the LDAP server. If Bind DN is undefined for anonymous login (the default), Bind Password should also be undefined. This is a global setting. It cannot be configured on a per-host basis. |
|||||||||
|
Group Base DN |
Specifies that membership in the named Group Base DN is required for successful login to the GigaVUE H Series node. By default, the Group Base DN is left empty—group membership is not required for login to the system. If you do specify a Group Base DN, the attribute specified by Group Login Attr must contain the user’s distinguished name as one of the values in the LDAP server or the user will not be logged in. This is a global setting. It cannot be configured on a per-host basis. |
|||||||||
|
Bind DN |
Specifies the distinguished name (dn) on the LDAP server with which to bind. By default, this is left empty for anonymous login. This is a global setting. It cannot be configured on a per-host basis. |
|||||||||
|
Group Login Attr |
Specifies the name of the attribute to check for group membership. If you specify a value for Base Group DN, the attribute you name here will be checked to see whether it contains the user’s distinguished name as one of the values in the LDAP server. You ca select on of the following:
This is a global setting. It cannot be configured on a per-host basis. |
|||||||||
|
LDAP Version |
Specifies the version of LDAP to use. The default is version 3, which is the current standard. Some older servers still use version 2. This is a global setting. It cannot be configured on a per-host basis. |
|||||||||
|
Port |
Specifies the port number on which the LDAP server is running. If you do not specify a port, the default LDAP authentication port number of 389 is used. This is a global setting. It cannot be configured on a per-host basis. |
|||||||||
|
Timeout |
Specifies how long the GigaVUE H Series node should wait for a response from an LDAP server to a bind request before declaring a timeout failure. The valid range is 0-60 seconds. The default is 5 seconds. |
|||||||||
|
Extra Roles |
When Yes is selected, enables the GigaVUE H Series node to accept user roles assigned in the LDAP server. The default is No. |
|||||||||
|
SSL Mode |
Enables SSL or TLS to secure communications with LDAP servers as follows:
Note: SSL and TLS modes use TLS 1.2 for negotiation with the LDAP server and the default ports. |
|||||||||
|
SSL Port |
Configures LDAP SSL port number. |
|||||||||
|
SSL Cert Check |
Enables LDAP SSL/TLS certificate verification. Use Off to disable. |
|||||||||
|
SSL ca-list |
Configures LDAP to use a supplemental CA list. Set to default Ca list to use the CA list configured with the Secure Cryptography (refer to Configure Secure Cryptography Mode). Set to None if you do not want to use a supplemental list. |
Delete an LDAP Server
To delete an LDP Server, do the following:
| 1. | Select Settings > Authentication > LDAP. |
| 2. | Select the LDAP server to delete on the LDAP Server page. |
| 3. | Click Delete. |
Configure an IPv6 Address
To configure an IPv6 address for a LDAP server, enter the IPv6 address in the Server IP filed on the Add LDAP Server page (select Settings > Authentication > LDAP > Add.)
Note: To use IPv6 addresses, you must use the CLI to enable IPv6 through the configuration jump-start wizard. For more information, refer to the GigaVUE-OS CLI Reference Guide.


