Step 2: Register NSX-T vCenter and NSX-T Manager in GigaVUE‑FM
Before adding a NSX-T Manager, you must add a vCenter to GigaVUE‑FM .
When the NSX-T Manager is registered in GigaVUE‑FM, it registers the GigaVUE Cloud Suite in NSX-T as a Network Monitoring Service. The GigaVUE Cloud Suite is used to install GigaVUE-VM Service Virtual Machines and define profiles for forwarding traffic to the GigaVUE visibility fabric.
Add vCenter Registered with NSX-T to GigaVUE‑FM
To add the vCenter to GigaVUE‑FM:
| 1. | From the left navigation pane, select Inventory > VIRTUAL > VMware > vCenter > Management. The Management page appears. |
| 2. | In the Virtual Center tab, click Add. The Add Virtual Center page displays.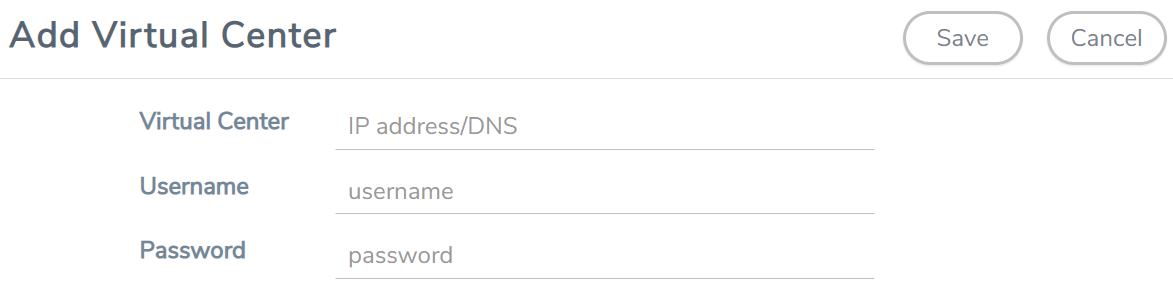 |
| 3. | On the Add Virtual Center page, do the following: |
| In the Virtual Center field, Enter the DNS name or IP address of the vCenter server. |
| In the Username field, enter the VMware vCenter username that has a minimum of the Read Only role or higher. |
| In the Password field, enter the password for vCenter. |
| 4. | Click Save. |
Add a NSX-T Manager in GigaVUE‑FM
To add a NSX-T Manger with VMware vCenter, do the following:
- From the left navigation pane, select Inventory > VIRTUAL > VMware > NSX-T > Management. The Management page appears.
- In the NSX-T Managers tab, click Add. The NSX-T Manager page appears.
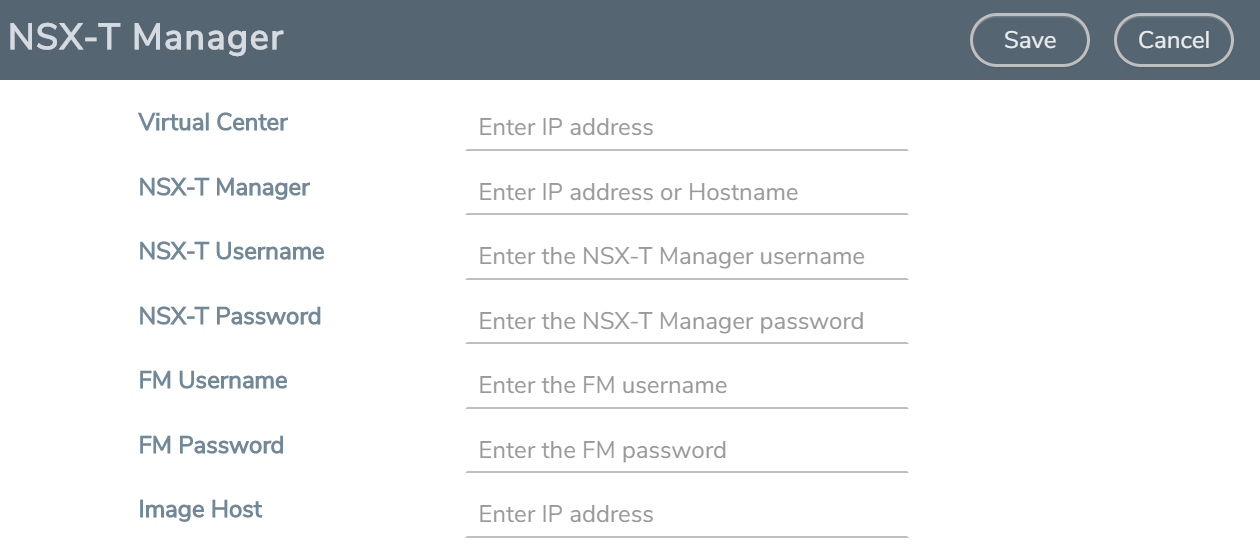
- Enter the information in the fields as follows:
- In the Virtual Center field, enter the IP address of the vCenter.
- In the NSX-T Manager field, enter the hostname or IP address of the NSX-T Manager.
- In the NSX-T Username field, enter the user that FM uses to authenticate with NSX-T. This is the user created during the steps described in Create VMware NSX-T user in GigaVUE‑FM.
- In the NSX-T Password field, enter the password for the NSX-T user.
- In the FM Username field, enter in the user in GigaVUE‑FM for NSX-T to communicate back with FM. This the user created in Create GigaVUE‑FM User in NSX-T manager.
- In the FM Password, field enter a password for the GigaVUE‑FM user.
- In the Image Hostfield, enter the IP address of the Image Host. Refer to GigaVUE-VM image (.ova) must be extracted to an Image Host Server so that http://<Server_IP>/GigaVUE-VM file2.ovf is accessible from GigaVUE‑FM, NSX Manager, and vCenter. for more information.
- Click Save.
Note:
- A GigaVUE‑FM managing a NSX-T environment cannot be used to manage vCenter or NSX-V environment.
- You cannot connect more than one GigaVUE‑FM to a NSX-T manager simultaneously.
Create a Service Segment in NSX-T
Registering the NSX-T details on GigaVUE-FM is a prerequisite to create the service segment.
To create a service segment in VMware NSX-T:
- On the NSX manager, go to System > Service deployment > Deployment. GigaVUE-FM and NSX-T must be synced to reflect the GigaVUE cloud suite as the partner service in NSX-T. On the same page, click the View service details link to check the version details.
- Click DEPLOY SERVICE and a service deployment page appears.
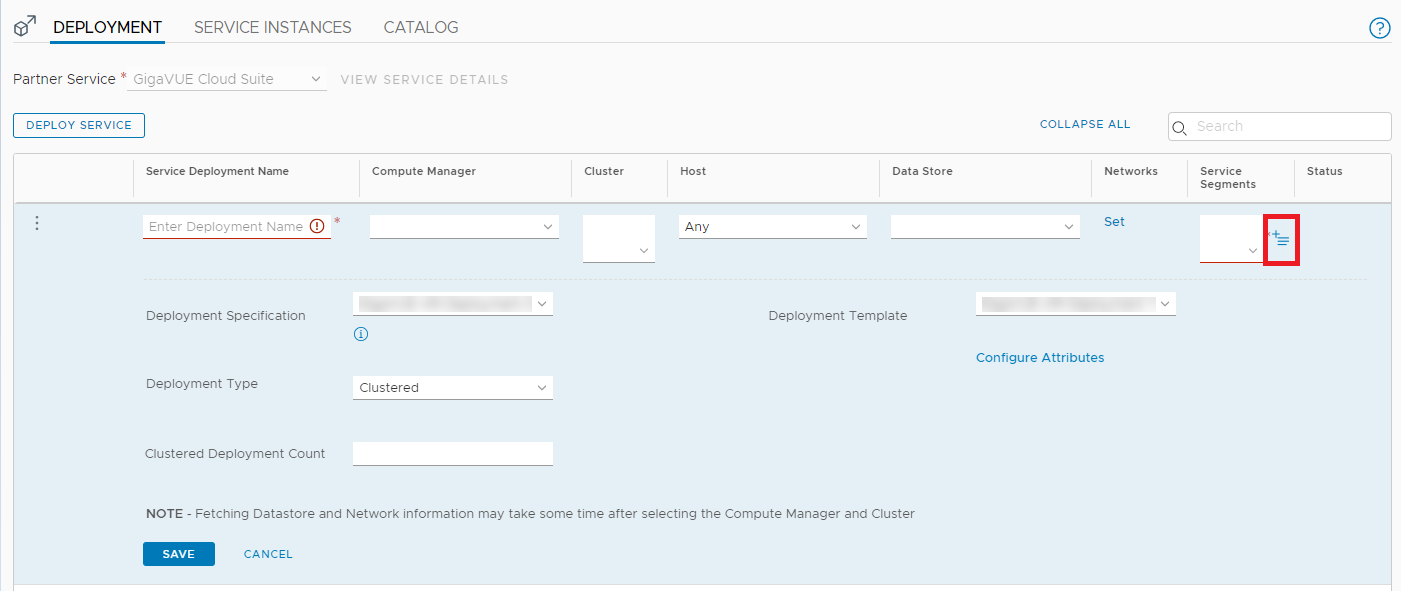
- On the Service Segments column, click + and the Service Segment page appears.
- On the Service Segment page, click ADD SERVICE SEGMENT and a new row appears to create a service segment.
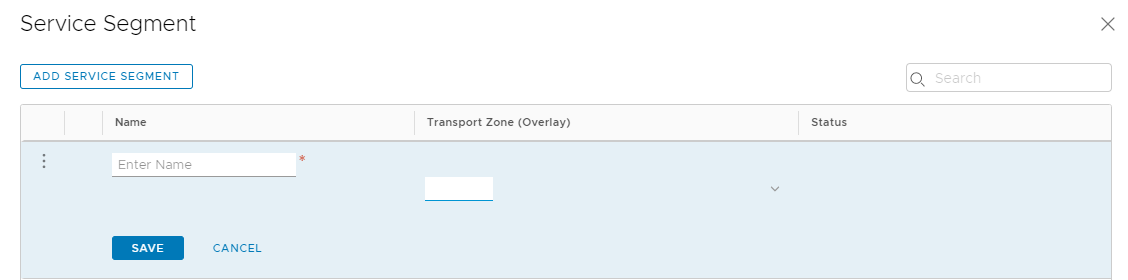
- Enter the name and map it to the overlay transport zone created for the VMs.
- Click Save.
Note: Due to certificate validation requirement in NSX-T manager nodes, V Series node deployment may fail. Before deploying the V Series nodes, disable the certificate validation as follows.
- Login to each NSX-T manager
- Open /config/vmware/auth/ovf_validation.properties file
- Set a value for THIRD_PARTY_OVFS_VALIDATION_FLAG as 2. The definition of the legends are as follows:
- 0: only VMware-signed OVFs are allowed for deployment
- 1: only VMware-signed and well-known CA-signed OVFs are allowed for deployment
- 2: no validation
- Save and Exit the file.


