Manage Devices
This section describes the following:
| Add Devices |
| Edit Devices |
| Delete Devices |
| Add TAP |
| Add Links |
| Edit Links |
Add Devices
To add a node or nodes to the topology, do the following:
| 1. | Select Add > Add Device(s). |
You can add additional nodes by clicking the + button. To remove a node, click the - button.
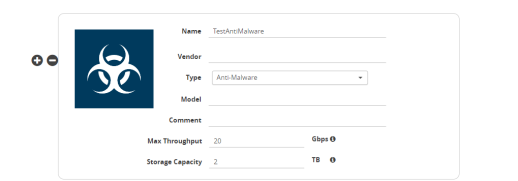
| 2. | Enter the following information for the node: |
| Name—the name of the node. |
| Vendor—the node’s manufacturer. For Gigamon nodes, you cannot edit this field. |
| Model—the model number of the node. |
| Description—optional description or additional information about the node. |
| Max Throughput - the maximum throughput traffic currently being sent to this tool. |
| Storage Capacity - the total processing capacity dedicated to all Gigamon ports physically connect to the tool. |
Note: This field is not displayed when selecting a device type Network.
The information entered for the node displays when hovering over the icon on the topology. Also, the type selected determines the icon.
| 3. | Click in the Type field to select the icon for this node. The possible types are as follows: |
|
Type |
Icon |
|
Router |
|
|
Switch |
|
|
Virtual Switch |
|
|
Load Balancer |
|
|
Firewall |
|
|
VOIP |
|
|
Cloud |
|
|
Analyzer |
|
|
Anti-Malware |
|
|
Customer Experience Management |
|
|
Application Performance Management |
|
|
Data Loss Prevention (DLP) |
|
|
Forensics |
|
|
Intrusion Detection System (IDS) |
|
|
Intrusion Prevention System (IPS) |
|
|
Next Generation Firewall (NGFW) |
|
|
SIEM |
|
|
Other |
|

| 4. | Click Next. The system returns to the Topology, where the new node appears on the page. |
Edit Devices
To edit a node, do the following:
| 5. | Select the node. |
| 6. | Select Actions > Edit. |
The Edit page opens, which displays information about the node and the links to the node.
| 7. | On the Edit page, make the changes to the node or link information or both. |
| 8. | Click Submit. |
Note: You cannot edit Gigamon nodes.
Delete Devices
To delete a single node from the topology, do the following:
| 9. | Select the icon for the node in Topology View or select the checkbox in Table View. |
| 10. | Select Actions > Delete. |
| 11. | On the confirmation dialog, click OK. |
To delete all nodes, select Actions > Delete All. All nodes and links are removed from the topology.
Note: You cannot delete Gigamon nodes from the topology.
Add TAP
In addition to nodes and links, you can add Gigamon TAPs to the topology with the TAP wizard or manually add the TAP and links.
To add a TAP with the wizard, do the following:
| 12. | Select the links for the TAP. |
To select the links, press Shift and select the two node links for the TAP.
| 13. | Select Add > Tap. |
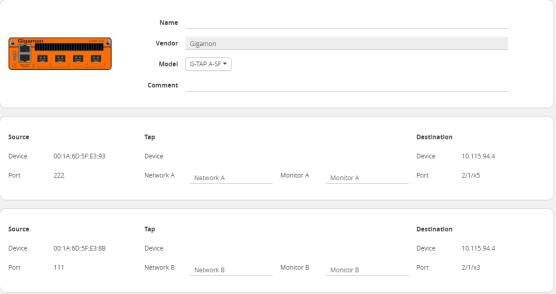
The Add Tap page displays, which includes the dialogs for configuring the network and monitor links for network A and the network and monitors links for network B. The default names for the links are Network A, Network B, Monitor A, and Monitor B. The figure shows the Add Tap Wizard with a Gigamon G-TAP A-SF selected.
| 14. | Enter type a name for the TAP in the Name field. |
| 15. | Select a Gigamon TAP model from the list of Models. |
| 16. | (Optional) Add a description about the TAP in the Description field. |
| 17. | Click Submit. |
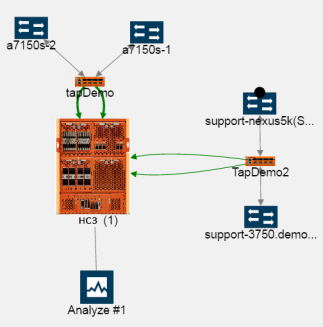
The wizard adds the TAP and links to the topology as shown in the following figure, where TapDemo2 is the newly added TAP. When the TAP is added, it is initially placed in the lower right-hand corner of the page.