Configure Active Visibility
Refer to the following sections for details:
View Conditions and Actions
To view the list of pre-defined conditions and actions along with their descriptions and comments:
- On the left navigation pane, click on

-
On the left navigation pane, go to Physical > Active Visibility, and then select the required cluster or node ID.
- On the left navigation pane, click Conditions to view the list of pre-defined conditions or click Actions to view the list of pre-defined actions.
Configure Policies
An active visibility policy defines conditions and actions. When all conditions are met, all actions are executed. The policy ties the conditions and actions together.
A policy must have at least one condition. An action is not required.
Up to five (5) conditions can be specified in a policy. The parameters and values that are specified in the condition depends on the condition. The policy is executed only when all conditions are met.
Within a policy, there is one unique condition. For example, there can only be one PortUp condition, not multiple PortUp conditions within a policy.
Up to five (5) actions can be specified in a policy. The parameters and values that are specified in the action depends on the action.
Within a policy, there can be multiple actions, including the same action. For example, there can be multiple PortEnable actions within a policy.
A policy is triggered if all the conditions are met. Then all the actions are executed. If there are five conditions in the policy, they all have to be met before the action or actions are executed. If there are multiple actions, they are executed in sequence, as specified in the policy. The policy specifies the priority of the actions.
When there are multiple actions, they will continue to be executed even if there is an error. For example, if there are three actions and there is an error with the second action, the first and third actions will be executed. When the policy executes, each action will have their status reported (success or failure).
Multiple policies can be in effect at the same time. The policies can monitor different conditions and take different actions. Up to 100 policies per cluster can be defined.
A policy must be enabled for it to become active. However, when you first create a policy, you might want to disable it so that it does not become active right away.
When a policy is triggered, an SNMP event and email notification (policytrigger) can optionally be generated.
|
1.
|
Go to Active Visibility > Policies to start configuring a policy. |
|
3.
|
The Policy page has sections for Policy Info, Conditions, and Actions. |
|
4.
|
Enter an alias for the policy and a description, if desired. When you first define a policy, you will probably want the policy to be disabled, so clear the Enable check box. |
|
5.
|
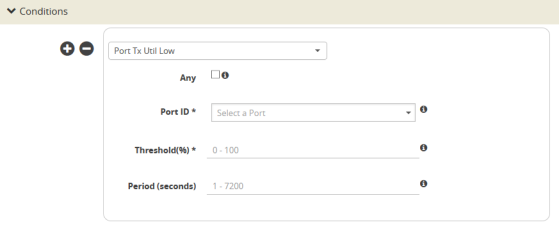
Select a condition from the drop-down menu. The parameters and values that are populated for each condition depend on the condition. For example, in Figure 1 Conditions on Policy Page, the condition is PortTxUtilLow, so there is an Any checkbox and fields for Port ID, Threshold (%), and Period (seconds). For details on configuring conditions, refer to Configure Conditions. |
|
Figure 117
|
Conditions on Policy Page |
|
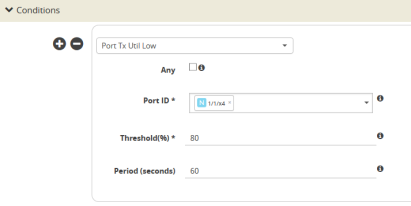
Figure 118
|
Conditions on Policy Page, Entered |
|
7.
|
For multiple conditions (up to five), click + or -. |
|
8.
|
Select an action from the drop-down menu. The parameters and values that are populated for each action depend on the action. For example, in Figure 3 Actions on Policy Page, the action is Port Disable, so there is a Porting checkbox and a field for Port ID. For details on configuring actions, refer to Configure Actions. |

|
Figure 119
|
Actions on Policy Page |
|
9.
|
For multiple actions (up to five), click + or -. |
|
10.
|
When you have specified the conditions and actions, click OK. |
|
11.
|
The newly defined policy is displayed. |
|
12.
|
When you are ready to enable a policy, select the policy, click Edit, select the Enable check box, and click OK. |
|
13.
|
Another way to enable a policy is to select the policy, click Actions, and select Enable. |
|
14.
|
When a policy has not been executed, it will show a status of NOT EXECUTED. When a policy has been executed, it will show a status of SUCCESS or FAILURE. |
|
15.
|
To view information on a policy that has executed, click Report History. The policy report history is displayed. |
|
16.
|
To edit a policy, select a policy and click Edit. |
|
17.
|
The Policy Info, Conditions, and Actions are displayed. |
|
18.
|
Make the changes and click OK. |
|
19.
|
To clone a policy, select a policy and click Clone. |
|
20.
|
Change the policy alias, make any changes to conditions or actions, and click OK. |
|
21.
|
To delete a policy, select a policy and click Delete. |
|
22.
|
A confirmation displays. To confirm, click OK. |
|
23.
|
To view details of a policy, click a policy in the Policies page. |
|
24.
|
To edit the policy, click Edit or to exit, click X. |
Configure Conditions
The parameters and values that are populated for each condition depend on the condition. Refer to the following sections for details:
Configure Port Up/Port Down Conditions
To configure port up and port down conditions:
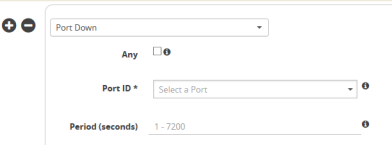
1Select Port Up or Port Down. Refer to Figure 4 Port Up or Port Down Conditions.
|
Figure 120
|
Port Up or Port Down Conditions |
|
25.
|
Specify the following: |
|
o
|
Any—Click if any of the selected ports match the condition. |
|
o
|
Port ID—Select one or more ports to match the condition. |
|
o
|
Period—Specify the number of seconds to wait for the condition to be true, in integers from 1 to 7200. |
Configure Port Rx/TxConditions
To configure port Rx/Tx conditions:
|
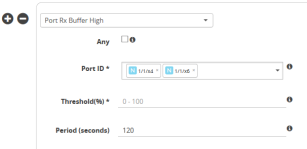
Figure 121
|
Port Rx or Tx Conditions |
|
2.
|
Specify the following: |
|
o
|
Any—Click if any of the selected ports match the condition. |
|
o
|
Port ID—Select one or more ports to match the condition. |
|
o
|
Threshold—Specify the threshold as a percentage from 0 to 100% for Port Rx/Tx Buffer and Util, or as a value between 0 and 2^64, for example, 1024, for Port Rx/Tx Errors, Drops, and Discards. |
|
o
|
Period—Specify the number of seconds to wait for the condition to be true, in integers from 1 to 7200. |
Configure Time Conditions
To configure Time conditions, select a Time condition. Refer to Figure 6 Time Conditions.

|
Figure 122
|
Time Conditions |
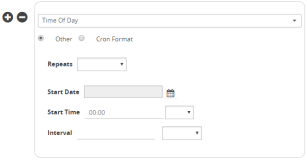
Configure Time of Day Conditions
To configure time of day conditions:
|
Figure 123
|
Time of Day Conditions |

|
Figure 124
|
Time of Day Conditions, Cron Format |
|
3.
|
Enter the value in Cron format. For more information on Cron, refer to: |
http://www.nncron.ru/help/EN/working/cron-format.htm
|
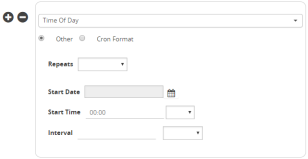
Figure 125
|
Time of Day Conditions, Other Format |
|
5.
|
The Other format allows you to specify the following: |
|
o
|
Repeats—Specify Once Only, or a recurrence of Minute, Hourly, Daily, Weekly, Monthly, or Yearly. |
|
o
|
Start Date—Specify the Start Date using the calendar. |
|
o
|
Start Time—Specify the Start Time in hours and minutes, then select AM or PM. |
|
o
|
Interval—For repeat occurrences, specify the interval. For occurrences longer than Hourly, specify the interval as Minute, Hour, or Day. |
|
o
|
Every—For occurrences longer than Hourly, specify the number of days, weeks, or months. For example, if Repeats is Daily, Every can be every 2 days. |
|
o
|
End Date—For occurrences longer than Hourly, specify an end date that is After a specified number of occurrences or By a date specified using the calendar. The default is None. |
|
o
|
On—For Weekly repeats, specify the day of the week. For Monthly repeats, specify the First, Second, Third, Fourth, or Last day of the month, or specify the day of the month as a number from 1 to 31. The default is None. |
Configure Actions
The parameters and values that are populated for each action depend on the action. Refer to the following sections for details:
Configure Port Actions
To configure port actions:
1Select Port Disable or Port Enable. Refer to Figure 10 Port Actions.

|
6.
|
Specify the following: |
|
o
|
Porting—Select if you want to pass the port, defined in a condition, to the action. |
|
o
|
Port ID—Select one or more ports to match the action. |
Configure Policy Actions
To configure policy actions:
1Select Policy Disable or Policy Enable. Refer to Figure 11 Policy Actions.

|
Figure 127
|
Policy Actions |
|
7.
|
Select a policy alias. |
Configure Map Actions
To configure map actions:
1Select Map Disable or Map Enable. Refer to Figure 12 Map Actions.

Configure Map Rule Add Actions
To configure map rule add actions:
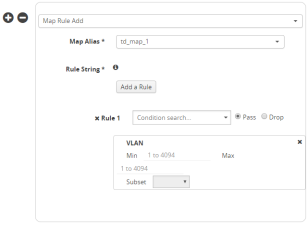
1Select Map Rule Add. Refer to Figure 13 Map Rule Add Actions.
|
Figure 129
|
Map Rule Add Actions |
|
9.
|
Specify the following: |
|
o
|
Map Alias—Select a map alias. |
|
o
|
Add a Rule—Click to add one or more map rules. |
|
o
|
Rule String—Specify a map rule, such as pass VLAN 100. The parameters and values that are populated for each rule depend on the rule. |
Configure Map Rule Delete Actions
To configure map rule delete actions:
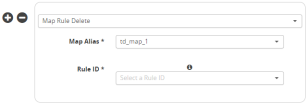
1Select Map Rule Delete. Refer to Figure 14 Map Rule Delete Actions.
|
Figure 130
|
Map Rule Delete Actions |
|
10.
|
Specify the following: |
|
o
|
Map Alias—Select a map alias. |
|
o
|
Rule ID—Specify a map rule ID. |


