System Board
Removing the System Board
CAUTION: If you are using the Trusted Platform Module (TPM) with an encryption key, you may be prompted to create a recovery key during program or System Setup. Be sure to create and safely store this recovery key. If you replace this system board, you must supply the recovery key when you restart your system or program before you can access the encrypted data on your hard drives.
CAUTION: Do not attempt to remove the TPM plug-in module from the system board. Once the TPM plug-in module is installed, it is cryptographically bound to that specific system board. Any attempt to remove an installed TPM plug-in module breaks the cryptographic binding, and it cannot be re-installed or installed on another system board.
-
Follow the safety guidelines listed in Safety instructions.
-
Follow the procedure listed in Before working inside your system.
-
Remove the following:
| • | Air shroud |
| • | All expansion cards and risers |
| • | Internal PERC riser |
| • | IDSDM/vFlash module card |
| • | Internal USB key (if installed) |
| • | Processors and heat sink modules |
| • | Memory modules |
| • | LOM riser card |
Follow the below steps to remove the System Board:
1. Disconnect all cables from the system board.
Note: Ensure that you note the routing of the cables as you remove them from the system board.
CAUTION: Take care not to damage the system identification button while removing the system board from the chassis.
CAUTION: Do not lift the system board by holding a memory module, processor, or other components.
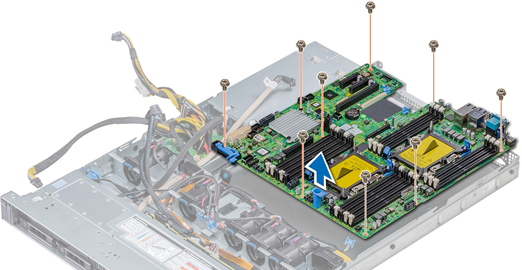
2. Using a Phillips #2 screwdriver, remove the screws that secure the system board to the chassis.
3. Hold the system board holder, slightly lift the system board, and then slide it toward the front of the chassis.
4. Using the system board holder, lift the system board out of the chassis.
Installing the System Board
-
Follow the safety guidelines listed in Safety instructions.
Follow the below steps to install the System Board:
1. Unpack the new system board assembly.
CAUTION: Do not lift the system board by holding a memory module, processor, or other components.
CAUTION: Take care not to damage the system identification button while placing the system board into the chassis.
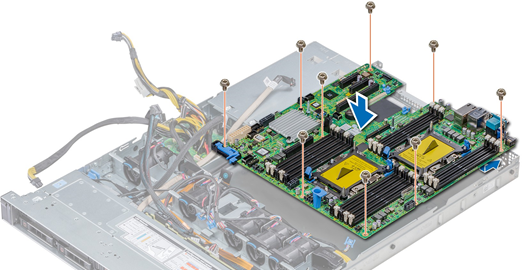
2. Holding the system board holder, align the connector on the system board with the slots on the back of the chassis and place the system board in place.
3. Using a Phillips #2 screwdriver, replace the screws that secure the system board to the chassis.
After installing the system board you could do the following:
1. Replace the following:
| a. | Install the Trusted Platform Module (TPM). |
| b. | Internal PERC riser |
| c. | Internal USB key (if applicable) |
| d. | USB 3.0 module (if applicable) |
| e. | IDSDM/vFlash module card |
| f. | All expansion cards and risers |
| g. | Processors and heat sink modules |
| h. | Processors blanks (if applicable) |
| i. | Memory modules |
| j. | LOM riser card |
| k. | Air shroud |
2. Reconnect all cables to the system board.
Note: NOTE: Ensure that the cables inside the system are routed along the chassis wall and secured using the cable securing bracket.
3. Follow the procedure listed in Before working inside your system.
4. Ensure that you:
| a. | Use the Easy Restore feature to restore the Service Tag. For more information, see the Restoring the Service Tag by using the Easy Restore feature section. |
| b. | If the Service Tag is not backed up in the backup flash device, enter the Service Tag manually. For more information, see the Restoring the Service Tag by using the Easy Restore feature section. |
| c. | Update the BIOS and iDRAC versions. |
| d. | Re-enable the Trusted Platform Module (TPM). For more information, see the Upgrading the Trusted Platform Module section. |
5. Import your new or existing iDRAC Enterprise license.
Restoring the system using Easy Restore
The easy restore feature enables you to restore your service tag, license, UEFI configuration, and the system configuration data after replacing the system board. All data is backed up in a backup flash device automatically. If BIOS detects a new system board, and the service tag in the backup flash device, BIOS prompts the user to restore the backup information.
You can do the following tasks:
● Restore the service tag, license, and diagnostics information, press Y
● Navigate to the Lifecycle Controller based restore options, press N.
● Restore data from a previously created Hardware Server Profile, press F10
Note: When the restore process is complete, BIOS prompts to restore the system configuration data.
● To restore the system configuration data, press Y
● To use the default configuration settings, press N
Note: NOTE: After the restore process is complete, system reboots.
Manually update the Service Tag
After replacing a system board, if Easy Restore fails, follow this process to manually enter the Service Tag, using System Setup.
If you know the system service tag, use the System Setup menu to enter the service tag. Follow the below steps:
1. Power on the system.
2. To enter the System Setup, press F2.
3. Click Service Tag Settings.
4. Enter the service tag.
Note: You can enter the service tag only when the Service Tag field is empty. Ensure that you enter the correct service tag. Once the service tag is entered, it cannot be updated or changed.
5. Click OK.
Entering the system Service Tag by using System Setup
If Easy Restore fails to restore the Service Tag, use System Setup to enter the Service Tag.Follow the below steps:
1. Turn on the system.
2. Press F2 to enter System Setup.
3. Click Service Tag Settings.
4. Enter the Service Tag.
Note: You can enter the Service Tag only when the Service Tag field is empty. Ensure that you enter the correct Service Tag. After the Service Tag is entered, it cannot be updated or changed.
5. Click OK.
6. Import your new or existing iDRAC Enterprise license.
Trusted Platform Module
Upgrading the Trusted Platform Module
-
Follow the safety guidelines listed in Safety instructions.
-
Follow the procedure listed in Before working inside your system.
Note:
1. Ensure that your operating system supports the version of the TPM module being installed.
2. Ensure that you download and install the latest BIOS firmware on your system.
3. Ensure that the BIOS is configured to enable UEFI boot mode.
CAUTION: If you are using the Trusted Platform Module (TPM) with an encryption key, you may be prompted to create a recovery key during program or System Setup. Work with the customer to create and safely store this recovery key. When replacing this system board, you must supply the recovery key when you restart your system or program before you can access the encrypted data on your hard drives.
CAUTION: Once the TPM plug-in module is installed, it is cryptographically bound to that specific system board. Any attempt to remove an installed TPM plug-in module breaks the cryptographic binding, the removed TPM cannot be reinstalled or installed on another system board.
Removing the TPM
To remove the TPM follow the below steps:
1. Locate the TPM connector on the system board.
2. Press to hold the module down and remove the screw using the security Torx 8-bit shipped with the TPM module.
3. Slide the TPM module out from its connector.
4. Push the plastic rivet away from the TPM connector and rotate it 90° counterclockwise to release it from the system board.
5. Pull the plastic rivet out of its slot on the system board.
Installing the TPM
To install the TPM follow the below steps:
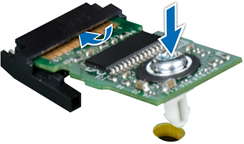
1. To install the TPM, align the edge connectors on the TPM with the slot on the TPM connector.
2. Insert the TPM into the TPM connector such that the plastic rivet aligns with the slot on the system board.
3. Press the plastic rivet until the rivet snaps into place.
After installing the TPM do the following:
1. Install the system board.
2. Follow the procedure listed in After working inside your system.
Initializing TPM for BitLocker users
-
Initialize the TPM.
-
The TPM Status changes to Enabled, Activated.
Initializing the TPM 1.2 for TXT users
Follow the below steps to initialize the TPM:
1. While booting your system, press F2 to enter System Setup.
2. On the System Setup Main Menu screen, click System BIOS > System Security Settings.
3. From the TPM Security option, select On with Pre-boot Measurements.
4. From the TPM Command option, select Activate.
5. Save the settings.
6. Restart your system.
7. Enter System Setup again.
8. On the System Setup Main Menu screen, click System BIOS > System Security Settings.
9. From the Intel TXT option, select On.


