Set Bulk Values
Set Bulk Value feature makes it easy to apply the same template of settings to all GigaVUE-VM nodes selected for deployment:
| 1. | Click the Set Bulk Values button and choose settings for each of the options. |
| 2. | After clicking the OK button, you will return to the list of hosts with the new bulk values applied to each host in the list. |
| 3. | Once you have applied bulk values, you can go back and edit any necessary settings for specific individual nodes. This can be a time saving feature when deploying a large number of nodes. |
Regardless of whether you select Set Bulk Values or configure individual nodes, you set the same set of options described in Bulk Deploy GigaVUE-VM Nodes in Standalone or Cluster.
|
GigaVUE-VM Node Option |
Description |
|
Datastore |
Select the datastore on the target host where the GigaVUE-VM node should be installed. |
|
Power |
Choose whether to power on the GigaVUE-VM node after deployment. |
|
GigaVUE-VM Name |
Supply a name for the GigaVUE-VM node. The name supplied here will be used to identify the GigaVUE-VM instance in Virtual Center. If you are applying bulk values, you choose a suffix to be used for individual hostnames, assuring that names are not duplicated. GigaVUE‑FM automatically prepends the specified prefix with the ESXi hostname. DNS support for these hostnames is provided. |
|
Password |
Supply and confirm a password for the GigaVUE-VM node. Passwords must contain at least eight characters with one numerical character, one upper case character, one lower case character, and one special character (for example, $, %, !, and so on). The maximum number of characters is 30. |
|
Use the drop-down lists to select the port groups (vSphere Standard Switch) for the Management Port, IP interface, and Network Port for the GigaVUE-VM instance. The port groups you configured in Configure Port Groups/Port-Profiles are available for assignment. |
|
|
Management Switch/Port Group Management IP |
This is the port used for communications between GigaVUE-VM and GigaVUE‑FM. This port does not carry monitored traffic. You can either assign a Static IP address or use DHCP. GigaVUE‑FM automatically discovers the assigned address and displays it in the Management > Virtual Nodes page. If you are configuring bulk values, you can specify a range of static IP addresses to be used. Note that the range specified must consist of contiguous values (for example 10.1.1.25 to 10.1.1.50 with a subnet mask of 255.255.255.0) and must not overlap with a range specified for the Tunnel Port Group. |
|
Tunnel Switch/Port Group Tunnel IP |
This port that is used as the starting point for that GigaSMART tunnel that will carry packets matching a vMap to the Gigamon visibility fabric. The other end of the tunnel is a Network-Tunneled Port on a GigaVUE-2404, or a GigaVUE H Series family with GigaSMART blade and tunneling encapsulation enabled. You can either assign a Static IP address or use DHCP. If you are configuring bulk values, you can specify a range of static IP addresses to be used. Note that the range specified must consist of contiguous values (for example 192.168.1.25 to 192.168.1.50 with a subnet mask of 255.255.255.0) and must not overlap with a range specified for the Management Port Group. Note: For optimal performance, Gigamon recommends maintaining the IP interface on a separate subnet than that used by the management port or network ports. |
|
Network Switch/Port Group |
These are the ports that GigaVUE-VM uses to monitor network traffic. All of the virtual switch traffic being monitored arrives at the GigaVUE-VM node via these ports. |
|
Deployment folder |
Parameter to indicate where GVM should be deployed (optional). |
| 4. | Click Deploy when you have finished configuring settings for GigaVUE-VM nodes.The wizard reminds you to disable automatic cluster migration for each GigaVUE-VM node. This prevents situations where migration could inadvertently cause a situation with two GigaVUE-VM nodes on the same host, which is not allowed. Refer to Best Practices for vSphere Integration for details and additional tips on configuring vSphere settings for GigaVUE-VM nodes. |
| 5. | Click Finish to launch the Bulk Deploy. To monitor the progress of the Bulk Deploy: |
| a. | On the left navigation pane, select Dashboard > SYSTEM > Events. The Events page appears.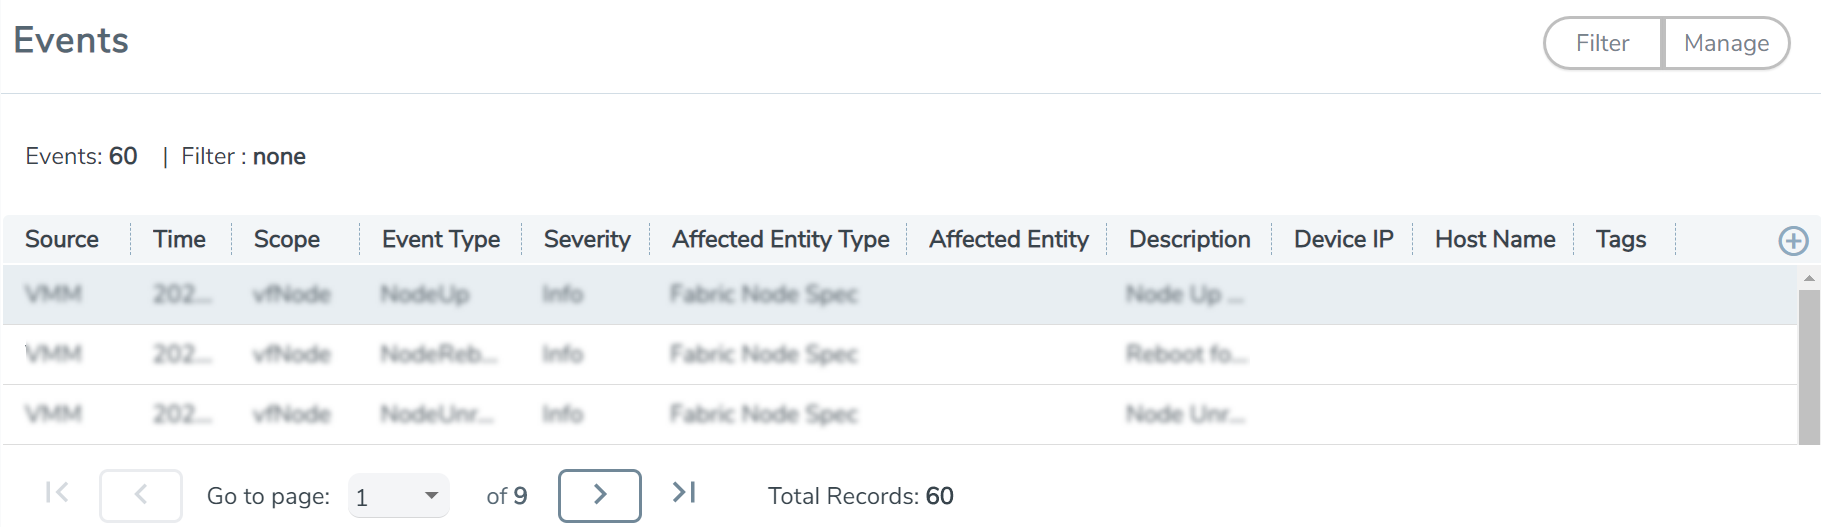 |
For example: Bulk Deploy takes place by deploying an initial OVF template to the first requested host. Once the initial OVF file is deployed, vSphere clones that template to all other requested hosts. Cloning takes place in waves of four GigaVUE-VM nodes at a time – if you request a Bulk Deploy of 21 GigaVUE-VM nodes, the OVF file is deployed to the first node in the list, followed by two successive waves of four cloned nodes.
| 6. | Once the Bulk Deploy completes, log in to the vSphere Client and verify that there is only one GigaVUE-VM node installed per ESXi host. For example, after navigating to the VMs > Virtual Machines tab for the ESXi host on 10.210.17.11, we can see that there is only one GigaVUE-VM node installed.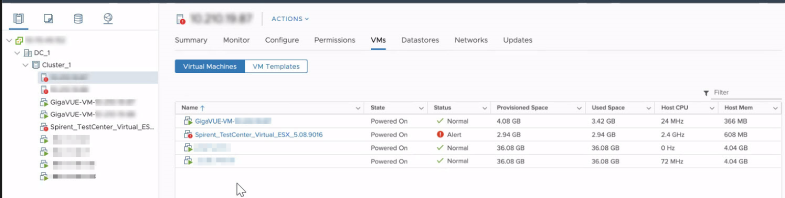 |


