Create a New Map
Each map can have up to 32 rules associated with it. The following table lists the various rule conditions that you can select for creating a map, inclusion map, and exclusion map.
|
Conditions |
Description |
||||||||||||||||||||||||||||||||||||||||||
|
L2, L3, and L4 Filters |
|||||||||||||||||||||||||||||||||||||||||||
|
EtherType |
The packets are filtered based on the selected ethertype. The following conditions are displayed:
L3 Filters If you choose IPv4 or IPv6, the following L3 filter conditions are displayed:
L4 Filters If you select TCP or UDP protocol, the following L4 filter conditions are displayed:
|
||||||||||||||||||||||||||||||||||||||||||
|
MAC Source |
The egress traffic from the VMs matching the specified source MAC address is selected. |
||||||||||||||||||||||||||||||||||||||||||
|
MAC Destination |
The ingress traffic from the VMs matching the specified destination MAC address is selected. |
||||||||||||||||||||||||||||||||||||||||||
|
VLAN |
All the traffic matching the specified IEEE 802.1q Virtual LAN tag is filtered. Specify a number from 0 to 4094. |
||||||||||||||||||||||||||||||||||||||||||
|
VLAN Priority Code Point (PCP) |
All the traffic matching the specified IEEE 802.1q Priority Code Point (PCP) is filtered. Specify a value between 0 to 7. |
||||||||||||||||||||||||||||||||||||||||||
|
VLAN Tag Control Information (TCI) |
All the traffic matching the specified VLAN TCI value is filtered. Specify the exact TCI value. |
||||||||||||||||||||||||||||||||||||||||||
|
Pass All |
All the packets coming from the monitored instances are passed through the filter. When Pass All is selected, the L3 and L4 filters are disabled. |
||||||||||||||||||||||||||||||||||||||||||
When you select a condition without source or destination specified, then both egress and ingress traffic is selected for monitoring the traffic. For example, if you select IPv4 as the EtherType, TCP as the protocol, and do not specify IP source or destination, then both egress and ingress traffic is selected for monitoring purpose.
When you select a condition with either source or destination specified, it determines the direction based on the selection.
Note: You can create Inclusion and Exclusion Maps using all default conditions except EtherType and Pass All.
To create a new map:
- In the Monitoring Session canvas, from Maps section, drag and drop a new map template to the workspace. If you are creating an exclusion or inclusion map, drag and drop a new map template to their respective section at the bottom of the workspace. The new map page is displayed.
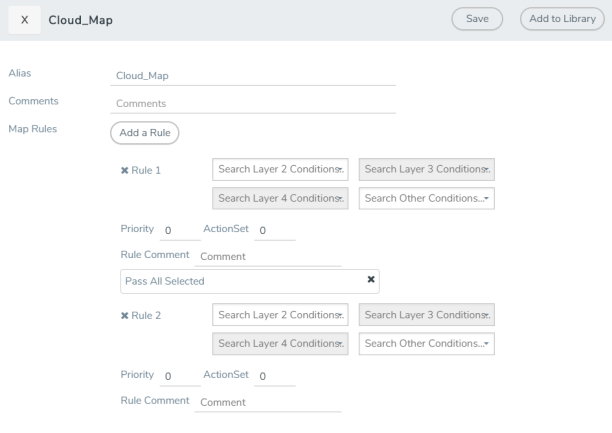
- Enter the appropriate information for creating a new map as described in the following table.
Parameter
Description
Alias
The name of the new map.
Note: The name can contain alphanumeric characters with no spaces.
Comments
The description of the map.
Map Rules
The rules for filtering the traffic in the map.
To add a map rule:
a. Click Add a Rule. b. Select a condition from the Search L2 Conditions drop-down list and specify a value. Based on this selection, the Search L3 Conditions drop-down list is automatically updated. c. Select a condition from the Search L3 Conditions drop-down list and specify a value. d. (Optional) If you have selected TCP or UDP as the protocol in the L3 conditions, then select Port Source or Port Destination from the Search L4 Conditions drop-down list and specify a value. If you have selected conditions other than TCP or UDP, then the Search L4 Conditions drop-down list is disabled. Map Rules
e. (Optional) In the Priority and Action Set box, assign a priority and action set. f. (Optional) In the Rule Comment box, enter a comment for the rule. Note:
- Repeat steps b through f to add more conditions.
- Repeat steps a through f to add nested rules.
- To reuse the map, click Add to Library. Save the map using one of the following options:
- Select an existing group from the Select Group list and click Save.
- Enter a name for the new group in the New Group field and click Save.
Note: The maps saved in the Map Library can be reused in any monitoring session present in the VNet.
- Click Save.
Note: Do not create duplicate map rules with the same priority.
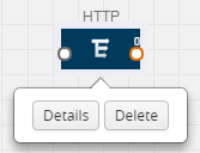
To edit or delete a map, click a map and select Details to edit the map or Delete to delete the map as shown in the following figure.
Click the Show Targets button to view the monitoring targets highlighted in orange.
Click  to expand the Targets dialog box. Click
  to change the view from topology to viewing the target VM names. To view more details about the instance tag name, direction of tapping, and so on, click the arrow next to the instance name.
Agent Pre-filtering
The G-vTAP Agent pre-filtering option filters traffic before mirroring it from G-vTAP Agent to the V Series Nodes.
Agent pre-filtering is performed directly at the packet capturing point. By filtering at this point, unnecessary traffic is prevented from reaching the fabric nodes that perform filtering and manipulation functions. Preventing this traffic reduces the load on the V Series nodes and the underlying network.
Agent Pre-filtering Guidelines
In cloud environments, there will be limits on how much traffic could be sent out per instance/single or double network interface.
Traffic will be passed if a network packet matches one or more of these rules:
- Only filters from traffic maps will be considered for G-vTAP filters. Inclusion and exclusion maps are purely for ATS (automatic target selection); not for G-vTAP.
- Only first-level maps of the monitoring session are filtered to create G-vTAP maps.
- User-entered L2-L4 filters in the monitoring-session maps must be in the format that V Series Node currently accepts.
- Both egress and ingress maps with filters are supported on G-vTAP.
- Both single and dual network interfaces for G-vTAP Agent are supported.
Agent Pre-filtering Capabilities and Benefits
G-vTAP Agent pre-filtering has the following capabilities and benefits:
- The agent pre-filtering option can be enabled or disabled at the monitoring-session level and is enabled by default.
- When enabled, traffic is filtered at the G-vTAP Agent-level, before mirroring to the V Series Nodes. Consequently, traffic flow to the V Series Nodes is reduced, which reduces the load/cost on the Cloud networks.
- Only rules from first-level maps are pushed to the agents.
- Pass rules are supported 100%.
- Drop rules are only supported for simple cases.
- Rules that span all monitoring sessions will be merged for an G-vTAP Agent, if applicable.
- If the max-rule limit of 16 is reached, then all the traffic is passed to the V Series node; no filtering will be performed.
Enable/Disable G-vTAP Agent Pre-filtering
Agent pre-filtering can be enabled or disabled by the user at the monitoring-session level. This ensures that we provide a knob to the user to turn it on or off at the G-vTAP level according to the requirements.
To change the G-vTAP Agent Pre-filtering option setting:
- From the left navigation pane, select Traffic > VIRTUAL > Orchestrated Flows > AnyCloud. The Monitoring Session page appears.
- Click the check box of a monitoring session and then click Edit to edit an existing session.
- Select or deselect the Agent Pre-filtering check box in the Monitoring Session info box to change the setting. It is enabled by default.
- Click OK.
- The Monitoring Session view displays the setting in the Agent Pre-filtering column.


