Perform Initial Configuration
Before powering on GigaVUE-FM, you can optionally perform the following:
Perform Network Configurations
To perform the initial configuration:
|
1.
|
Log in to GigaVUE-FM using one of the following methods: |
|
•
|
If you have a static IP address set up for the GigaVUE-FM, log in through SSH. |
|
•
|
If you do not have a static IP address set up for the GigaVUE-FM, complete the following steps: |
|
a.
|
Log in to the VMware vCenter web interface. |
|
b.
|
Go to Menu > VMs and Templates. |
|
c.
|
Right-click the GigaVUE-FM virtual machine, and select Open Remote Console. |
|
d.
|
Log in with your GigaVUE-FM Shell credentials. |
|
2.
|
Perform the following steps to complete the initial configuration: |
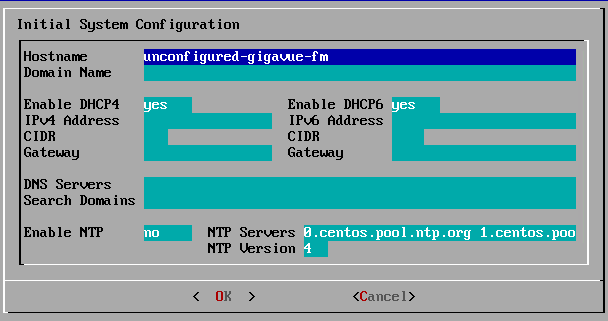
- Run the fmctl jump-start command. The Initial System Configuration screen appears as shown in the following figure:

- Provide a unique hostname for GigaVUE-FM. Note that the hostname may contain letters, numbers, periods (.), and hyphens (-), but may not begin with a hyphen. No other special characters are permitted.
- Enter the required domain name.
- Decide whether to use DHCP for the management interface. Choose one of the following options:
- If you enter yes, the IPv4 Address or IPv6 Address, CIDR, Gateway, DNS Servers, and Search Domains are dynamically set up for the management interface.
- If you enter no, you must provide the following:
- IPv4 Address or IPv6 Address, and the respective CIDR and Gateway.
- In the DNS Servers field, provide the address of any additional name servers required. Enter the set of IP addresses with spaces in between.
- In the Search Domains field, provide the required DNS domains with spaces in between.
- You can choose to either enable or disable NTP. In the Enable NTP field, enter one of the following:
- Yes—Use NTP to synchronize the time between GigaVUE-FM virtual machine and the NTP server. In the NTP Servers and NTP Version fields, enter the NTP server address and the version number of the NTP server.
- No—you can skip the next step and directly save your configurations.
- Select OK to save your configurations.
- Reboot your GigaVUE-FM virtual machine.
You can now access GigaVUE-FM by opening a browser and entering its IP address (the IP address you specified).
Add Additional vNIC
Gigamon allows you to configure GigaVUE-FM with two network interfaces—eth0 and eth1. The network interface eth0 can be configured to connect to a network used to manage Gigamon devices. The other network interface eth1 can be configured to connect to a network hosting different servers like SMTP server, Archive server, and so on.
To add an additional vNIC:

|
Figure 11
|
vSphere Client: Edit Settings |
|
2.
|
In the Hardware tab, click Add. |

|
Figure 12
|
vSphere Client: Selecting Ethernet Adapter |

|
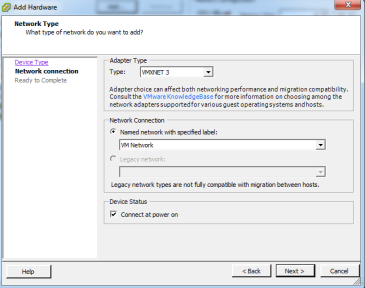
Figure 13
|
vSphere Client: Selecting Device Type |
|
5.
|
In the Named network with specified label drop-down list, select an appropriate network and click Next. |
The Network adapter 2 is added to GigaVUE-FM.
Increase the Memory
Based on the requirement, you can increase the memory of the GigaVUE-FM instance.
To increase the memory:

|
Figure 14
|
vSphere Client: Edit Settings |
|
2.
|
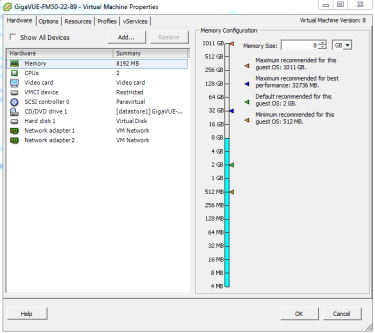
In the Hardware tab, select Memory. |

|
Figure 15
|
vSphere Client: Increasing Memory |
Add vCPUs
Based on the requirement, you can add additional vCPUs to the GigaVUE-FM instance.
|
1.
|
Right-click the GigaVUE-FM instance and select Edit Settings... |

|
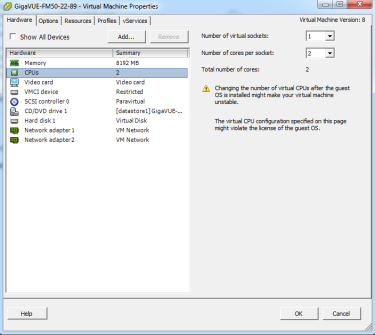
Figure 16
|
vSphere Client: Adding vCPUs |
|
3.
|
In the Number of virtual sockets field, enter the appropriate number of sockets. |
|
4.
|
In the Number of cores per socket field, enter the appropriate number of cores per socket. |


